
آمنة وفعالة شفرات وجه قالب التكوير يتطلب الاستبدال إجراءات سلامة دقيقة وصيانة دورية. يمكنك مساعدة جهاز التكوير الخاص بك على العمل على النحو الأمثل من خلال مراقبة علامات مثل زيادة الغرامات، أو زيادة حمولة المحرك، أو ضوضاء غير عادية. كما هو الحال في سوق التكوير ينمو بمعدل 4.5% سنويًااستخدام شفرات عالية الجودة يضمن لك مواكبة المتطلبات المتزايدة. اختر دائمًا شفرة مخصصة ذات خلوص مناسب - من 0.2 إلى 0.3 مم - لقطع نظيف وتقليل وقت التوقف.
النقاط الرئيسية
- ارتدِ دائمًا معدات السلامة المناسبة مثل القفازات المقاومة للقطع، ونظارات السلامة، والأحذية ذات الأصابع الفولاذية قبل تغيير الشفرات.
- اتبع خطوات القفل/التعليق لإيقاف تشغيل آلة التكوير ووقف الحوادث أثناء الصيانة.
- قم بتنظيف وفحص وجه القالب والشفرات بعناية للعثور على أي تلف وتأكد من أن الشفرات الجديدة مناسبة بشكل جيد.
- استخدم شفرات التكوير المخصصة للحصول على عمل أفضل واستخدام أطول وتوفير المال بمرور الوقت.
- قم بفحص محاذاة الشفرة والفجوة (0.2–0.3 مم) بشكل متكرر للحفاظ على عمل الماكينة بشكل جيد ولإنتاج حبيبات جيدة.
السلامة والاستعداد

معدات الحماية الشخصية والأدوات
معدات الحماية الشخصية المطلوبة
يجب عليك الحفاظ على سلامتك قبل البدء. ارتدِ دائمًا قفازات مقاومة للقطع لحماية يديك من الحواف الحادة. ارتدِ نظارات واقية لمنع دخول أي شيء في عينيك. إذا كنت تعتقد أن هناك رذاذًا أو غبارًا، فاستخدم واقيًا للوجه. تساعد الأحذية ذات الأصابع الفولاذية على حماية قدميك في حال سقوط شيء ثقيل. ارتدِ أكمامًا طويلة وبنطالًا لتغطية بشرتك. إذا كان الصوت عاليًا، فاستخدم واقيًا للسمع.
الأدوات الأساسية لاستبدال الشفرة
جهّز جميع أدواتك قبل البدء. ستحتاج إلى مفتاح ربط لربط الأشياء جيدًا. أحضر مفاتيح ألين أو سداسية، ومفك براغي. مطرقة ناعمة تساعدك على عمل نقرات خفيفة. استخدم فرشاة تنظيف وقطعة قماش خالية من الوبر لمسح الأوساخ. احتفظ بعلبة للشفرات وأدوات التثبيت القديمة. تأكد من أن أدواتك تعمل بشكل جيد وليست مكسورة.
إيقاف تشغيل الآلة
إجراءات إيقاف التشغيل خطوة بخطوة
يجب إيقاف تشغيل جهاز التكوير بالطريقة الصحيحة للحفاظ على سلامتك. اتبع الخطوات التالية:
- ابحث عن جميع مصادر الطاقة والمخاطر الموجودة بالقرب من الماكينة.
- قم بإيقاف تشغيل الطاقة الرئيسية وإيقاف جميع الأجزاء المتحركة.
- استخدم أجهزة القفل/التعليق، وليس فقط أزرار الإيقاف، لقطع الطاقة.
- ضع أجهزة القفل/العلامة في الأماكن الصحيحة.
- إخراج أو حبس أي طاقة مخزنة، كما هو الحال في المكثفات.
- اختبر الجهاز للتأكد من أنه متوقف بالفعل.
- أخبر فريقك حتى يعلم الجميع أن الجهاز مغلق.
بروتوكول السلامة للإغلاق/العزل (LOTO)
يضمن لك نظام القفل/التعليق (LOTO) سلامتك عند تغيير الشفرات. استخدم دائمًا أجهزة القفل/التعليق لإبقاء الآلة متوقفة. ضع علامات على الجهاز لإثبات أن العمل جارٍ. لا تعتمد على أنظمة القفل المتشابكة وحدها. يجب على الأشخاص المدربين فقط إزالة أجهزة القفل/التعليق بعد انتهاء العمل.
إعداد المنطقة
تنظيف وتطهير منطقة العمل
نظافة مكان العمل تمنع الحوادث. أزل جميع حبيبات البلاستيك والغبار والقمامة من الأرض والآلة. رتّب الأدوات واللوازم بعناية. الحفاظ على الأشياء مرتبة يمنع الانزلاق والتعثر والحرائق.
تحديد المخاطر الشائعة ومنعها
تقول تقارير الصناعة إن الحرائق والانفجارات يمكن أن تحدث أثناء صيانة آلة التكوير. يوضح الجدول أدناه أنواع المخاطر الرئيسية:
| فئة | تفاصيل |
|---|---|
| المواد المعنية | ألياف الخشب الخضراء والجافة، وحبيبات الخشب، والغازات القابلة للاشتعال |
| المعدات المعنية | آلات التكوير، المجففات، مطاحن المطارق، الصوامع، الناقلات، مجمعات الغبار، المبردات |
| مصادر الاشتعال | العمل الساخن، الشرر الميكانيكي، المعدات الكهربائية، الاحتراق، التسخين الذاتي، الاحتكاك |
| أنواع الحوادث | الحرائق (الحبيبات، الصوامع، المجفف)، الاحتراق، الانفجارات، أعطال المعدات |
يمكنك الحد من هذه المخاطر بالسيطرة على الغبار، وفحص المعدات، وتدريب فريقك. ركّب أجهزة إنذار الحريق، وحافظ على المنطقة خالية من أي مواد قد تُشعل الحرائق. اتبع دائمًا خطوات السلامة عند تغيير الشفرات.
خطوات استبدال شفرات وجه قالب التكوير
إزالة الشفرة
عملية الإزالة خطوة بخطوة
يجب إزالة الشفرات القديمة قبل تركيب الجديدة. إليك خطوات إزالة الشفرات بأمان وسرعة: ١. تأكد من فصل جهاز التحبيب وتثبيته. ٢. اترك سطح القالب والشفرات يبرد إذا كان ساخنًا. ٣. استخدم مفتاح عزم الدوران أو مفاتيح ألين لفك البراغي. أدر كل برغي ببطء وبشكل متساوٍ. ٤. أمسك الشفرة بيد واحدة عند إزالة آخر برغي. هذا يمنع الشفرة من السقوط. ٥. ارفع الشفرة بعيدًا عن سطح القالب. ضعها في حاوية آمنة للتخلص منها أو فحصها.
نصيحة: أبقِ يديك بعيدًا عن الحواف الحادة. ارتدِ قفازات مقاومة للقطع لحماية نفسك.
المشاكل الشائعة والحلول أثناء الإزالة
قد تواجه بعض المشاكل عند إخراج الشفرة. إليك بعض المشاكل الشائعة وكيفية إصلاحها:
| مشكلة | سبب | حل |
|---|---|---|
| شفرة عالقة للموت | تراكم البقايا أو التآكل | قم بالضرب بلطف باستخدام مطرقة ناعمة؛ استخدم القليل من الزيت المخترق إذا لزم الأمر. |
| رؤوس البراغي المجردة | الإفراط في شد الأدوات أو تآكلها | استخدم مستخرج البراغي أو احصل على أدوات جديدة. |
| الشفرة تسقط فجأة | عدم تثبيت الشفرة أثناء الترباس الأخير | امسك الشفرة دائمًا بيدك أو استخدم المشبك. |
التفتيش والتنظيف
قائمة التحقق من التفتيش وخطوات التنظيف
بعد إخراج الشفرة، افحص سطح القالب ومنطقة التركيب ونظّفهما. استخدم قائمة التحقق التالية: - ابحث عن أي شقوق أو خدوش أو تآكل غير متساوٍ على سطح القالب. - افحص فتحات التركيب بحثًا عن تلف الخيوط أو الأوساخ. - افحص الشفرة القديمة بحثًا عن أي تآكل أو كسر زائد. - تحقق من عدم وجود أي بقايا أو تراكمات بلاستيكية أو صدأ على جميع الأسطح.
لتنظيف المنطقة: ١. امسح الغبار والأوساخ بقطعة قماش خالية من الوبر. ٢. استخدم فرشاة تنظيف للتخلص من البقايا الصعبة. ٣. إذا لزم الأمر، استخدم مذيبًا خفيفًا آمنًا من الشركة المصنعة. ٤. جفف كل شيء قبل تركيب الشفرة الجديدة.
ملحوظة: تساعد الأسطح النظيفة على تثبيت الشفرة بشكل صحيح وإيقاف مشاكل المحاذاة.
المشاكل الشائعة والحلول أثناء الفحص/التنظيف
قد تحدث مشاكل عند فحص المنطقة وتنظيفها. إليك بعض الأمثلة:
| مشكلة | سبب | حل |
|---|---|---|
| بقايا يصعب إزالتها | البلاستيك المذاب أو الشحم القديم | استخدم مكشطة بلاستيكية أو مذيبًا آمنًا. |
| خيوط مليئة بالأوساخ | لم يتم تنظيفه بعد التغيير الأخير | تنظيف الخيوط باستخدام فرشاة سلكية صغيرة. |
| الصدأ السطحي | التعرض للماء | قم برملها بلطف باستخدام ورق ناعم، واستخدم مثبط الصدأ. |
تركيب الشفرة
عملية التثبيت خطوة بخطوة
الآن يمكنك وضع الجديد شفرات وجه قالب التكويراتبع الخطوات التالية: ١. طابق الشفرة الجديدة مع الثقوب الموجودة على سطح القالب. ٢. ثبّت البراغي يدويًا لتجنب تشابكها. ٣. شدّ كل برغي قليلًا بشكل متقاطع. ٤. استخدم مفتاح عزم الدوران لربط البراغي بعزم الدوران الصحيح. ٥. تأكد من أن الشفرة مثبتة بشكل مسطح على سطح القالب دون أي فجوات.
التحقق من السلامة: تأكد من أن جميع البراغي محكمة وأن الشفرة تتحرك إذا لزم الأمر.
المشكلات الشائعة والحلول أثناء التثبيت
قد تواجه هذه المشاكل عند تركيب الشفرة:
| مشكلة | سبب | حل |
|---|---|---|
| الشفرة لا تناسب | حجم الشفرة خاطئ أو غير مصطف | تحقق من رقم القطعة وتأكد من أنها الشفرة الصحيحة. |
| لن يتم شد البراغي | الخيوط المتقاطعة أو الأوساخ | قم بإزالة البراغي، ونظف الخيوط، ثم حاول مرة أخرى. |
| الشفرة تجلس بشكل غير متساو | الأوساخ أو التلف على سطح التركيب | قم بتنظيف السطح مرة أخرى وتحقق من وجود أي ضرر. |
المحاذاة واختبار التشغيل
إجراءات المحاذاة وخطوات التشغيل التجريبي
المحاذاة الجيدة تُساعد الآلة على العمل بكفاءة وتطيل عمر الشفرات. إليك كيفية محاذاة الشفرة الجديدة واختبارها: ١. أدر سطح القالب يدويًا للتحقق من فجوة الشفرة. ٢. قِس المسافة بين الشفرة وسطح القالب. اضبطها على ٠٫٢-٠٫٣ مم. ٣. تأكد من عدم ملامسة الشفرة لسطح القالب أو سحبها. ٤. أزل جميع الأدوات ومواد التنظيف من المنطقة. ٥. أزل أجهزة القفل/التعليق وأعد تشغيل الجهاز. ٦. شغّل آلة التكوير بسرعة منخفضة. انتبه لأي أصوات غريبة أو اهتزاز. ٧. زِد السرعة ببطء وراقب الكريات.
نصيحة احترافية: أوقف الماكينة فورًا إذا سمعت صوت كشط أو رأيت حبيبات غير متساوية. تحقق من المحاذاة والفجوة مرة أخرى.
المشكلات الشائعة والحلول أثناء المحاذاة/تشغيل الاختبار
قد تواجه مشاكل أثناء المحاذاة أو أثناء التشغيل التجريبي. إليك كيفية إصلاحها:
| مشكلة | سبب | حل |
|---|---|---|
| ضوضاء غريبة أو اهتزاز | محاذاة سيئة أو مسامير فضفاضة | أوقف الماكينة، وتحقق من المحاذاة، ثم قم بربط البراغي. |
| الحبيبات ليست حتى | فجوة الشفرة خاطئة | اضبط الفجوة على 0.2–0.3 ملم. |
| شفرة تلامس وجه الموت | الفجوة صغيرة جدًا | قم بفك البراغي، ثم حرك الشفرة، ثم قم بربطها مرة أخرى. |
اتبع دائمًا تعليمات الشركة المصنعة لاستبدال القالب والشفرة. اتباع كل خطوة بعناية يضمن سلامتك ويضمن لك نتائج ممتازة.
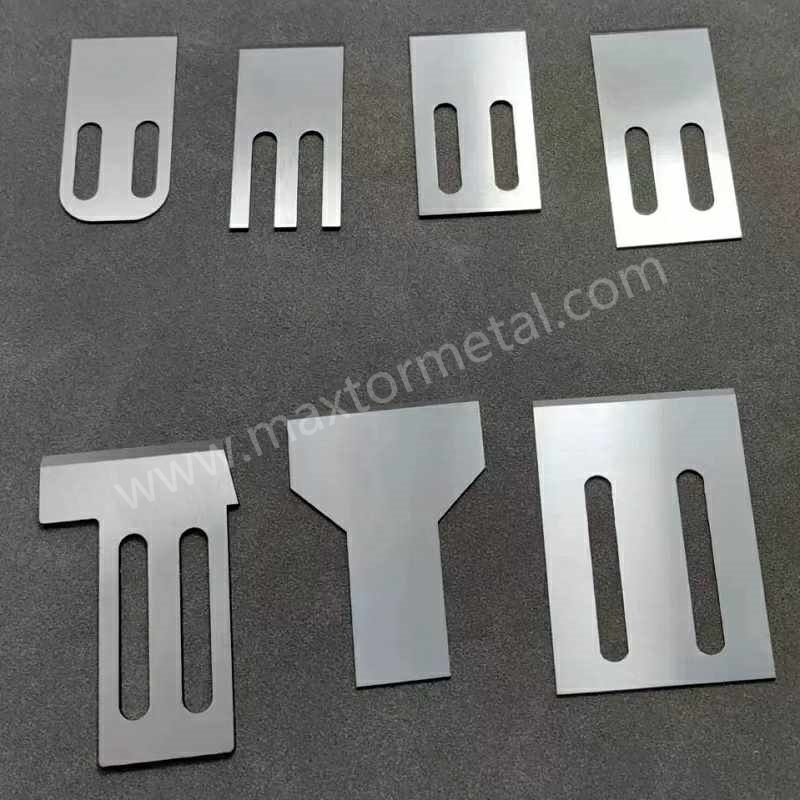
شفرات وجه قالب التكوير المخصص
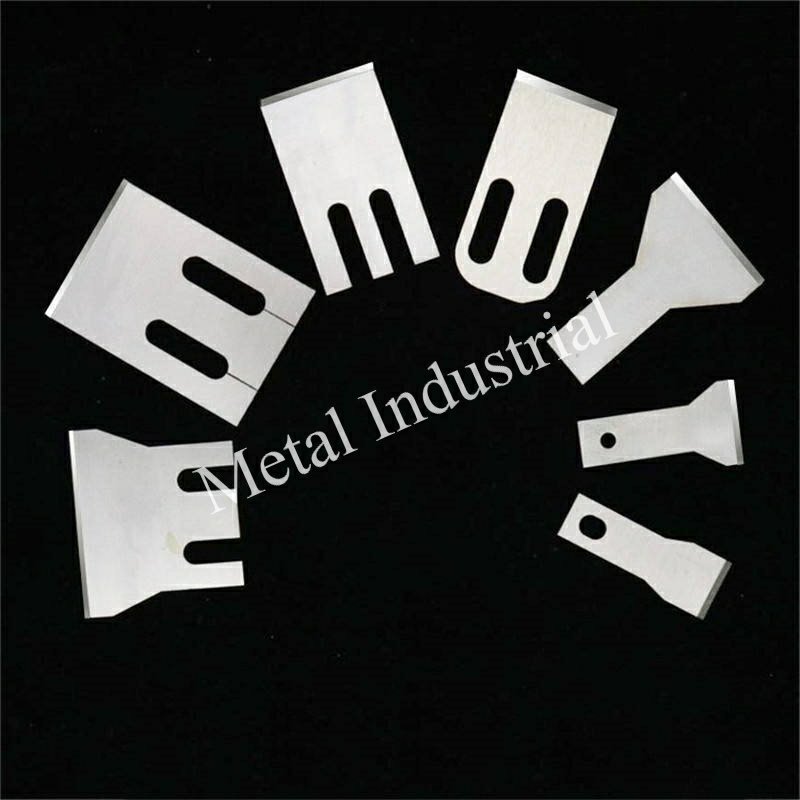
فوائد التخصيص
تحسين الأداء والكفاءة
شفرات التكوير المُخصصة تُساعدك على إنتاج المزيد من الكريات. كما تُساعدك على إنتاج حبيبات بجودة أفضل. يمكنك اختيار شكل الشفرة والمادة المُناسبة لعملك. هذا يُساعدك على الحصول على حبيبات مُتشابهة الشكل وتُقلل من هدر المواد. تُظهر الدراسات أنه إذا... التحكم في أشياء مثل حجم الجسيمات وسرعة الماكينةستحصل على حبيبات أقوى وأكثر. تتيح لك الشفرات المخصصة اختيار الأنسب لموادك الخام وأهدافك.
زيادة المتانة وعمر الخدمة
تدوم الشفرات المُخصصة لفترة أطول بفضل استخدام مواد وطلاءات خاصة. بعضها مُغطى بكربيد التنغستن أو السيراميك لمنعها من التلف السريع. تبقى هذه الشفرات حادة لفترة أطول، ولن تحتاج لتغييرها كثيرًا، مما يوفر عليك الوقت والمال اللازمين للإصلاحات.
ملاءمة دقيقة لآلات محددة
شفرات مُخصصة تُناسب جهاز التحبيب لديك تمامًا. هذا يُساعد على تشغيل الجهاز بسلاسة ويُقلل من الاهتزاز. كما يُجنّب التركيب الجيد مشاكل مثل عدم تساوي القطع أو عدم محاذاة الشفرات.
فعالية التكلفة بمرور الوقت
قد تكون تكلفة الشفرات المُخصصة أعلى في البداية، لكنك ستوفر المال لاحقًا لأنها تدوم لفترة أطول. قد تدوم حتى ثلاثة أضعاف الشفرات العادية، كما أنك ستقضي وقتًا أقل في إصلاح جهازك. يوضح الجدول أدناه مدى تفوق الشفرات المُخصصة على الشفرات القياسية:
| جانب الأداء | شفرات التكوير المخصصة | الشفرات القياسية |
|---|---|---|
| عمر الشفرة | حتى 3 مرات أطول بسبب المواد/الطلاءات المتقدمة | الفولاذ القياسي، عمر افتراضي أقصر |
| اتساق القطع | أعلى، مما يؤدي إلى توحيد أفضل للحبيبات | اتساق أقل |
| معدل الإنتاج | إنتاجية أعلى؛ على سبيل المثال: 200 طن من الحبيبات المعاد تدويرها شهريًا | انخفاض الإنتاجية |
| توفير المواد الخام | أعلنت شركة أثاث في الصين عن توفير يصل إلى 35% | أقل كفاءة، المزيد من النفايات |
| تأثير الإيرادات | $1.2 مليون إيرادات سنوية إضافية (مثال حالة) | لا توجد زيادة مماثلة |
| تردد الصيانة | أقل تكرارًا بسبب المتانة والملاءمة الأفضل | تغيير وإصلاح الشفرة بشكل متكرر |
| فعالية التكلفة | أفضل بسبب عمر أطول ووقت تعطل أقل | تكاليف تشغيلية أعلى |
تحسين الصيانة والسلامة
الشفرات المُخصصة أسهل في التركيب والإزالة، مما يجعلها أكثر أمانًا للعمال، كما يُساعد في الحفاظ على كفاءة عمل آلة التحبيب.
حلول نانجينغ Metal
نانجينغ Metal شركة صناعية محدودة هي شركة رائدة في تصنيع شفرات قوالب التكوير. خبرتها في تصنيع الشفرات تزيد عن 20 عامًا. الشركة حاصلة على شهادة ISO، ما يعني جودة منتجاتها. يضم فريقها مهندسين من ذوي الخبرة والكفاءة العالية، يعملون بجد لإنتاج شفرات ممتازة. يتيح لك نانجينغ Metal طلب شفرات مخصصة تناسب احتياجاتك.
يتأكدون من الجودة في كل خطوة، بدءًا من فحص المواد ووصولًا إلى المنتج النهائي. يستخدمون مواد قوية مثل SK2 وHSS وM2 وSKD11. كما يستخدمون معالجات حرارية خاصة مثل التبريد، والتصلب، والمعالجة تحت الصفر. هذه الخطوات تجعل الشفرات شديدة الصلابة، بصلابة تتراوح بين 52 و65 من HRC. هذا يساعد على إطالة عمر الشفرات حتى 60%. يمكنك أيضًا الحصول على طلاءات مثل طلاء الكروم أو نتريد التيتانيوم لتحسين جودة الشفرات.
شفرات نانجينغ Metal المُخصصة تُناسب العديد من المهام، مثل إعادة تدوير البلاستيك وإنتاج الماسترباتش. يمكنك الوثوق بخبرتهم والحصول على آخر المستجدات بشأن طلبك. إذا كنت ترغب في معرفة المزيد أو تحتاج إلى شفرة خاصة، يمكنك اتصل بنا مهندسي المبيعات لديهم.
صيانة القالب وأفضل الممارسات
التفتيش الروتيني
نقاط التفتيش الرئيسية لمنطقة تركيب الشفرة
يجب فحص العديد من الأجزاء أثناء صيانة القالب. تفقّد جذر الشفرة، والمنصة، والحافة الخلفية، وطرف الشفرة، والحافة الأمامية، والجناح، ونصف قطر المنصة. تُسهّل الشفرات النظيفة اكتشاف المشاكل. تُظهر الأبحاث أن الشفرات النظيفة تُساعدك في اكتشاف المشاكل. ثلاث مرات أكثر امسح الغبار والبقايا دائمًا قبل الفحص. يساعدك هذا على اكتشاف الشقوق والخدوش وأي أضرار أخرى قد تؤثر على عمل الجهاز.
علامات التآكل أو التشقق أو الارتخاء في مقاعد الشفرة
تحقق من عدم وجود أخاديد أو شقوق أو تآكل غير متساوٍ في قواعد الشفرة. انتبه للشقوق أو عدم إحكام الشفرة. إذا لاحظتَ مسامير مفكوكة أو أجزاء متحركة، فتوقف وأصلحها فورًا. قد يؤدي تجاهل هذه المشاكل إلى أعطال أكبر ويكلفك وقتًا وجهدًا. غالبًا ما يساعدك فحص القالب على اكتشاف هذه المشاكل مبكرًا.
التنظيف والتزييت
إجراءات تنظيف أسطح تلامس الشفرة والقالب
بعد كل استخدام، نظّف مناطق تلامس القالب والشفرة. استخدم قطعة قماش خالية من الوبر لإزالة الغبار والقطع البلاستيكية. تحقق من وجود أي بقايا مواد قبل تشغيل الآلة مرة أخرى. التنظيف الجيد يمنع التلوث ويحافظ على أداء الآلة.
نصائح التشحيم لتركيب الشفرة والأجزاء المتحركة
ضع زيت التشحيم المناسب على الأجزاء المتحركة وحوامل الشفرات. لا تستخدم أبدًا زجاجات بدون ملصقات. ابحث دائمًا عن أي تسريبات أو قطرات أثناء تشغيل الجهاز. حدد جدولًا لإضافة زيت التشحيم بناءً على مدة استخدامك للجهاز.
منع التلوث أثناء الصيانة
حافظ على نظافة مكان عملك. ارتدِ ملابس نظيفة وأغلق الأبواب لمنع دخول الغبار والحشرات. خزّن مواد التشحيم في عبوات تحمل ملصقات. قد تُسبب عادات التنظيف السيئة تلوثًا، مما قد يُلحق الضرر بشفراتك ويُتلفها. تساعدك إجراءات الصيانة الجيدة على تجنب هذه المشاكل.
استكشاف الأخطاء وإصلاحها
المشاكل الشائعة بعد استبدال الشفرة (على سبيل المثال، التركيب غير الصحيح، والضوضاء غير العادية، والقطع غير المتساوي)
قد تسمع أصواتًا غريبة، أو ترى حبيبات غير متساوية، أو تشعر بالاهتزاز بعد تغيير الشفرات. تحدث هذه المشاكل عادةً بسبب سوء التركيب، أو ارتخاء البراغي، أو عدم ملاءمة فجوة الشفرة.
الحلول والتدابير الوقائية للمشاكل المتعلقة بالشفرة
تأكد من محاذاة كل شيء، وشدّ جميع البراغي. اضبط فجوة الشفرة على المقاس المناسب. اتبع تعليمات الشركة المصنعة في كل خطوة. احتفظ بقائمة مرجعية لصيانة القالب. تُظهر الأبحاث أن الصيانة الجيدة للقالب تطيل عمره وتقلل التكاليف بنسبة تصل إلى 90%. الفحوصات والعناية الدورية تضمنان عمل آلتك بكفاءة.
هل تحتاج إلى استشارة خبير أو حلول مخصصة؟ تواصل مع مهندسي مبيعات نانجينغ Metal للحصول على الدعم.
باتباع كل خطوة، يمكنك تغيير شفرات وجه قالب التكوير بأمان وسرعة. الصيانة الدورية واستخدام شفرات مخصصة يُساعدان جهازك على العمل بكفاءة وعدم التوقف المتكرر. ينصح الخبراء باتباع الخطوات التالية:
- افحص الشفرات والأجزاء الأخرى بحثًا عن أي ضرر أو تآكل.
- قم بتغيير الأجزاء المكسورة أو القديمة على الفور للحفاظ على عمل الماكينة بشكل جيد.
- استخدم دائمًا قواعد السلامة واستمع إلى ما يقوله المُصنِّع.
- قم بتعليم فريقك ما يجب فعله وتأكد من إعداد أجزاء إضافية.
- اطلب المساعدة من الخبراء إذا كانت المهمة صعبة.
التعليمات
كم مرة يجب عليك استبدال شفرات وجه قالب التكوير؟
افحص الشفرات بعد كل دورة إنتاج. استبدلها إذا لاحظت أي تشققات أو شقوق أو تآكل غير متساوٍ. يساعد الفحص الدوري على منع مشاكل الماكينة والحفاظ على جودة الكريات.
ما هي فجوة الشفرة الصحيحة للتكوير الفعال؟
اضبط فجوة الشفرة من ٠٫٢ إلى ٠٫٣ مم. تساعد هذه الفجوة على إجراء قطع دقيقة ودقيقة. احرص دائمًا على فحص الفجوة قبل تشغيل الماكينة.
هل يمكنك استخدام الشفرات القياسية على جميع آلات التكوير؟
لا، أنت بحاجة إلى شفرات مصممة خصيصًا لجهازك. الشفرات المخصصة تناسب جهازك بشكل أفضل وتدوم لفترة أطول. استخدام شفرة غير مناسبة قد يؤدي إلى تناثر حبيبات غير متساوية وإتلاف الجهاز.
كيف تمنع التلوث أثناء استبدال الشفرة؟
حافظ على نظافة منطقة عملك. استخدم أقمشة خالية من الوبر، وضع مواد التشحيم في عبوات مُعلّمة. ارتدِ دائمًا قفازات نظيفة، وأغلق الأبواب لمنع دخول الغبار.
انظر أيضا
اعثر على سكاكين التحبيب المثالية لاحتياجات معالجة البلاستيك لديك
مقارنة شفرات التحبيب: اعثر على الشفرة المناسبة بسهولة
ما هي شفرات التحبيب وكيف تعمل في الصناعة؟
كيفية اختيار سكين التكوير المناسب لصناعتك