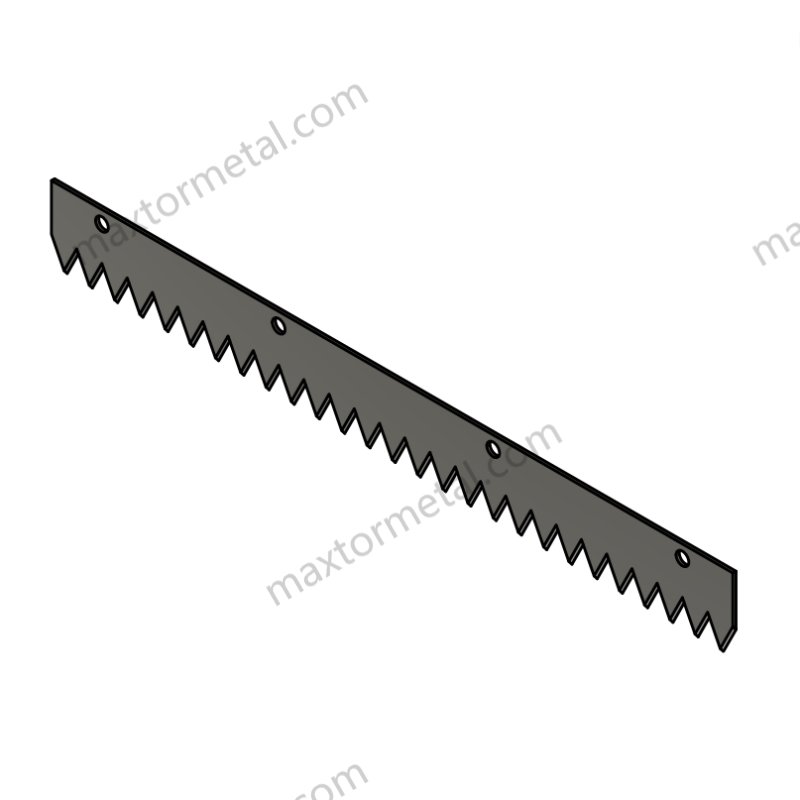
You may see uneven perforations and lots of stops in your production line. Using a good Cuchillas Perforadoras helps a lot. These blades make your work faster and your products better. The table below shows how much better your process can get with the right blade.
| Benefit Category | Statistical Impact |
|---|---|
| Eficiencia de producción | Increases production line efficiency by 12-15% each year |
| Velocidad de producción | Makes production lines go up to 20% faster |
| Reducción de residuos | Cuts down packaging waste by 20-30% |
| Durabilidad de la cuchilla | Coatings like TiN or DLC make blades last 25-40% longer |
| Efficiency Improvement | Cuchilla personalizada designs made efficiency 53% better |
| Stress Reduction | Special blade shapes lowered stress by 27% |

Puntos clave
- Use good perforation blades to make things faster, waste less, and help blades last longer.
- Check, clean, and oil blades often to keep cuts nice and stop the machine from breaking down.
- Put in blades carefully by following safety rules, using the right tools, and lining up blades for smooth cuts.
- Change machine settings like speed, pressure, tension, and blade depth to fit the material so results stay the same.
- Do test runs after putting in or changing blades to find problems early and save material.
- Sharpen blades on a set schedule based on what you cut and the blade coating to keep them sharp and cutting well.
- Write down all maintenance and use checklists to watch blade condition and stop surprise problems.
- If there is an emergency, stop the machine fast, check the blades, and fix or change them to avoid long waits.
Importance of Perforation Blade Maintenance
Production Stability
Taking care of your perforation blade keeps your production line steady. A sharp and properly installed blade cuts fast and clean. If you do not care for the blade, you will have more stops and longer downtime. Machines can even get damaged if you ignore blade care. Poor maintenance makes blades wear out, break, and cut badly. These problems happen a lot in factories and waste time and money. You can stop most failures by checking, cleaning, and oiling your blades often.
Consejo: Check your blades every day or week to find problems early and keep your line running well.
Calidad del producto
The way your perforation blade is kept affects your product quality. A sharp blade gives you neat and even perforations. If the blade is dull or chipped, you get rough edges and weak tear lines. You will see more waste and bad products if you do not keep blades in good shape. Good blade care means your products are always the same and better for customers. Always pick blades made from strong materials like SK5, D2, M2, or 440C. These materials make blades last longer and stay sharp.
- Blades that are cared for give you neat and even perforations.
- Picking the right blade material helps blades last and cut well.
- Sharpening on a schedule and using custom blade designs keeps your cuts precise.
Problemas comunes
Blade Wear and Dulling
When blades wear out, they get dull and cut rough. Machines may sound strange or shake. Blade wear comes from using them a lot, not cleaning, or using the wrong blade. You can stop this by cleaning after each use, sharpening on time, and picking the right blade.
Improper Installation
If you install blades wrong, you get uneven cuts and blades may slip. You might see crooked perforations or machine jams. Always follow the right steps and use the correct tools. Make sure the blade is tight and lined up before you start.
Insufficient Lubrication
If blades do not get enough oil, they get hot and wear out faster. You will hear more noise and see rougher cuts. Oil helps blades move smoothly and stay cool. Put on oil often and check if blades are dry.
Material Build-up
When dirt sticks to blades, they cut badly and can get damaged. Dirt and debris make perforations uneven. Clean blades after every shift to get rid of build-up and keep them working well.
Corrosion or Rust
Rust makes blades weak and shortens their life. You may see brown spots or holes on the blade. Water and not cleaning cause rust. Dry blades after cleaning and use oil to stop rust.
Incorrect Blade Alignment
If blades are not lined up, you get uneven perforations and torn material. You may see crooked lines or cuts that do not go all the way through. Use guides and check blade position before each run. Lining up blades right makes cutting smooth and accurate.
| Common Issue | Síntomas | Causas | Medidas preventivas |
|---|---|---|---|
| Blade Wear and Dulling | Dull edges, rough cuts, noise | Heavy use, poor cleaning | Clean, sharpen, use right blade |
| Improper Installation | Uneven cuts, slippage, jams | Incorrect mounting, loose screws | Follow installation steps, check |
| Insufficient Lubrication | Overheating, rough cuts, noise | Dryness, lack of oil | Lubricate regularly |
| Material Build-up | Poor cuts, blade damage | Dirt, debris | Clean after each use |
| Corrosion or Rust | Brown spots, blade weakness | Moisture, poor cleaning | Dry, use protective oils |
| Incorrect Alignment | Crooked lines, incomplete cuts | Poor setup, shifting | Use guides, check alignment |
Nota: Using high-grade steel blades and picking the right blade for your material helps you avoid most problems. Good quality and regular care keep your production line working well and your products the same every time.
Perforation Blade Installation
Preparación
Medidas de seguridad
You need to be safe when using cutting equipment. Always turn off and unplug the machine first. This keeps you from getting hurt by accident. Wear cut-resistant gloves and safety glasses to protect yourself. These keep your hands and eyes safe from sharp pieces. Make sure your work area is clean and not messy. Take off loose clothes or jewelry so nothing gets caught in the machine.
Consejo: Check that the machine is off before touching the blade or any moving part.
Tools Checklist
Get all your tools ready before you start. This helps you work faster and make fewer mistakes. Here is a list to help you:
- Allen wrenches or hex keys for blade mounts
- Screwdrivers, both flathead and Phillips
- Torque wrench for tightening screws just right
- Clean, lint-free cloths for cleaning parts
- Lubricating oil for the blade and moving parts
- Blade alignment gauge or ruler
- Gloves and safety glasses for protection
Having these tools ready makes the job safer and easier.
Extracción de la cuchilla
First, make sure the machine is off and unplugged. Open the blade guard or access panel. Use the right wrench or screwdriver to loosen the screws or bolts. Hold the blade tight when you take out the last screw. This stops the blade from falling. Carefully slide the old blade out of its holder. Put the used blade in a safe place for disposal or sharpening.
New Blade Setup
Alineación
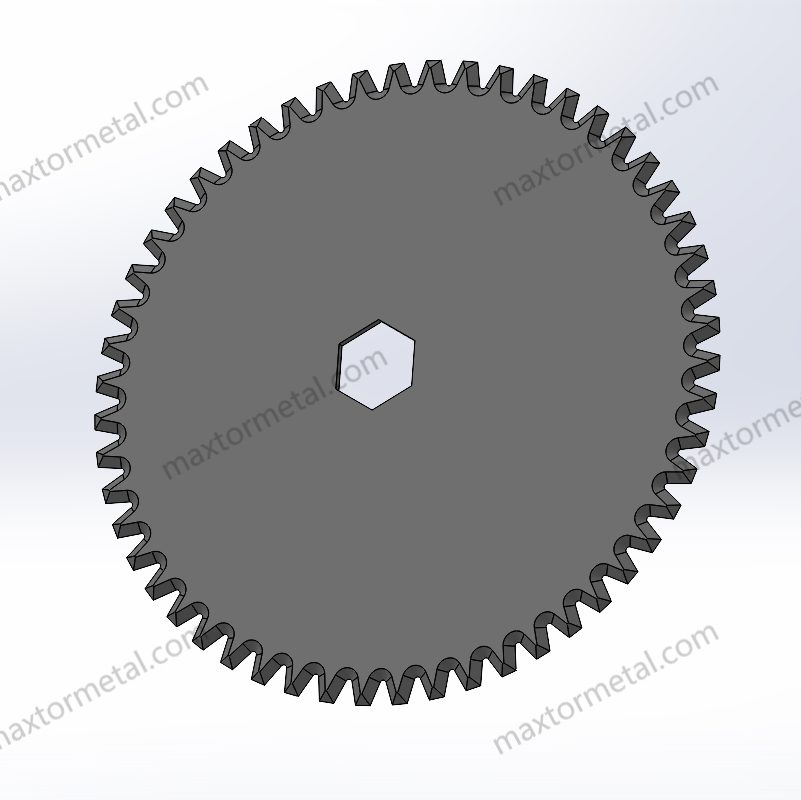
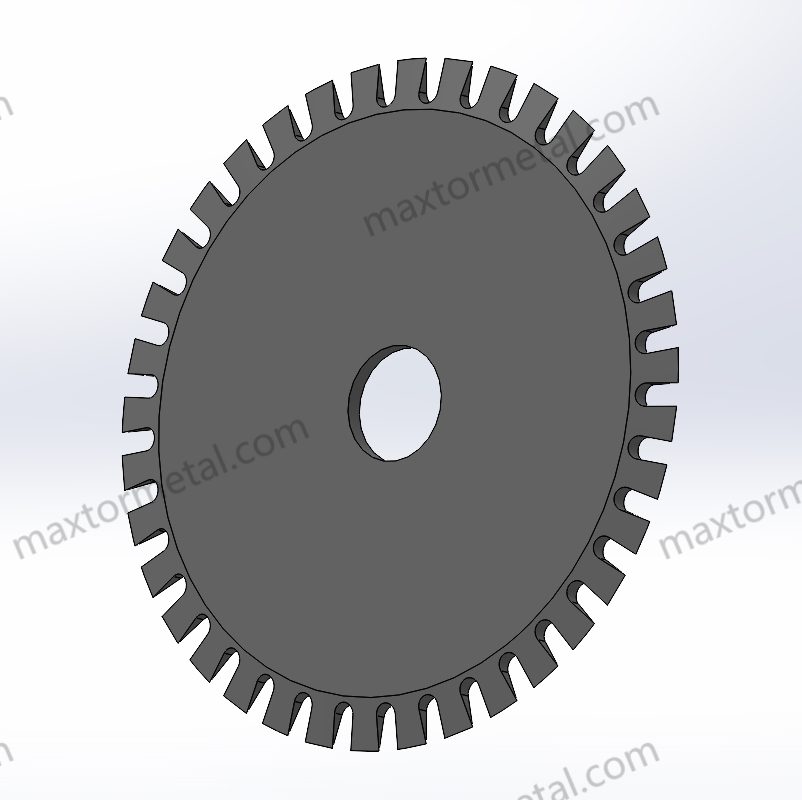
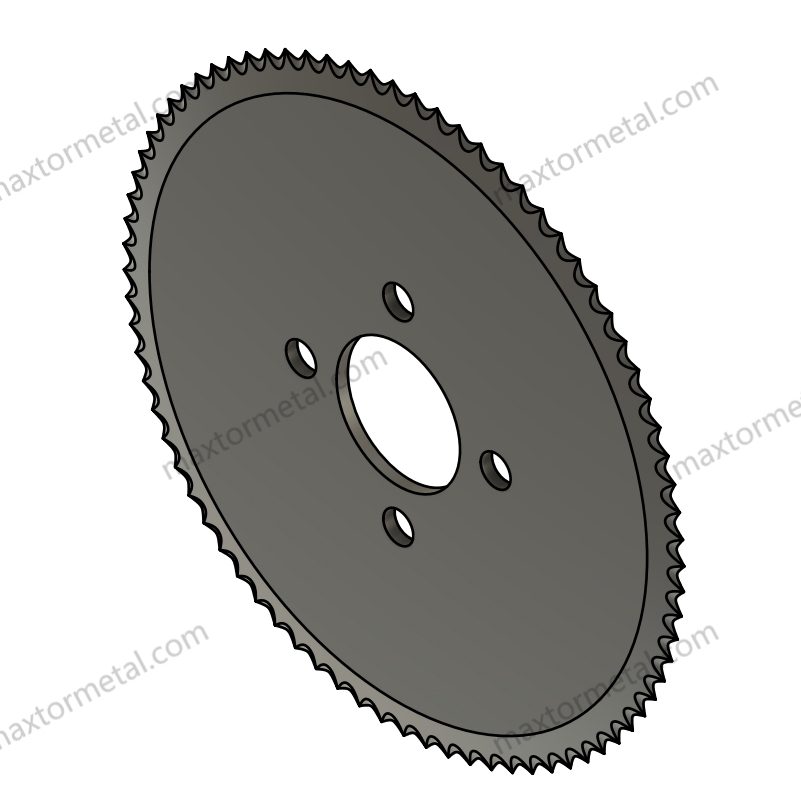
Getting the blade lined up right is very important. Take your new perforation blade and check the holes match your machine. Use a gauge or ruler to make the blade straight with the cutting path. For rotary or toothed blades, line up the teeth or edges with the way the material moves.
Different blades need special care:
| Tipo de cuchilla | Alignment Focus |
|---|---|
| Cuchillas Rectas | Make sure the edge is straight with the material |
| Cuchillas giratorias | Center the blade on the shaft and check for wobble |
| Cuchillas Dentadas | Line up the teeth with the material’s pattern |
A blade that is lined up right cuts better and lasts longer.
Mounting
After you line up the blade, put it in place. Put in the screws or bolts and tighten them by hand first. Use a torque wrench to finish tightening to the right setting. Do not make them too tight or you could bend the blade. Check that the blade sits flat with no spaces under it.
Maxtor Metal blades come in tool steel, high-speed steel, and stainless steel. These match the hardness of what you are cutting. This helps the blade last longer and cut well. Special blade edges, like scalloped or double-bevel, can help with certain materials.
Nota: Always check the blade’s position and tightness before closing the guard and turning the machine back on.
Careful installation helps your cutting work go smoothly and keeps you safe.
Verification
Inspección
After you put in the blade, check your work. Make sure the blade holder is tight and does not move. Look at the blade to see if it lines up right. Use a ruler or gauge to check if the blade is straight. Check all screws and bolts to see if they are tight, but do not make them too tight.
Look around the blade for any scraps or dirt. Clean the nylon anvil and the blade holder. This helps stop jams and keeps the blade cutting well. Look at the blade edge for damage or wear. If you see nicks or dull spots, sharpen or change the blade before using the machine.
Consejo: Always clean away any build-up before you start a new run. This keeps your cuts neat and your machine safe.
Prueba de funcionamiento
You should always do a test run after putting in a new blade. This step checks if the blade works and if your setup is right. Follow these steps for a good test:
- Set the machine’s starting point and make a simple cut.
- Put in a sample of the material you will use.
- Start cutting at a slow speed.
- Take out the material and look at the perforation line.
- Check for missed cuts, rough edges, or bad perforations.
If you see problems, stop the machine and check the blade’s spot. Fix the alignment or pressure if you need to. Do the test again until you get a clean, even cut. This helps you find mistakes early and saves material during big jobs.
Nota: A good test run saves time and materials. It also helps you find problems before they get worse.
Solución de Problemas
Even if you install the blade carefully, you might have problems like slipping, uneven cuts, or crooked material. Use this table to find quick fixes:
| Problema | Pasos para la solución de problemas |
|---|---|
| Slippage or Uneven Cuts | – Change blade force a little and test each time. – Make sure the blade and holder are tight. – Change speed or blade offset for the material. – Adjust how deep the blade cuts. – Run a test cut to see if it is better. |
| Material Slipping from Pinch Rollers | – Check that pinch rollers hold the material tight. – Load material straight and flat. – Clean rollers and blade holder. |
| Material Misalignment | – Load material straight and use pinch rollers. – Run a test cut to check if it lines up. – Move the cutting spot if needed. – Check blade tip offset. |
| Persistent Issues | – Change dull or broken blade. – Clean and care for blade holder and rollers often. |
| Alimentación de material | – Load material carefully to stop wrinkles. – Make sure material is tight so it does not move. |
Sometimes, you need to change how deep the blade cuts. If the blade does not cut all the way, make it go deeper. If it cuts too deep or hurts the backing, make it less deep. Always do a test after each change to find the best setting.
Alerta: If you keep having trouble, check if the blade is dull or damaged. Change it if you need to. Cleaning and caring for your tools often stops most problems.
You can keep your perforation blade working well by doing these steps. Careful checking, testing, and fixing problems help your production line stay steady and your products stay good.
Machine Adjustment

Settings
Velocidad
You need to set the machine speed for each material. Thin things like paper or film can be cut fast. Thick or soft materials need a slower speed. Changing speed changes how much energy the blade uses. High-speed laser surface hardening helps the blade stay sharp longer.
When you change speed, cutting can change too. If the machine goes too fast, it may shake or get hot. These problems mean you should check the blade’s spot or sharpen it. Maxtor Metal’s Perforating Blade Knives work well with high-speed laser cutting. You get clean cuts and less stopping.
The table below shows how different materials act when you change speed and pressure:
| Tipo de material | Energy Levels Tested (J) | Maximum Absorbed Energy (Relative to JFRP) | Peak Load Behavior | Damage Progression and Displacement Characteristics |
|---|---|---|---|---|
| JFRP | 3 | Baseline (lowest energy absorption) | Barely presented a peak; brittle failure | Low energy absorption; brittle failure mode |
| CURAUÁ 2D and 3D | 7 | ~74% higher than JFRP | Peak load reached at ~6 mm displacement, maintained until ~10 mm | Similar initial slopes; moderate damage progression |
| SISAL 2D and 3D | 12 | ~86% higher than JFRP | SISAL 2D peak load at 6 mm, SISAL 3D peak load interval shorter (1.2 mm) | Higher deformation and damage in SISAL 2D; faster damage progression in SISAL 3D |

Consejo: If you see too much heat or shaking, slow down. Check the blade’s surface or if it is lined up right.
Presión
You pick the pressure by looking at how thick and strong the material is. High pressure is good for thick or many-layered materials. Low pressure is better for thin or weak materials. Too much pressure can break the blade or mess up the material. Too little pressure means the cuts are not finished or look bad.
Check and change the pressure often to keep cuts the same.
Nota: Always try the pressure on a test piece first. This step helps you not make big mistakes.
Material Alignment
Getting the material straight is important for good cuts. Feed the material flat and straight into the machine. Use guides and sensors to help line it up.
Here are some tips for keeping material lined up:
- Check if the material is clean and in the right spot before cutting.
- Use the tools from the maker to set up the machine.
- Teach workers to check and fix alignment as needed.
- Pick the right tool for each material to stop damage.
- Do regular checks and fixes to find problems early.
- Show workers how to set the machine and start the strip right.
- Fix jams or bad cuts fast to keep the line moving.
Alerta: If cuts are crooked or uneven, the material may not be lined up. You can stop these problems by following good alignment steps.
Blade Depth
Set the blade depth to match how thick the material is. If the blade is too high, cuts will not go all the way through. If it is too low, the blade wears out or hurts the backing. Always test the depth on a sample before starting a big job. Write down the best depth for each material to help next time.
Consejo: Write down the blade depth for every job. This makes future jobs faster and keeps cuts looking good.
Tension
You need to control tension to keep things steady. Tension changes how material moves in the machine. It also affects how the blade cuts. If tension is too loose, material can wrinkle or slip. If tension is too tight, you might see tears or blade slippage. Both problems make perforations uneven and waste material.
Tension control systems help set the right tension. These systems measure and change tension by themselves. You should check tension before every run and recalibrate often. Maxtor Metal’s Perforating Blade Knives work well with tension control systems. These blades cut many materials like paper, film, and textiles. They stay sharp and do not jam.
Here are steps to keep tension right in your setup:
- Look at the material for slack or tight spots before starting.
- Change tension using the control panel or levers.
- Watch for wrinkles, tears, or blade movement while working.
- Use tension sensors if your machine has them.
- Recalibrate tension after switching materials or blade types.
Consejo: If you see vibration or overheating, check tension first. These signs usually mean tension is wrong.
Good tension helps you get clean perforations. It keeps your machine running smoothly. You avoid downtime and waste by watching tension closely.
Real-Time Monitoring
Real-time monitoring lets you control your production line. You track speed, pressure, temperature, and vibration as the machine works. This helps you find problems early and fix them fast.
You can set alerts for strange readings. For example, if temperature goes up quickly, check lubrication or blade alignment. If vibration gets worse, look at the blade for wear or misalignment. Maxtor Metal’s blades work well with monitoring systems. They stay sharp and resist damage, even at high speeds.
Use real-time monitoring to:
- Track speed and pressure for each material.
- Watch temperature to stop overheating.
- Check vibration to find misalignment or blade wear.
- Plan maintenance using the data.
- Change settings for each run to make things better.
| Monitoring Parameter | What to Watch For | Acción a tomar |
|---|---|---|
| Velocidad | Sudden changes, slowdowns | Check for jams or blade issues |
| Presión | Drops or spikes | Adjust settings, inspect blade |
| Temperatura | Rapid increases | Check lubrication, clean blade |
| Vibration | Unusual patterns | Inspect alignment, tension, blade |
Nota: Real-time monitoring helps you stop surprise stops. It keeps your machine line steady. You get better results and save time by acting on alerts fast.
Errores comunes
You may make common mistakes when adjusting machines. These mistakes can hurt your production and waste time and money. Many problems happen from missed steps, poor planning, or not enough training.
Some common mistakes are:
- Not changing settings when you switch materials. This causes bad perforations and blade damage.
- Skipping alignment checks. You get uneven cuts and machine jams.
- Forgetting to set tension and pressure. This leads to wrinkles, tears, and slippage.
- Ignoring vibration or overheating signs. Small problems can turn into big failures.
- Not following lean maintenance like 5S. Messy work areas cause more errors.
Machine adjustment mistakes often mean more rework, lots of scrap, and uneven product quality. You may see delays, bottlenecks, and safety risks. Human mistakes during repeated tasks can mess up machining and cause defects. Not following standards leads to complaints and possible penalties.
You can stop these mistakes by using error-proofing methods. Poke-Yoke tools, fixture automation, and tool monitoring help catch errors early. Continuous pressure hydraulics keep clamping force steady. This gives you even part quality. Training your team and keeping good records also help you avoid mistakes.
| Common Machine Adjustment Mistakes | Documented Effects on Production Outcomes |
|---|---|
| Insufficient Planning | Last-minute work, time pressure, interruptions, unscheduled interventions, loss of effectiveness and productivity |
| Poor Task Prioritization | Quality deterioration, additional costs, non-compliance with standards, customer dissatisfaction |
| Lacking Documentation and Follow-up | Loss of traceability, difficulty in assessment, repetition of errors, delays in continuous improvement initiatives |
| Overlooking Team Training and Expertise | Declining motivation, increased turnover, reduced performance, loss of competitiveness |
| Neglecting Preventive Maintenance | Premature equipment wear, unexpected failures, performance loss, increased energy consumption, compliance violations |
| Incorrect Use of Equipment | Material deterioration and contamination, breakage, injuries, sanctions |
| Underestimating Cleaning and Lubrication | Dirt accumulation, corrosion, increased friction and overheating, accelerated machinery wear |
| Ignoring Modernization and Technological Updates | Obsolescence, competitive disadvantage, increased vulnerability, compatibility issues, market exclusion |
⚠️ Always use a checklist for machine adjustment. Write down each step, train your team, and use error-proofing tools. You will get better results and have fewer problems.
Laser machining and machining need careful adjustment and watching. When you avoid common mistakes, you keep your line steady and your products high quality.
Perforation Blade Sharpening

Cuándo afilar
Signs of Dull Blades
Watch for signs that your perforation blade is dull. If cutting gets harder, the blade edge is not sharp. Uneven perforations or rough edges mean the blade needs help. Loud machine noise or more vibration can be a clue. These changes show the blade is not working well. You might see nicks or chips on the blade edge. If you notice any of these, sharpen the blade soon.
Consejo: Check the blade after every shift. Finding dullness early stops bigger problems on the line.
Recommended Sharpening Intervals
Set your sharpening schedule by material type and blade coating. Some materials wear blades out faster than others. Low pressure LDPE can dull a blade in hours. High pressure LDPE lets blades last longer. Coated blades like Teflon or tungsten carbide need less sharpening. The table below shows how often to sharpen blades for different materials and coatings:
| Tipo de material | Recubrimiento de la cuchilla | Blade Life / Sharpening Interval | Notas |
|---|---|---|---|
| LDPE convencional de alta presión | Sin recubrimiento | 2 a 4 semanas | Perforating blades service life |
| LDPE de baja presión | Sin recubrimiento | A few hours (approx. 26 hours) | Perforating blades dull quickly, requiring frequent replacement |
| LDPE de baja presión | recubierto de teflón | 26 a 30 horas | Slightly extended blade life compared to uncoated |
| LDPE de baja presión | Ny-Carb (metal duro) | Unas 20 horas | Coated blades last longer but still require frequent sharpening |
| Low pressure LDPE (resharpened blades) | N / A | de 8 a 24 horas | Las cuchillas reafiladas tienen una vida útil reducida |
| LDPE convencional de alta presión | Uncoated (slitting blades) | Afilado una vez por semana | Slitting blades require less frequent sharpening |
| Low pressure LDPE (slitting blades) | Sin recubrimiento | Afilado dos veces al día | Sharpening frequency increases significantly without coating |
| Low pressure LDPE (slitting blades) | Tungsten carbide coating | Afilado una vez por semana | Hard metal coating extends sharpening interval back to once a week |

Nota: Track your sharpening times. This helps you plan and avoid surprise downtime.
Métodos de afilado
Manual
Manual sharpening is good for many production lines. You use hand tools to make the blade edge sharp again. This way, you control the angle and pressure. It works best for small jobs or quick sharpening.
Step-by-Step Manual Sharpening Procedure
Follow these steps to sharpen a blade by hand:
- Take the blade out and clean it.
- Hold the blade steady in a vise or holder.
- Use a fine-grit stone or diamond file. Hold it at the right angle.
- Move the stone along the edge in smooth strokes. Keep the angle the same.
- Check the edge after a few strokes. Look for a sharp, smooth surface.
- Do the same on the other side if needed.
- Wipe the blade and check for missed spots.
- Put the blade back and test it on a sample.
Consejo: Use light pressure. Pressing too hard can hurt the blade and make it wear out faster.
Tools and Safety Precautions
You need the right tools and safety gear for sharpening:
- Fine-grit stones or diamond files
- Blade holder or vise
- Safety glasses and cut-resistant gloves
- Clean cloths for wiping
- Lubricating oil for the stone
Wear gloves and glasses to stay safe from sharp edges and flying bits. Always hold the blade tight before you start. Keep your work area neat and clear.
Automated
Automated sharpening systems help keep blades sharp with less work. These machines use controls to grind the blade edge. You get the same results every time and save time, especially for big jobs.
Automated Sharpening System Setup
To set up an automated sharpening system:
- Put the blade in the machine’s holder.
- Pick the right program for your blade.
- Set the grinding wheel or belt to the right angle and pressure.
- Choose the speed and feed rate.
- Start the machine and watch the sharpening cycle.
- Check the blade when it is done.
Automated systems use sensors to check blade sharpness and finish. This makes sure you get a good edge every time.
Calibration and Monitoring
You must set up your automated sharpening system before each use. Check the grinding wheel for wear and change it if needed. Set the right angle and pressure for your blade. Use the machine’s monitor to track temperature, vibration, and progress. If something looks wrong, stop and check the blade.
Alerta: Calibrate your sharpening system often. This keeps edges even and helps blades last longer.
Limpieza
Pre-Sharpening Cleaning Steps
Always clean your blade before sharpening. Remove dirt, glue, or build-up from the edge. Use a soft brush or cloth to wipe away loose stuff. Cleaning helps sharpening work better and keeps the blade safe.
Cleaning Agents and Tools
Pick the right cleaning agents and tools for your blade:
- Mild cleaners for sticky stuff
- Soft brushes for dust and dirt
- Lint-free cloths for wiping
- Compressed air for tiny bits
Do not use harsh chemicals that can hurt the blade. Only use cleaners made for your blade material.
Safety Guidelines for Cleaning
Follow safety rules when cleaning blades:
- Wear gloves to protect your hands.
- Use safety glasses to keep your eyes safe.
- Work in a place with good air when using cleaners.
- Take your time and do not rush cleaning.
Consejo: Clean blades last longer and are easier to sharpen. Make cleaning part of your regular maintenance.
Reconditioning
Welding and Grinding Process
You can make a perforation blade last longer by reconditioning it. If the blade has chips or cracks, start with welding. Use a filler metal that matches the blade. This helps rebuild the damaged part. Be careful not to let the blade get too hot during welding. Too much heat can make the blade softer and hurt how it cuts.
After welding, you need to grind the blade. Use a precision grinder to fix the blade’s edge. Keep the grinding angle the same as before. Grinding removes extra weld and shapes the edge for smooth cutting. Always cool the blade while grinding to protect it. Cooling stops the blade from warping or getting damaged. Keep grinding until the edge is sharp and even.
Consejo: Use fine-grit wheels for the last grinding step. This makes the blade smooth and helps it cut cleanly.
Inspection After Reconditioning
When you finish welding and grinding, check the blade carefully. Look for uneven spots or leftover weld marks. Gently run your finger along the edge to feel for smoothness. Use a magnifier to find small cracks or pits. Make sure the blade edge is straight and sharp.
Spin the blade slowly in its holder to check balance. A balanced blade will not wobble. Test the blade on a sample to see if it cuts well. If you see rough edges or bad cuts, sharpen or grind the blade again.
Nota: Always check both sides of the blade. Even a small flaw can cause big problems when cutting.
When to Replace Instead of Recondition
Sometimes, fixing the blade is not enough. Replace the blade if you see deep cracks, bad warping, or lots of rust. If too much metal is gone after grinding, the blade may not fit or cut right. Blades with many welding repairs can get weak and unsafe.
Replace the blade if it does not pass inspection after fixing. Using a worn or damaged blade can hurt your cutting and your machine.
⚠️ Always pick a new blade if you are not sure about safety or how well it works.
Mantenimiento preventivo
Routine Inspection Checklist
Regular checks keep your cutting tools working well. Use this checklist every day or week:
- Look at the blade edge for nicks, chips, or dull spots.
- Check if the blade holder is tight and lined up.
- Look for rust or corrosion on the blade.
- Test the blade on a sample to see if it cuts clean.
- Check the machine for loose parts or dirt.
A simple checklist helps you find problems early and stop downtime.
Lubrication and Storage
Lubrication protects the blade and machine. Put a thin layer of oil on the blade after cleaning and sharpening. Oil lowers friction and stops rust. Only use oils made for your blade material.
Store blades in a dry, clean place. Use blade guards or cases to protect the edge. Keep blades away from water and chemicals. Good storage makes blades last longer and keeps cuts good.
Consejo: Write the last sharpening date on each blade before storing. This helps you track maintenance easily.
Registro de Mantenimiento
Keep good records of all maintenance work. Write down each sharpening, grinding, or welding job. Note the date, what you did, and any problems you found. Track when you replace blades and why.
Use a simple table or notebook for your records:
| Fecha | Maintenance Type | Estado de la cuchilla | Action Taken | Next Check |
|---|---|---|---|---|
| 2024-06-01 | Afilado | Slightly dull | Sharpened, oiled | 2024-06-08 |
| 2024-06-08 | Inspección | Bien | No action needed | 2024-06-15 |
Good records help you plan future checks and spot patterns in blade wear.
Troubleshooting Wear
Identifying Types of Wear or Damage
You may see different kinds of wear on your perforation blade. Common problems are:
- Corrosion: Rust or pits on the blade, often from liquids.
- Edge dulling: The blade edge gets blunt and does not cut well.
- Chipping: Small pieces break off the edge and make rough cuts.
- Warping: The blade bends or twists and cuts unevenly.
Look for these signs every time you check the blade. Finding problems early helps you fix them before they get worse.
Common Causes and Solutions
Many things can make blades wear out. Corrosion often comes from liquids like shampoos or conditioners. Uncoated steel blades, like M2, rust the most. You can fix this by using blades with special coatings. Physical Vapor Deposition (PVD) coatings like Titanium Nitride (TiN) or Chromium Nitride (CrN) protect the blade. CrN-coated SS420 blades resist rust best and last longer. Coatings that keep water off also help stop corrosion.
Edge dulling happens when you cut rough materials or skip sharpening. Chipping can happen if you use too much force or cut hard things. Warping often comes from too much heat during grinding or using the blade wrong.
Nota: Pick the right blade material and coating for your job. Regular care and the right steps keep your blades in good shape.
Emergency Repair Steps
If your blade fails suddenly, act fast to stop production loss:
- Stop the machine and take out the damaged blade.
- Check the blade for cracks, chips, or rust.
- Clean the blade and see if quick sharpening or grinding can fix it.
- If the blade cannot be fixed, put in a new one.
- Check the machine for dirt or bad alignment before starting again.
Keep extra blades and tools ready for emergencies. Fast action helps you avoid downtime and keep cuts clean.
⚡ Always teach your team the emergency repair steps. Quick action protects your tools and your products.
Stability Checklist
A checklist helps keep your production line steady. Use this guide to make sure your Cuchillas Perforadoras and machine work well every day.
Daily Tasks
Check your Cuchillas Perforadoras and machine after each shift. These steps help you find problems early and keep things running.
| Tarea | Frecuencia | Notas |
|---|---|---|
| Limpiador de superficies | A diario | Wipe blade surface at the end of every shift to remove debris and contaminants |
| Inspección visual | A diario | Check blade edges and chips for damage or wear |
| Comprobación del montaje | A diario | Ensure blade is securely mounted and does not wiggle |
First, wipe the blade to get rid of dust and glue. Then, look at the blade edge for chips or dull spots. If you see any, plan to sharpen or change the blade soon. Always check that the blade is tight in its holder. A loose blade can make cuts uneven or jam the machine.
Consejo: Do these checks at every shift change. You will find small problems before they get worse.
Weekly Tasks
Weekly jobs go further. Test if your Cuchillas Perforadoras is sharp and check if it lines up right. These steps help you get clean cuts and keep your machine steady.
| Tarea | Frecuencia | Notas |
|---|---|---|
| Prueba de nitidez | Semanalmente | Test blade sharpness by cutting actual material; look for clean cuts without dragging or burrs |
| Revisión de alineación | Semanalmente | Use a straight edge or gauge to verify blade alignment parallel to material feed |
| Superficie de montaje limpia | Semanalmente | Remove blade and clean mounting area; inspect for dirt, rust, or damage |
Cut a piece of material with your Cuchillas Perforadoras. If the cut is rough or drags, sharpen the blade. Use a straight edge to see if the blade lines up with the material. Take out the blade and clean where it sits. Look for rust or dirt that could cause trouble.
Nota: Doing these checks every week helps stop surprise problems and keeps your line steady.
Emergency Steps
Sometimes, things go wrong fast. You need to act quickly to keep your machine and products safe. If you see bad cuts, hear strange sounds, or get a jam, stop the machine right away. Take out the Cuchillas Perforadoras and check for cracks, chips, or rust. Clean the blade and where it sits. If you cannot fix it, put in a new blade.
Keep extra perforation blades and tools ready for quick fixes. If you need a custom blade, ask about their OEM options.
⚡ Acting fast in emergencies keeps your line safe and stops long delays.
Following this checklist keeps your Cuchillas Perforadoras sharp, your machine steady, and your production line working well.
You can make your production line more stable by following simple steps for perforation blade installation, machine adjustment, and sharpening. Pick high-quality blades like Maxtor Metal’s for better cuts and blades that last longer. Do regular maintenance and use the stability checklist each day. Share your tips or questions in the comments.
Preguntas frecuentes
What materials can perforation blades cut?
Perforation blades can cut paper, film, textiles, packaging, rubber, and more. These blades work in many industries. You will get neat and exact cuts every time.
How often should you sharpen a perforation blade?
Check your perforation blade after each shift. Sharpen it if you see dull edges, rough cuts, or hear more noise. Most of the time, sharpening once a week keeps the blade working well.
What is the best way to store perforation blades?
Keep your perforation blades in a dry and clean place. Use blade guards or cases to keep the edge safe. Do not let blades touch water or chemicals. Storing them right helps them last longer and cut better.
How do you know if a perforation blade needs replacing?
Look for deep cracks, lots of rust, or a blade that still cuts badly after sharpening. If you see these problems, change the perforation blade. Using a broken blade can hurt your machine and make products worse.
What safety steps should you follow when changing a perforation blade?
Always turn off and unplug the machine first. Wear cut-resistant gloves and safety glasses. Use the right tools for the job. Make sure the blade is tight before you start the machine again.
Ver también
Cómo Obtener el Mejor Rendimiento de Su Cuchillo Perforado
Cómo elegir la cuchilla perforadora adecuada para su material