


게시일: 2026-04-29 · 최종 검토일: 2026-04-29
식품 안전 및 규정 준수 참고 사항: 본 가이드는 일반적인 권장 사항을 제공합니다. 항상 귀사 작업장의 SSOP/HACCP 프로그램 및 슬라이서 OEM의 모델별 지침(분해, 장력/토크 범위, 승인된 윤활유 및 위생 화학물질 포함)을 준수하십시오. 상충되는 사항이 있는 경우, OEM 매뉴얼과 귀사의 검증된 식품 안전 계획이 우선합니다. 예방 관리 및 검증 기록의 일부로 모든 변경 사항을 문서화하십시오.
핵심 요약
- 위생 관리와 칼날 관리를 하나의 시스템으로 취급하십시오. 빵가루 + 수분 + 정렬 불량은 마모와 위생 위험을 초래합니다.
- 귀사의 생산 라인에서 감사할 수 있는 방식으로 “30% 수명 연장”을 정의하고(칼날 세트당 작동 시간/생산된 빵 개수, SKU별), 이를 슬라이스 편차 및 빵가루 %와 연계하십시오.
- 위험 기반 위생 주기(연속 가동 중 4시간마다 점검)를 적용하고, 이를 OEM 지침 및 귀사의 FSMA 기록과 대조하여 검증하십시오.
- 식빵 슬라이서 칼날 유지보수가 슬라이스 일관성, 빵가루 감소, 가동 시간 및 TCO를 향상시키는 이유
칼날 상태는 다음과 같은 요소에 동시에 영향을 미치는 몇 안 되는 변수 중 하나입니다. 품질, 위생 및 가동 시간 날이 무뎌지거나 트래킹이 벗어나면 일반적으로 다음과 같은 동일한 고장 패턴이 나타납니다.
- 슬라이스 두께 편차 증가 (재작업, 불량품 또는 고객 불만 발생).
- 빵가루 발생 증가 (수율 손실, 청소 시간 증가, 공기 중 먼지 증가).
- 제품 찢어짐 / 눌림 빈도 증가 (특히 따뜻하거나 수분 함량이 높은 식빵의 경우).
- 계획되지 않은 가동 중단 증가 (파손, 걸림, 지속적인 “미세 조정 및 가동”).
비용은 단순히 칼날 세트에만 국한되지 않습니다. 인건비, 수율 손실, 추가 위생 처리 시간, 가동 중단 시간, 즉 총소유비용(TCO)이 포함됩니다.
- “수명 30% 연장”의 의미와 라인 및 SKU별 측정 방법
“수명 30% 연장”(칼날 수명 30% 연장)은 귀사의 장비와 제품에서 장비와 측정 가능한 의미를 가져야 합니다. 제빵 공장이나 슬라이서 OEM의 경우, 타당한 정의는 다음과 같습니다.
- 칼날 수명 (기본): 설치부터 제거까지의 총 슬라이싱 시간 (또는 총 생산 빵 개수).
- 수명 종료 트리거 (객관적 기준): 다음 중 어느 하나라도 지속적으로 기준치를 벗어나는 경우:
- 슬라이스 두께 편차가 사양을 초과함
- 빵가루 %가 관리 한계를 초과함
- 찢어짐/눌림 발생률이 불량 임계값을 초과함
- 사양을 유지하기 위해 한 교대 근무 내에서 슬라이서를 반복적으로 조정해야 함
비교 가능하도록 만들기 위해 라인 및 SKU별로:
- 칼날 수명을 다음과 같이 추적하십시오. 시간 + 생산 빵 개수 (시간만으로는 속도 변화를 파악하기 어려울 수 있습니다).
- 마모 메커니즘이 다르므로 SKU 제품군(예: 샌드위치 식빵 vs 크러스트 빵)별로 세분화하십시오.
- 품질 신호 표준화: 매 가동 시 동일한 샘플링 비율과 빵가루 측정 방법으로 두께 점검을 기록하십시오.
실용적인 기준 설정 방법은 동일한 SKU, 동일한 작업자, 동일한 검사 지점을 대상으로 4주간의 “현재 상태” 기간을 거친 후, 4~8주간의 “새로운 표준” 기간을 적용하는 것입니다.
- 본 가이드가 FSMA 위생 관리 및 OEM 검증과 일치하는 방식
FSMA 준수 위생 관리는 단순히 “더 많이 청소하는 것”이 아닙니다. 이는 문서화된 관리: 정의된 절차, 모니터링, 검증, 시정 조치 및 기록을 의미합니다. 슬라이서는 빵가루가 끼기 쉬운 구조의 식품 접촉 시스템이므로 매우 중요한 교차점에 위치해 있습니다.
Use the regulatory framing as a design constraint:
- Build sanitation and maintenance steps into written SSOPs and keep records consistent with 21 CFR Part 117 sanitation and CGMP requirements.
- Validate the maintenance standard against OEM instructions per model (torque, tension specs, allowable lubricant points, disassembly rules).
Done right, your maintenance program becomes easier to audit because it ties hygiene actions to measurable outcomes (crumb %, variance, downtime) instead of relying on “we always do it this way.”
모델별 검증 체크리스트
Use this checklist to translate the guidance in this article into model-specific standard work and auditable records.
- OEM manual checkpoints (per model): confirm disassembly steps, blade installation order, tension/tracking method, allowable adjustment points, and reassembly sequence.
- Mechanical parameters (do not guess): record the OEM-defined tension/torque ranges and the tools used (torque wrench, tension gauge, etc.). Keep those values in your internal SOP, not in a generic poster.
- Food-contact lubrication control: document which points are permitted, which lubricant is approved for incidental food contact where required, and how excess is prevented.
- Chemical compatibility: verify detergents/sanitizers and contact times are compatible with the slicer’s materials (metal, plastics, seals) and do not accelerate corrosion.
- Post-maintenance release test: define a short trial-slice routine (thickness check + crumb observation + visual check for rub marks) and pass/fail criteria.
- FSMA/SSOP record alignment: ensure the above items map to your written SSOPs, monitoring, corrective actions, verification, and recordkeeping expectations under your preventive controls program.
위생 및 청결 주기 (슬라이서 위생 주기)
Sanitation is not separate from blade life. Moisture, chemistry, and crumb accumulation change friction and corrosion conditions—and those conditions change wear rate.
Clean-in-place vs dry-clean choices
Most bread slicers aren’t truly CIP machines in the way a closed pipe system is, so think in terms of wet-clean vs dry-clean, and choose based on risk and materials.
- Dry-clean (preferred for frequent checks): vacuum/brush crumb removal and targeted wiping on guards and accessible food-contact areas. Use it to reduce abrasive crumb buildup without adding moisture.
- Wet-clean (for end-of-shift / deep clean): required when soils, allergen risk, or microbial risk calls for detergents/sanitizers—but it introduces a corrosion and re-lube burden.
The decision rule is simple: dry-clean as your high-frequency control, wet-clean as your validated reset.
Four-hour checks and end-of-shift deep clean
For continuous operation, a conservative benchmark is a 4-hour sanitation interval. The FDA’s slicer guidance is explicit: clean and sanitize slicers per manufacturer instructions at least every four hours during continuous use to reduce contamination risk (FDA: Keep Commercial Deli Slicers Safe).
This benchmark is best treated as a continuous-use minimum for retail-style slicer operation; adapt the exact cadence to your slicer model, product risk, and validation records. The U.S. Centers for Disease Control and Prevention notes that cleaning and inspecting in-use food slicers every 4 hours—while also checking for damage and debris—can reduce contamination of food sliced on the slicers (CDC: Retail Delis — cleaning and inspecting in-use food slicers every 4 hours).
Translate that into a bakery line program:
- Every 4 hours (quick control check):
- remove crumbs from blade zone, guides, and guards
- inspect for sticky buildup that increases drag
- verify guards and fasteners are seated (loose parts create rub and uneven wear)
- document the check (time, operator, pass/fail, corrective action)
- End-of-shift (deep clean and reset):
- disassemble per OEM instruction
- clean + sanitize all food-contact surfaces
- rinse/dry thoroughly to prevent corrosion
- reassemble and verify alignment/tension checkpoints
프로 팁: Your “4-hour check” doesn’t need full disassembly. It needs repeatable crumb removal + verification so you don’t let wear conditions accumulate for an entire shift.
Allergen changeover and verification
Evidence note: what 4-hour cleaning looks like in practice
Evidence from retail delis is useful because slicers there are a well-studied, high-risk food-contact system for cross-contamination. The CDC reports that about half of delis did not fully clean their slicers every 4 hours, most delis had damaged slicers that are harder to clean, and only about 1 in 4 reported inspecting slicers for damage every 4 hours (CDC: Retail Delis — slicer cleaning and inspection practices).
For an industrial bakery, treat this as a practical warning: if the cadence and damage checks aren’t built into standard work and verified, real-world compliance tends to drift—especially during peak production.
If you run allergen-containing SKUs (e.g., milk, eggs, nuts, sesame), your changeover is not just a cleaning task—it’s a verification task.
Minimum controls to document:
- changeover trigger (SKU list and allergen profile)
- disassembly steps and tool list
- cleaning chemistry/contact time per SSOP
- verification method (visual + ATP and/or allergen swabs where appropriate)
- release criteria and sign-off
The point is to prevent cross-contact while also preventing a “wet, half-dried machine” scenario that accelerates corrosion and drag.
기계적 관리: 식빵 슬라이서 칼날 유지보수에서의 장력, 정렬 및 마모

Sanitation reduces wear drivers (crumb abrasion and corrosion). Mechanical care reduces edge loading, heat, and tracking errors—the biggest multipliers of blade life.
Reciprocating vs band slicers: what to check
Start by matching checks to slicer type.
- Reciprocating slicers (multi-blade frames):
- look for uneven wear across blade rows (often indicates alignment drift or inconsistent tension)
- verify blade mounting points and clamp integrity
- confirm stroke smoothness (binding increases edge load)
- Band slicers (continuous loop):
- confirm tracking stability (a band that “hunts” will wear guides and edges faster)
- check guide contact surfaces for grooves and heat discoloration
- verify band tension within OEM spec (over‑tension stresses the band; under‑tension increases wander)
Belts, guides, fasteners: stabilize slice thickness
If your thickness drift shows up gradually over a shift, don’t blame the blades first. Drift is often a system problem:
- Belts: glazing, stretch, or contamination can cause speed variation and feed inconsistency.
- Guides: worn guides introduce lateral play, which changes cut geometry and increases tearing.
- Fasteners: loose guards, clamps, or guide mounts create micro-movement that becomes macro-variance.
A practical standard is to torque-check critical fasteners at the same time you do your end-of-shift reset, then spot-check after any jam or blade event.
Lubricants: NSF H1 use and contamination control
If lubrication points exist near product zones, treat lubricant selection and application as a food safety control—not a convenience.
- Use lubricants registered for incidental food contact where needed, consistent with NSF’s overview of H1 food-grade lubricant registrations (NSF H1 lubricant).
- Apply minimally and only at OEM-defined points. “More grease” often becomes “more contamination + more crumb paste.”
- Separate tools: dedicate lube tools and keep them away from sanitation chemicals to avoid cross-contamination.
- Inspect seals and leakage paths at every deep clean; fix leaks instead of masking them with wipe-downs.
수명 연장을 위한 작동 규정
The fastest way to burn blade life is to let operating conditions drift until the machine is “fighting the product.” Standardize the inputs that drive sticking, tearing, and constant re-adjustment.
Cooling setpoints before slicing to reduce sticking
Warm bread and high-moisture crumbs tend to smear and stick. That creates drag, which increases edge load and makes sanitation harder.
운영 측면에서:
- define a cooling setpoint window (time and/or product core temperature) before slicing
- treat “slicing too warm” as a defect cause, not an operator preference
- watch for seasonal effects (ambient humidity changes sticking behavior)
This one discipline reduces tearing complaints and the “clean it again mid-run” cycle that shortens blade life.
Inspection cues: crumbs, tearing, thickness drift
Use simple, observable cues as early warnings:
- Crumbs increasing at the discharge: often indicates dulling or increased friction; check crumb traps and guide contact.
- Tearing on the same side: often indicates alignment/tracking issue, not just dullness.
- Thickness drift over time: suspect feed/belts/guides/fasteners and tension stability.
The key is to link cues to actions. If the cue appears twice in a shift, you shouldn’t “keep running”—you should trigger your defined check.
Changeover SOP to reset, document, and release
Changeovers are where programs fail: blades get cleaned, but alignment and release checks get skipped.
A release-ready SOP includes:
- reset steps (crumb removal → deep clean if required → dry → re-lube points)
- mechanical verification (tension, tracking/alignment, guard seating)
- trial slice + thickness check
- documentation (who, when, what was adjusted)
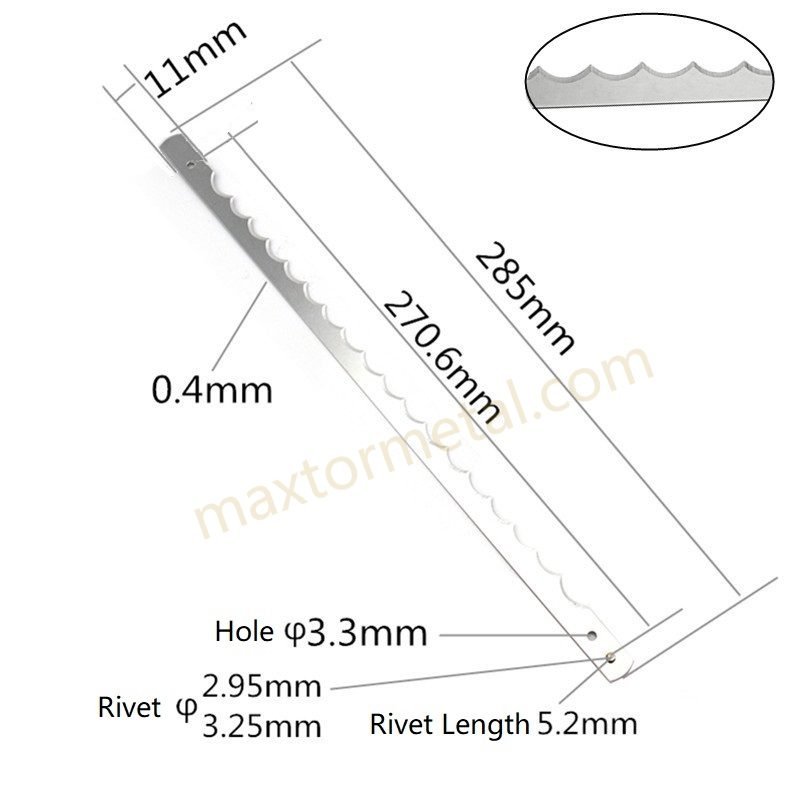
Example (fit/compatibility): some teams use MAXTOR METAL bread slicer blades when they need OEM/ODM support to match blades from drawings/photos and confirm fit with existing guide and tension hardware.
Disclosure: The link above points to MAXTOR METAL’s own product page. The example is provided for illustration of a fit/compatibility workflow only. Always validate blade specification, materials, and installation parameters against your slicer OEM manual and your facility’s food-safety requirements before purchasing or installing any replacement blades.
KPI, 기록 및 ROI 계산

If you want a 30% gain that survives management review and audits, you need KPIs tied to the failure modes above—and records that show control.
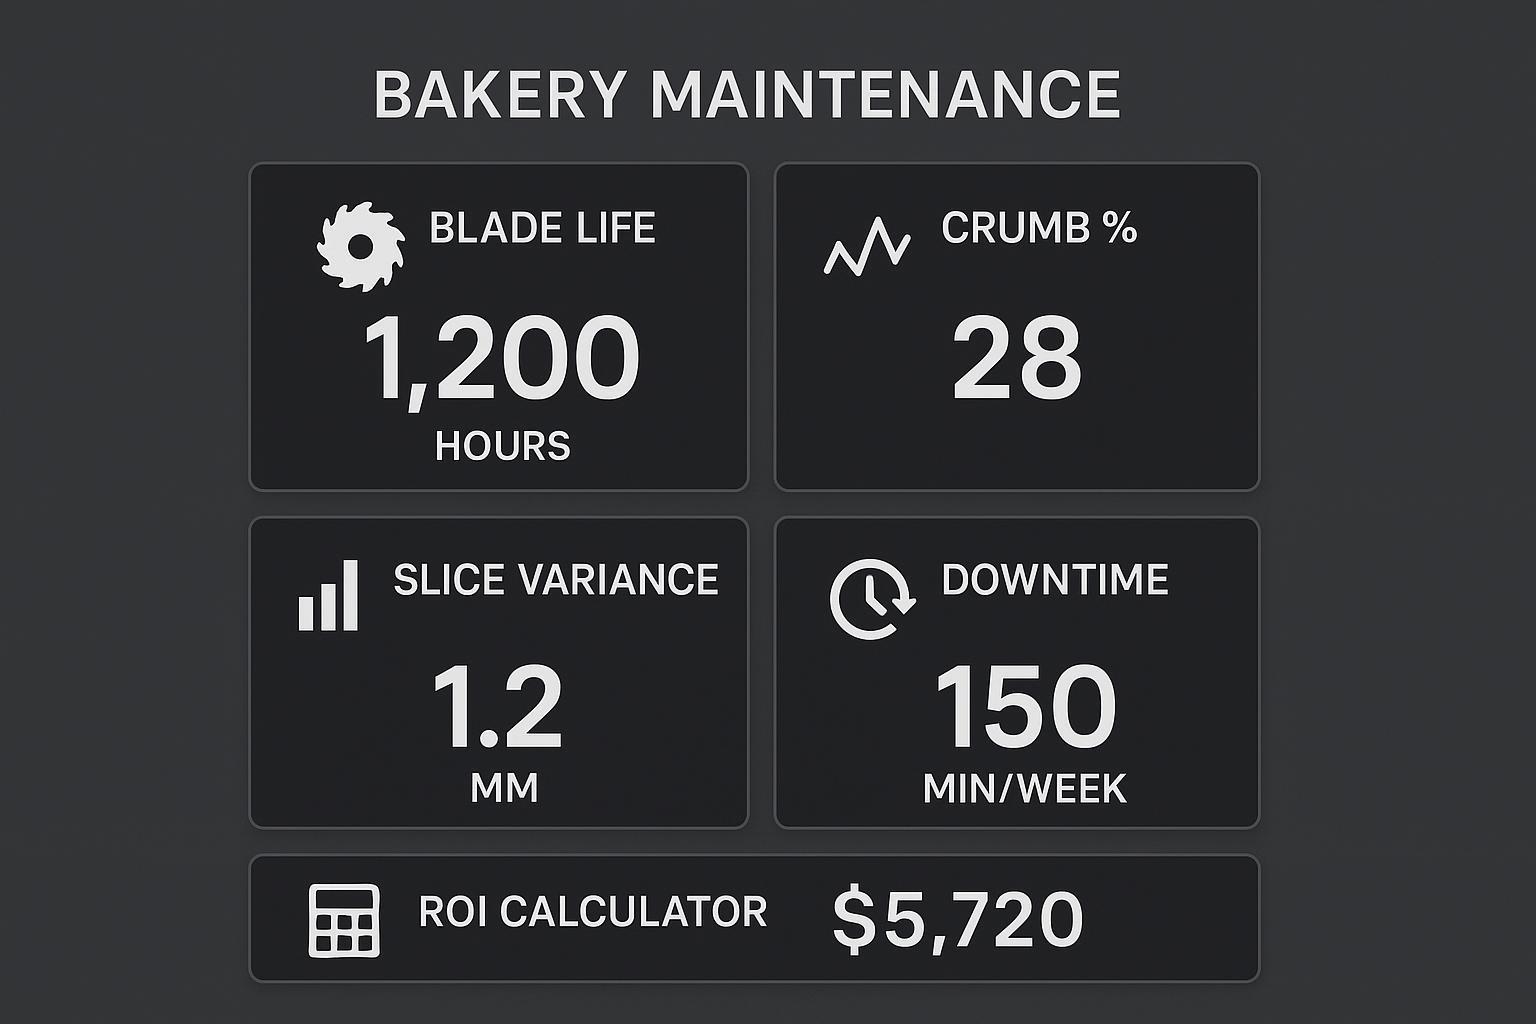
Track blade life, crumbs, variance, downtime
A minimal KPI set that works for both plants and OEM validation:
- Blade life: hours and loaves per blade set (by line and SKU)
- Crumb %: crumbs collected per defined sample (consistent method)
- Slice variance: thickness mean and range (or standard deviation) per sampling plan
- 중단 시간: minutes/week attributable to blade changes, jams, and slice-quality adjustments
- Corrective actions: count and type (tension adjust, guide change, deep clean, blade swap)
Tie each KPI to a trigger threshold and a response action.
Reusable log templates
Below are two templates you can copy into a paper log, spreadsheet, or CMMS.
| 필드 | Entry |
|---|---|
| Date / time | |
| Line / slicer ID | |
| SKU / product family | |
| Check type | 4-hour quick check |
| Crumb buildup observed | None / Light / Moderate / Heavy |
| Sticky buildup or moisture present | Yes / No |
| Damage/debris check | Pass / Fail (notes) |
| Corrective action taken | Vacuum / Brush / Wipe / Deep clean trigger / Maintenance call |
| Verification result | Pass / Fail |
| Operator | |
| Supervisor sign-off (optional) |
| 필드 | Entry |
|---|---|
| Date / time | |
| Line / slicer ID | |
| 이유 | Planned blade change / Quality drift / Break/jam / PM |
| Blade set ID (lot or internal code) | |
| OEM installation steps followed | Yes / No |
| Tension/tracking verified per OEM | Pass / Fail (notes) |
| Guards/fasteners seated | Pass / Fail |
| Trial slice thickness check | Pass / Fail (notes) |
| Crumb/tearing observation | Normal / Elevated (notes) |
| Release decision | Approved / Hold |
| Operator / maintenance tech | |
| QA or supervisor sign-off |
Simple cost-per-1,000-loaves calculator
Use a simple model to quantify savings without pretending it’s perfect:
- Blade cost per 1,000 loaves = (blade set cost ÷ blade life in loaves) × 1,000
- Downtime cost per 1,000 loaves = (downtime minutes per blade life × cost/minute ÷ blade life in loaves) × 1,000
- Yield loss cost per 1,000 loaves = (crumb % × loaf value) × 1,000 (use your plant’s yield accounting)
Your “30% improvement” is real when you see the blade-cost term drop, and at least one of: downtime or crumb % drops with it.
Documentation for audits and continuous improvement
For audit readiness and continuous improvement, keep three record layers:
- Sanitation records: time-stamped checks, chemicals used, verification results, corrective actions.
- Mechanical verification: tension/alignment checks, fastener torque checks, parts replaced.
- Performance outcomes: variance, crumbs, downtime trends tied to each blade set.
A simple practice that pays off: review these KPIs weekly with sanitation + maintenance + production in the same room. When one team owns only one metric, problems ping-pong.
결론
Author / publisher note
This article is published by 맥스터 메탈, a manufacturer and supplier of custom, precision-ground industrial blades with 15+ years of experience supporting industrial cutting applications. For model-specific maintenance parameters (tension, torque, lubrication points, disassembly rules), always defer to your slicer OEM documentation.
- Standardize sanitation and mechanical checks; validate with OEM specs per model
Build one standard work package per slicer model: sanitation cadence + mechanical verification + release checks. Then validate it against OEM documentation so adjustments don’t become tribal knowledge.
- Target ≥30% blade life gain; confirm with KPIs and cost-per-1,000-loaves
Define the end-of-life trigger, track blade life per SKU, and use cost-per-1,000-loaves to translate maintenance discipline into budget outcomes.
참고문헌
- 21 CFR Part 117 — Sanitation and CGMP requirements (eCFR): https://www.ecfr.gov/current/title-21/chapter-I/subchapter-B/part-117
- U.S. FDA — Keep Commercial Deli Slicers Safe (4-hour cleaning benchmark during continuous use): https://www.fda.gov/food/retail-food-industryregulatory-assistance-training/keep-commercial-deli-slicers-safe
- NSF — Food-grade lubricant registrations (H1 overview): https://www.nsf.org/knowledge-library/food-grade-lubricants-registrations

 English
  Spanish
  Italian
  French
  Portuguese
  Russian
  German
  Arabic
  Hindi
Hindi  Vietnamese
  Indonesian
  Japanese
  Korean