


تاريخ النشر: 2026-04-29 · آخر مراجعة: 2026-04-29
ملاحظة بشأن سلامة الأغذية والامتثال: يوفر هذا الدليل أفضل الممارسات العامة. اتبع دائمًا برامج SSOP/HACCP الخاصة بمنشأتك وإرشادات الشركة المصنعة للمعدات الأصلية (OEM) الخاصة بالطراز (بما في ذلك التفكيك، ونطاقات الشد/عزم الدوران، والمزلقات المعتمدة، والمواد الكيميائية للتطهير). في حال وجود أي تعارض، تكون الأولوية لدليل الشركة المصنعة (OEM) وخطة سلامة الأغذية المعتمدة لديك. قم بتوثيق أي تغييرات كجزء من الضوابط الوقائية وسجلات التحقق الخاصة بك.
أهم النقاط
- تعامل مع التطهير والعناية بالشفرات كنظام واحد: الفتات + الرطوبة + عدم المحاذاة تؤدي إلى التآكل ومخاطر النظافة الصحية.
- حدد “عمر أطول بنسبة 30%” بطريقة يمكن لخط الإنتاج لديك تدقيقها (الساعات/أرغفة الخبز لكل مجموعة شفرات، حسب وحدة حفظ المخزون SKU) واربطها بتباين سمك الشريحة ونسبة الفتات %.
- استخدم وتيرة نظافة صحية قائمة على المخاطر (فحوصات كل 4 ساعات أثناء التشغيل المستمر) وتحقق من صحتها بمطابقتها مع إرشادات الشركة المصنعة (OEM) وسجلات قانون تحديث سلامة الأغذية (FSMA) الخاصة بك.
- لماذا تؤدي صيانة شفرات قطاعة الخبز إلى اتساق الشرائح، وتقليل الفتات، وزيادة وقت التشغيل، وخفض التكلفة الإجمالية للملكية (TCO)
تعد حالة الشفرة أحد المتغيرات القليلة التي تؤثر على الجودة، والتطهير، ووقت التشغيل في الوقت نفسه. ومع تآكل الحواف أو انحراف مسار الشفرة، فإنك عادةً ما تلاحظ نمط الفشل نفسه:
- تباين سمك الشريحة يزداد (إعادة العمل، أو المرفوضات، أو شكاوى العملاء).
- توليد الفتات يرتفع (فقدان في الإنتاجية، وزيادة وقت التنظيف، والمزيد من الغبار المحمول جواً).
- تمزق / انضغاط المنتج يصبح أكثر تكراراً (خاصة في أرغفة الخبز الدافئة أو عالية الرطوبة).
- التوقفات غير المخطط لها تزداد (الكسور، والانحشارات، وعمليات “الضبط والتشغيل” المستمرة).
التكلفة لا تقتصر فقط على مجموعة الشفرات؛ بل تشمل العمالة، وفقدان الإنتاجية، ووقت التطهير الإضافي، ووقت التوقف عن العمل—أي التكلفة الإجمالية للملكية (TCO).
- ماذا يعني “إطالة العمر الافتراضي بنسبة 30%” وكيف ستقيس ذلك لكل خط إنتاج ولكل وحدة حفظ مخزون SKU
“يجب أن تعني عبارة ”إطالة العمر الافتراضي بنسبة 30%" (إطالة عمر الشفرة بنسبة 30%) شيئاً قابلاً للقياس على لك المعدات، مع لك المنتجات. بالنسبة لمصنع المخبوزات أو الشركة المصنعة لقطاعات الخبز (OEM)، فإن التعريف المقبول هو:
- عمر الشفرة (أساسي): إجمالي ساعات التقطيع (أو إجمالي أرغفة الخبز) من التركيب إلى الإزالة.
- مؤشر نهاية العمر الافتراضي (موضوعي): تجاوز أي مما يلي لحدودك باستمرار:
- تجاوز تباين سمك الشريحة للمواصفات الخاصة بك
- ارتفاع نسبة الفتات % فوق حد التحكم الخاص بك
- تجاوز معدل التمزق/الانضغاط لحد العيوب المسموح به
- متطلبات الضبط المتكرر للقطاعة خلال وردية عمل واحدة للحفاظ على المواصفات
لجعلها قابلة للمقارنة لكل خط إنتاج ولكل وحدة حفظ مخزون SKU:
- تتبع عمر الشفرة كـ ساعات + أرغفة خبز (الساعات وحدها قد تخفي التغييرات في السرعة).
- قم بالتقسيم حسب عائلة SKU (مثل خبز الساندويتش مقابل الخبز المقرمش) لأن آليات التآكل تختلف.
- توحيد إشارات الجودة: سجل فحوصات السمك بنفس معدل أخذ العينات وطريقة قياس الفتات في كل دورة تشغيل.
تتمثل الطريقة الأساسية العملية في تحديد فترة “الوضع الحالي” لمدة 4 أسابيع، تليها فترة “المعيار الجديد” لمدة 4 إلى 8 أسابيع، مع استخدام نفس وحدات حفظ المخزون SKUs، ونفس المشغلين، ونفس نقاط الفحص.
- كيف يتوافق هذا الدليل مع ضوابط التطهير الخاصة بقانون FSMA واعتماد الشركة المصنعة (OEM)
لا يقتصر التطهير المتوافق مع قانون FSMA على “زيادة التنظيف” فحسب، بل هو رقابة موثقة: إجراءات محددة، ومراقبة، وتحقق، وإجراءات تصحيحية، وسجلات. تقع قطاعتك في نقطة تقاطع حرجة لأنها نظام ملامس للأغذية يحتوي على العديد من مصائد الفتات.
استخدم الإطار التنظيمي كقيد للتصميم:
- Build sanitation and maintenance steps into written SSOPs and keep records consistent with 21 CFR Part 117 sanitation and CGMP requirements.
- Validate the maintenance standard against OEM instructions per model (torque, tension specs, allowable lubricant points, disassembly rules).
Done right, your maintenance program becomes easier to audit because it ties hygiene actions to measurable outcomes (crumb %, variance, downtime) instead of relying on “we always do it this way.”
قائمة التحقق من الصلاحية الخاصة بالطراز
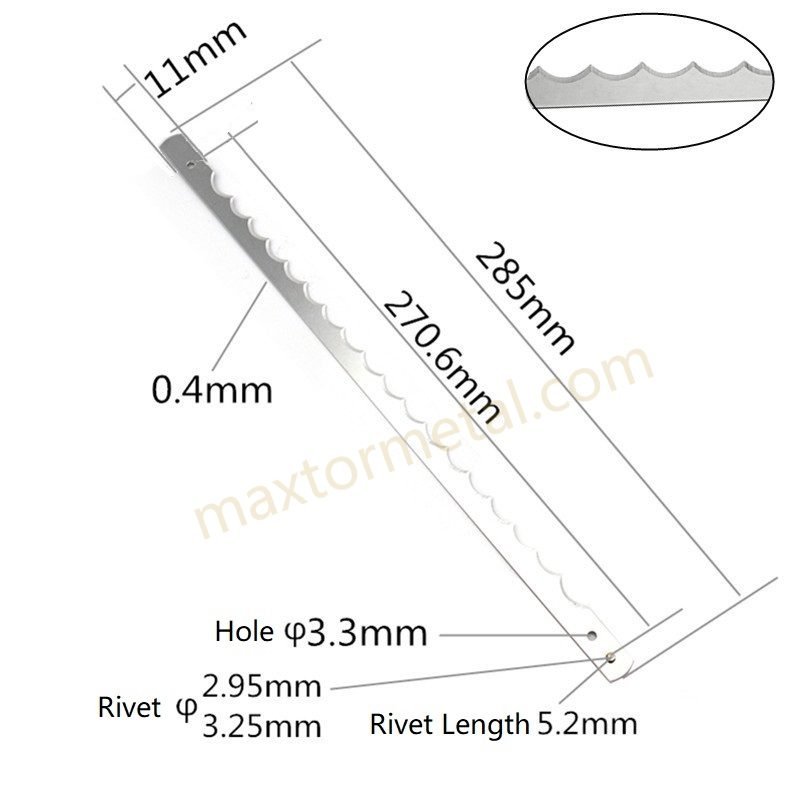
Use this checklist to translate the guidance in this article into model-specific standard work and auditable records.
- OEM manual checkpoints (per model): confirm disassembly steps, blade installation order, tension/tracking method, allowable adjustment points, and reassembly sequence.
- Mechanical parameters (do not guess): record the OEM-defined tension/torque ranges and the tools used (torque wrench, tension gauge, etc.). Keep those values in your internal SOP, not in a generic poster.
- Food-contact lubrication control: document which points are permitted, which lubricant is approved for incidental food contact where required, and how excess is prevented.
- Chemical compatibility: verify detergents/sanitizers and contact times are compatible with the slicer’s materials (metal, plastics, seals) and do not accelerate corrosion.
- Post-maintenance release test: define a short trial-slice routine (thickness check + crumb observation + visual check for rub marks) and pass/fail criteria.
- FSMA/SSOP record alignment: ensure the above items map to your written SSOPs, monitoring, corrective actions, verification, and recordkeeping expectations under your preventive controls program.
وتيرة التطهير والنظافة الصحية (وتيرة تطهير القطاعة)
Sanitation is not separate from blade life. Moisture, chemistry, and crumb accumulation change friction and corrosion conditions—and those conditions change wear rate.
Clean-in-place vs dry-clean choices
Most bread slicers aren’t truly CIP machines in the way a closed pipe system is, so think in terms of wet-clean vs dry-clean, and choose based on risk and materials.
- Dry-clean (preferred for frequent checks): vacuum/brush crumb removal and targeted wiping on guards and accessible food-contact areas. Use it to reduce abrasive crumb buildup without adding moisture.
- Wet-clean (for end-of-shift / deep clean): required when soils, allergen risk, or microbial risk calls for detergents/sanitizers—but it introduces a corrosion and re-lube burden.
The decision rule is simple: dry-clean as your high-frequency control, wet-clean as your validated reset.
Four-hour checks and end-of-shift deep clean
For continuous operation, a conservative benchmark is a 4-hour sanitation interval. The FDA’s slicer guidance is explicit: clean and sanitize slicers per manufacturer instructions at least every four hours during continuous use to reduce contamination risk (FDA: Keep Commercial Deli Slicers Safe).
This benchmark is best treated as a continuous-use minimum for retail-style slicer operation; adapt the exact cadence to your slicer model, product risk, and validation records. The U.S. Centers for Disease Control and Prevention notes that cleaning and inspecting in-use food slicers every 4 hours—while also checking for damage and debris—can reduce contamination of food sliced on the slicers (CDC: Retail Delis — cleaning and inspecting in-use food slicers every 4 hours).
Translate that into a bakery line program:
- Every 4 hours (quick control check):
- remove crumbs from blade zone, guides, and guards
- inspect for sticky buildup that increases drag
- verify guards and fasteners are seated (loose parts create rub and uneven wear)
- document the check (time, operator, pass/fail, corrective action)
- End-of-shift (deep clean and reset):
- disassemble per OEM instruction
- clean + sanitize all food-contact surfaces
- rinse/dry thoroughly to prevent corrosion
- reassemble and verify alignment/tension checkpoints
نصيحة احترافية: Your “4-hour check” doesn’t need full disassembly. It needs repeatable crumb removal + verification so you don’t let wear conditions accumulate for an entire shift.
Allergen changeover and verification
Evidence note: what 4-hour cleaning looks like in practice
Evidence from retail delis is useful because slicers there are a well-studied, high-risk food-contact system for cross-contamination. The CDC reports that about half of delis did not fully clean their slicers every 4 hours, most delis had damaged slicers that are harder to clean, and only about 1 in 4 reported inspecting slicers for damage every 4 hours (CDC: Retail Delis — slicer cleaning and inspection practices).
For an industrial bakery, treat this as a practical warning: if the cadence and damage checks aren’t built into standard work and verified, real-world compliance tends to drift—especially during peak production.
If you run allergen-containing SKUs (e.g., milk, eggs, nuts, sesame), your changeover is not just a cleaning task—it’s a verification task.
Minimum controls to document:
- changeover trigger (SKU list and allergen profile)
- disassembly steps and tool list
- cleaning chemistry/contact time per SSOP
- verification method (visual + ATP and/or allergen swabs where appropriate)
- release criteria and sign-off
The point is to prevent cross-contact while also preventing a “wet, half-dried machine” scenario that accelerates corrosion and drag.
العناية الميكانيكية: الشد، والمحاذاة، والتآكل في صيانة شفرات قطاعة الخبز

Sanitation reduces wear drivers (crumb abrasion and corrosion). Mechanical care reduces edge loading, heat, and tracking errors—the biggest multipliers of blade life.
Reciprocating vs band slicers: what to check
Start by matching checks to slicer type.
- Reciprocating slicers (multi-blade frames):
- look for uneven wear across blade rows (often indicates alignment drift or inconsistent tension)
- verify blade mounting points and clamp integrity
- confirm stroke smoothness (binding increases edge load)
- Band slicers (continuous loop):
- confirm tracking stability (a band that “hunts” will wear guides and edges faster)
- check guide contact surfaces for grooves and heat discoloration
- verify band tension within OEM spec (over‑tension stresses the band; under‑tension increases wander)
Belts, guides, fasteners: stabilize slice thickness
If your thickness drift shows up gradually over a shift, don’t blame the blades first. Drift is often a system problem:
- Belts: glazing, stretch, or contamination can cause speed variation and feed inconsistency.
- Guides: worn guides introduce lateral play, which changes cut geometry and increases tearing.
- Fasteners: loose guards, clamps, or guide mounts create micro-movement that becomes macro-variance.
A practical standard is to torque-check critical fasteners at the same time you do your end-of-shift reset, then spot-check after any jam or blade event.
Lubricants: NSF H1 use and contamination control
If lubrication points exist near product zones, treat lubricant selection and application as a food safety control—not a convenience.
- Use lubricants registered for incidental food contact where needed, consistent with NSF’s overview of H1 food-grade lubricant registrations (NSF H1 lubricant).
- Apply minimally and only at OEM-defined points. “More grease” often becomes “more contamination + more crumb paste.”
- Separate tools: dedicate lube tools and keep them away from sanitation chemicals to avoid cross-contamination.
- Inspect seals and leakage paths at every deep clean; fix leaks instead of masking them with wipe-downs.
الانضباط التشغيلي لإطالة العمر الافتراضي
The fastest way to burn blade life is to let operating conditions drift until the machine is “fighting the product.” Standardize the inputs that drive sticking, tearing, and constant re-adjustment.
Cooling setpoints before slicing to reduce sticking
Warm bread and high-moisture crumbs tend to smear and stick. That creates drag, which increases edge load and makes sanitation harder.
Operationally:
- define a cooling setpoint window (time and/or product core temperature) before slicing
- treat “slicing too warm” as a defect cause, not an operator preference
- watch for seasonal effects (ambient humidity changes sticking behavior)
This one discipline reduces tearing complaints and the “clean it again mid-run” cycle that shortens blade life.
Inspection cues: crumbs, tearing, thickness drift
Use simple, observable cues as early warnings:
- Crumbs increasing at the discharge: often indicates dulling or increased friction; check crumb traps and guide contact.
- Tearing on the same side: often indicates alignment/tracking issue, not just dullness.
- Thickness drift over time: suspect feed/belts/guides/fasteners and tension stability.
The key is to link cues to actions. If the cue appears twice in a shift, you shouldn’t “keep running”—you should trigger your defined check.
Changeover SOP to reset, document, and release
Changeovers are where programs fail: blades get cleaned, but alignment and release checks get skipped.
A release-ready SOP includes:
- reset steps (crumb removal → deep clean if required → dry → re-lube points)
- mechanical verification (tension, tracking/alignment, guard seating)
- trial slice + thickness check
- documentation (who, when, what was adjusted)
Example (fit/compatibility): some teams use MAXTOR METAL bread slicer blades when they need OEM/ODM support to match blades from drawings/photos and confirm fit with existing guide and tension hardware.
Disclosure: The link above points to MAXTOR METAL’s own product page. The example is provided for illustration of a fit/compatibility workflow only. Always validate blade specification, materials, and installation parameters against your slicer OEM manual and your facility’s food-safety requirements before purchasing or installing any replacement blades.
مؤشرات الأداء الرئيسية، والسجلات، وحسابات عائد الاستثمار (ROI)

If you want a 30% gain that survives management review and audits, you need KPIs tied to the failure modes above—and records that show control.
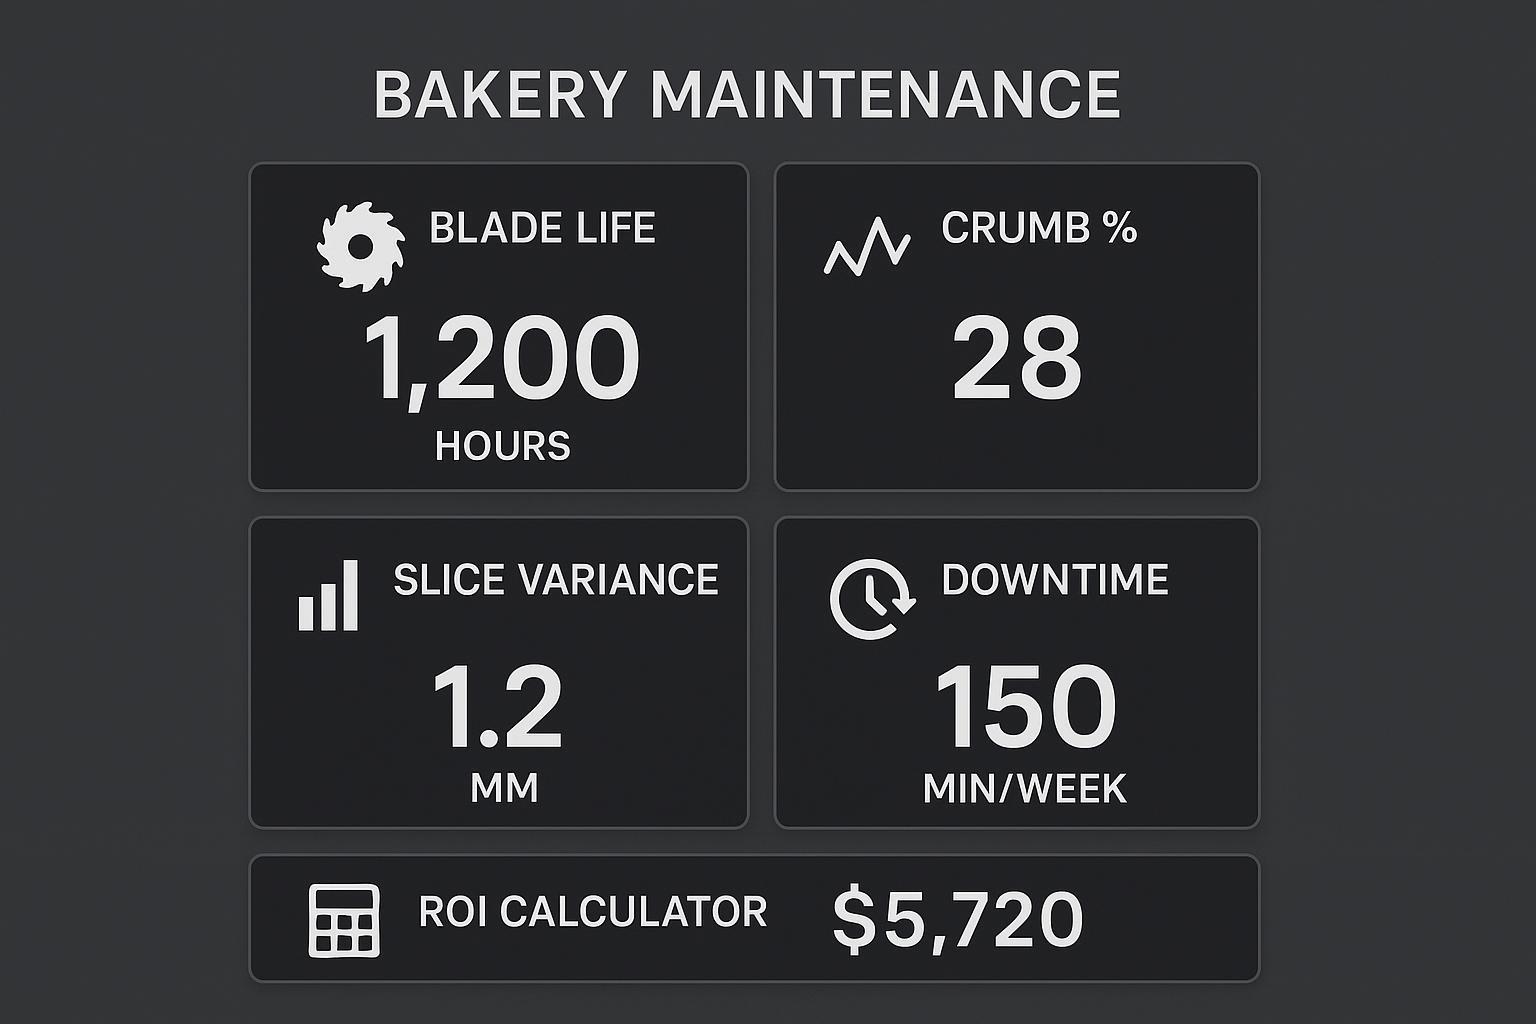
Track blade life, crumbs, variance, downtime
A minimal KPI set that works for both plants and OEM validation:
- Blade life: hours and loaves per blade set (by line and SKU)
- Crumb %: crumbs collected per defined sample (consistent method)
- Slice variance: thickness mean and range (or standard deviation) per sampling plan
- وقت التوقف: minutes/week attributable to blade changes, jams, and slice-quality adjustments
- Corrective actions: count and type (tension adjust, guide change, deep clean, blade swap)
Tie each KPI to a trigger threshold and a response action.
Reusable log templates
Below are two templates you can copy into a paper log, spreadsheet, or CMMS.
| مجال | Entry |
|---|---|
| Date / time | |
| Line / slicer ID | |
| SKU / product family | |
| Check type | 4-hour quick check |
| Crumb buildup observed | None / Light / Moderate / Heavy |
| Sticky buildup or moisture present | Yes / No |
| Damage/debris check | Pass / Fail (notes) |
| Corrective action taken | Vacuum / Brush / Wipe / Deep clean trigger / Maintenance call |
| Verification result | Pass / Fail |
| المشغل | |
| Supervisor sign-off (optional) |
| مجال | Entry |
|---|---|
| Date / time | |
| Line / slicer ID | |
| سبب | Planned blade change / Quality drift / Break/jam / PM |
| Blade set ID (lot or internal code) | |
| OEM installation steps followed | Yes / No |
| Tension/tracking verified per OEM | Pass / Fail (notes) |
| Guards/fasteners seated | Pass / Fail |
| Trial slice thickness check | Pass / Fail (notes) |
| Crumb/tearing observation | Normal / Elevated (notes) |
| Release decision | Approved / Hold |
| Operator / maintenance tech | |
| QA or supervisor sign-off |
Simple cost-per-1,000-loaves calculator
Use a simple model to quantify savings without pretending it’s perfect:
- Blade cost per 1,000 loaves = (blade set cost ÷ blade life in loaves) × 1,000
- Downtime cost per 1,000 loaves = (downtime minutes per blade life × cost/minute ÷ blade life in loaves) × 1,000
- Yield loss cost per 1,000 loaves = (crumb % × loaf value) × 1,000 (use your plant’s yield accounting)
Your “30% improvement” is real when you see the blade-cost term drop, and at least one of: downtime or crumb % drops with it.
Documentation for audits and continuous improvement
For audit readiness and continuous improvement, keep three record layers:
- Sanitation records: time-stamped checks, chemicals used, verification results, corrective actions.
- Mechanical verification: tension/alignment checks, fastener torque checks, parts replaced.
- Performance outcomes: variance, crumbs, downtime trends tied to each blade set.
A simple practice that pays off: review these KPIs weekly with sanitation + maintenance + production in the same room. When one team owns only one metric, problems ping-pong.
الخاتمة
Author / publisher note
This article is published by ماكستور ميتال, a manufacturer and supplier of custom, precision-ground industrial blades with 15+ years of experience supporting industrial cutting applications. For model-specific maintenance parameters (tension, torque, lubrication points, disassembly rules), always defer to your slicer OEM documentation.
- Standardize sanitation and mechanical checks; validate with OEM specs per model
Build one standard work package per slicer model: sanitation cadence + mechanical verification + release checks. Then validate it against OEM documentation so adjustments don’t become tribal knowledge.
- Target ≥30% blade life gain; confirm with KPIs and cost-per-1,000-loaves
Define the end-of-life trigger, track blade life per SKU, and use cost-per-1,000-loaves to translate maintenance discipline into budget outcomes.
المراجع
- 21 CFR Part 117 — Sanitation and CGMP requirements (eCFR): https://www.ecfr.gov/current/title-21/chapter-I/subchapter-B/part-117
- U.S. FDA — Keep Commercial Deli Slicers Safe (4-hour cleaning benchmark during continuous use): https://www.fda.gov/food/retail-food-industryregulatory-assistance-training/keep-commercial-deli-slicers-safe
- NSF — Food-grade lubricant registrations (H1 overview): https://www.nsf.org/knowledge-library/food-grade-lubricants-registrations

 English
  Spanish
  Italian
  French
  Portuguese
  Russian
  German
  Arabic
  Hindi
Hindi  Vietnamese
  Indonesian
  Japanese
  Korean