

Replacement thermocutter blades look like simple consumables, but they’re often the difference between a clean, repeatable cut and a line that bleeds time in micro-stops, scrap, and rework. When the blade doesn’t fit correctly—or fits but doesn’t match your material and power profile—you’ll see it fast: blackened edges, uneven seals, dragging on multilayer stacks, and more frequent changeovers.
In this guide, “compatibility” means the blade mounts correctly and heats as intended on your specific tool. “Cut quality” means the edge you ship: sealed where it should be, not over-melted, dimensionally stable, and consistent from the first cut to the last. “TCO” (total cost of ownership) means the full cost of that blade decision: downtime for blade changes, yield loss from defects, inventory carrying cost, and the labor to keep the process stable.
Use this outline as a buyer’s checklist. Start with model compatibility, then validate geometry and power matching, and finish with fit/tolerance verification before procurement.
About this guide (accountability)
- Autor: Tommy Tang, Senior Sales Engineer (application-focused), Nanjing METAL Industrial — 12 anos supporting industrial blade selection, replacement, and procurement for production environments.
- Last reviewed: 2026-04-19
- Corrections/contact: https://maxtormetal.com/contact/
- Relationship disclosure: This guide is not affiliated with Abbeon, Thermocutters.com, or Weller. Product names are used only for identification.
- Safety note: Always follow your tool manufacturer’s manual and your facility’s safety procedures for hot cutting tools and blade changes.
Compatibility at a glance
The fastest way to waste money on thermocutter blades is to assume the model name alone guarantees fit. Many families share blade “types” but not always mounts, thickness constraints, or adapter requirements.
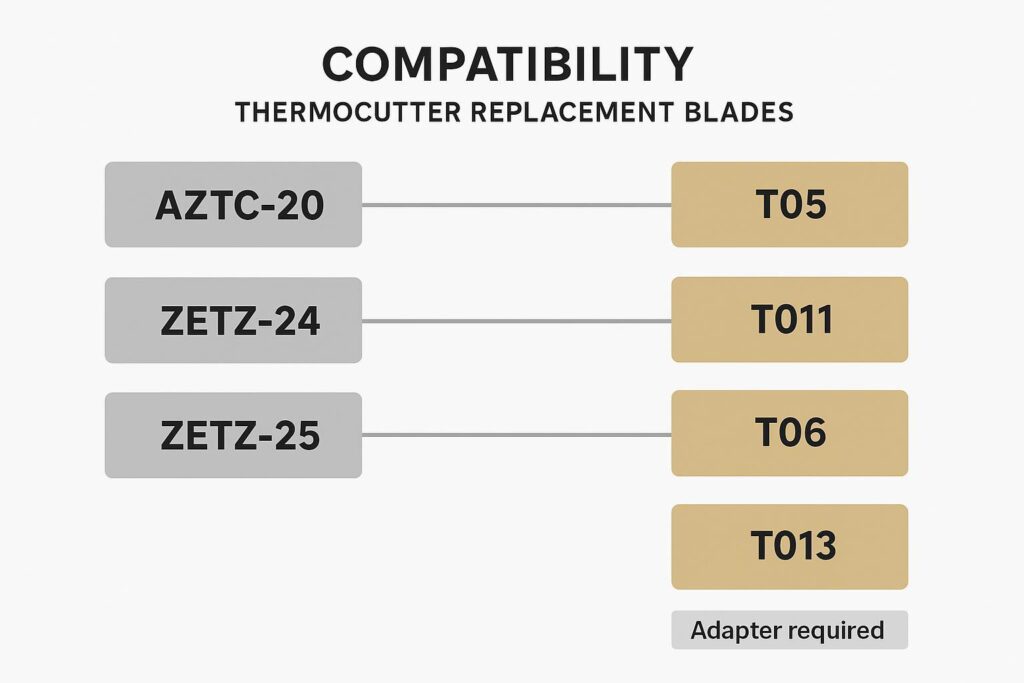
Abbeon/AZTC models and blade codes
If you’re running Abbeon/Thermocutters-style tools, start by separating the tool family:[^a]
- AZTC-20: compact thermocutter format[^a]
- ZETZ-24 / ZETZ-25: heavier-duty formats (with ZETZ-25 often positioned for EOAT/automation setups)[^a]
Blade ordering is commonly tied to blade codes (for example, T05, T011, T06, T013). Treat the code as the minimum necessary identifier—not the whole specification—and confirm the exact blade/adapter pairing in the manufacturer’s or catalog documentation.[^b]
For blade-change and basic operating constraints (including power isolation), it’s worth keeping the official instructions on hand; Abbeon’s AZTC-20 start-up and operation manual is a good example of the kind of procedural detail that prevents avoidable incidents.
Cross-reference for replacement thermocutter blades
Use a cross-reference approach rather than “closest-looking blade wins.” In practice, there are three checks to make before you ever compare pricing:
- Tool model family (AZTC-20 vs ZETZ-24/25)[^a]
- Blade code (confirm the code’s blade shape/length and any model limitations)[^b]
- Adapter requirement (some shapes mount via an adapter rather than directly)[^c]
Distributor documentation can help confirm which blade families are intended to fit which handles. Abbeon’s Thermocutters brochure (2019) and Abbeon’s Thermocutter brochure (2014) / Thermocutters brochure (2020) show how models, blades, and adapters are grouped for ordering.[^b][^c] The Thermocutters.com blade and adaptor catalog is also useful for cross-checking blade families and adaptor naming.[^d]
Conclusão principal: “Looks compatible” is not a compatibility test. Cross-check tool model, blade code, and adapter requirement before you compare price or lead time.
Weller models: validate before purchase
Weller-branded hot knives and cutters often have their own blade mounting styles and part-number conventions. Even when a blade profile looks interchangeable, the mounting interface (screw pattern, clamping geometry, slot width, contact style) may not be.
Before you place an order, validate three things on the Weller side:
- Exact tool model and variant (including voltage region and kit vs handle-only)
- Blade mounting interface (photo + measured dimensions)
- Replacement part-number mapping from the manufacturer or an authorized distributor
If you can’t confirm the replacement blade by part number, treat it as a fit-risk purchase and move to the verification checklist in the “Fit and tolerances” section.
Critérios de seleção
Once compatibility is narrowed, selection becomes an engineering decision. Your goal is not “sharpest” or “cheapest,” but the blade that holds stable results at your required throughput.
Quick selection cheat sheet
Use this as a fast “first pass” before you dive into part numbers and measurements.
| Decision factor | What to choose | Melhor para | Common failure mode you reduce |
|---|---|---|---|
| Material | Aço inoxidável | Humid shops, residue-prone materials, frequent wipe-down/cleaning | Rust/pitting after storage; variability after cleaning |
| Tool steel / higher rigidity designs | Dense materials, higher pressure, longer continuous cuts | Blade deformation; drift under load | |
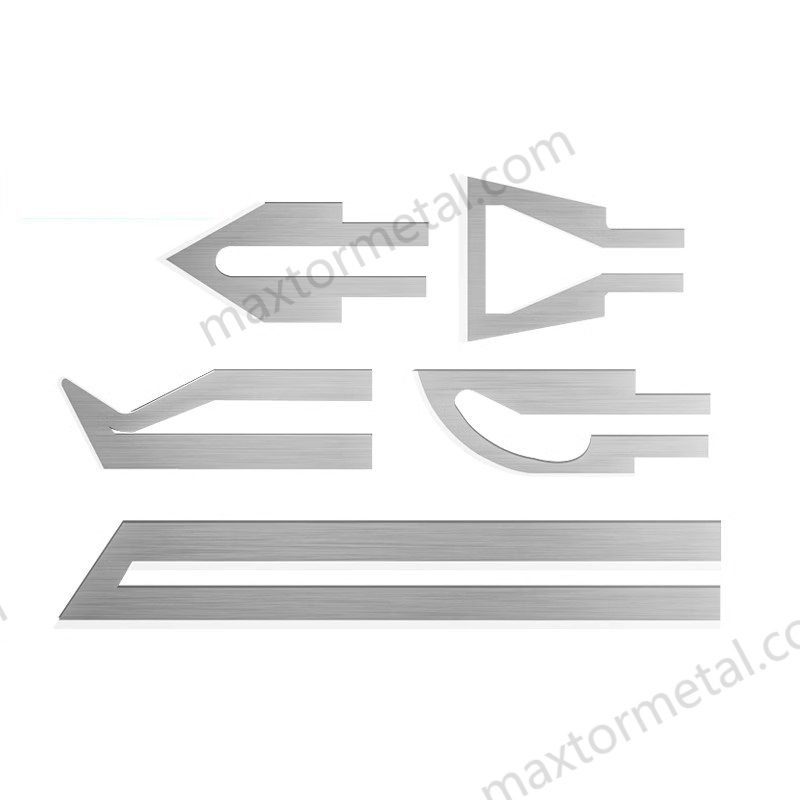
| Geometria | Straight edge | Straight trims, repeatable plunge cuts | Dragging from misalignment is easier to spot |
| Curved profile | Contour trimming; operator-controlled arcs | Tearing in turns from poor control | |
| Rounded nose / specialty | Sealing/finishing where sharp points snag | Snags/over-melt at corners | |
| Thickness / rigidity | Thicker / more rigid | High throughput, inconsistent operator dwell, multilayer stacks | Wave/uneven seal from flex; narrow process window |
| Thinner | Precision work with stable handling | Over-sensitivity to dwell/pressure changes |
Treat this table as a starting point. Final selection still depends on your exact tool mount, electrical contact style, and measured clamp-zone thickness.
Materials: tool steel vs stainless
Blade material choices show up as maintenance behavior on the shop floor.
- Aço inoxidável is typically chosen when corrosion resistance matters—humid environments, residue-prone materials, or frequent cleaning. In many factories, reduced rust sensitivity translates into more predictable blade changes and less variability after storage.
- Aço para ferramentas can be a reasonable choice when heat resistance and rigidity are the priority, but it can require more care to prevent corrosion and surface degradation.
When in doubt, make the decision based on your failure mode:
- If blades are failing early due to rust/pitting, favor stainless.
- If blades are deforming or losing stability under heavy, continuous cuts, tool steel or a higher-rigidity design may be worth evaluating.
Geometry and thickness matching
Geometry is what decides whether the material separates cleanly or drags and smears.
Match geometry to the cut type:
- Straight edges: general straight cuts, trim work, and consistent plunge cuts.
- Curved profiles: contour work and trimming where you need control through a turn.
- Rounded nose / specialty profiles: sealing and finishing behaviors where a sharp point creates snags or over-melt.
Thickness and rigidity matter as much as shape:
- Thicker / more rigid blades tend to stay stable in dense materials, higher feed pressure, and longer cuts.
- Thinner blades can be precise but are less forgiving when the operator dwell time varies or the material stack is inconsistent.
Catalogs that specify blade styles and thickness classes are useful for framing the choices; see PPE’s Thermocutter Blades catalog for a representative example of how blade geometries are grouped.
Thermal and power matching
A blade can be “compatible” and still cut poorly if thermal and power matching is off.
To get stable results, treat heat as a controlled input—not a fixed setting:
- Heat too high → blackening, smoke/odor, over-melting, rounded edges, and wider heat-affected zones.
- Heat too low (or feed too fast) → dragging, incomplete sealing, tearing, and dimensional instability.
A practical way to tune without guesswork:
- Start with the lowest temperature/power that completes the cut.
- Increase feed speed until cut quality starts to degrade.
- Back off slightly to create a stable process window.
If the process window is narrow, look first at blade thickness/rigidity e contact alignment before you blame temperature alone.
Fit and tolerances
If you only take one section to procurement, take this one. Most “wrong blade” incidents are not material-choice problems—they’re fit and tolerance problems.
Short case example: synthetic webbing hot cutting (smoke, stringing, frayed edge)
A common failure pattern on synthetic webbing/tapes is “the blade fits, but the cut doesn’t”: operators see more smoke/odor, melted stringing, and fuzzy/frayed edges even after they adjust temperature.
A practical troubleshooting sequence that avoids guesswork:
- Verify fit first: confirm the blade seats square in the clamp, contact surfaces are clean/flat, and there is no twist under tightening torque.
- Match rigidity to the job: if the process window is narrow (small changes in heat/feed cause defects), test a more rigid blade or a thickness class intended for continuous cutting.
- Tune a process window (not a single setpoint): lower heat until the cut barely completes, then increase feed until quality degrades, and back off slightly.
- Standardize the first-piece check: keep one approved photo of a “good edge” for webbing (no stringing, minimal discoloration, consistent seal line).
For incoming inspection, if you don’t have an official tolerance from the OEM, use a controlled baseline:
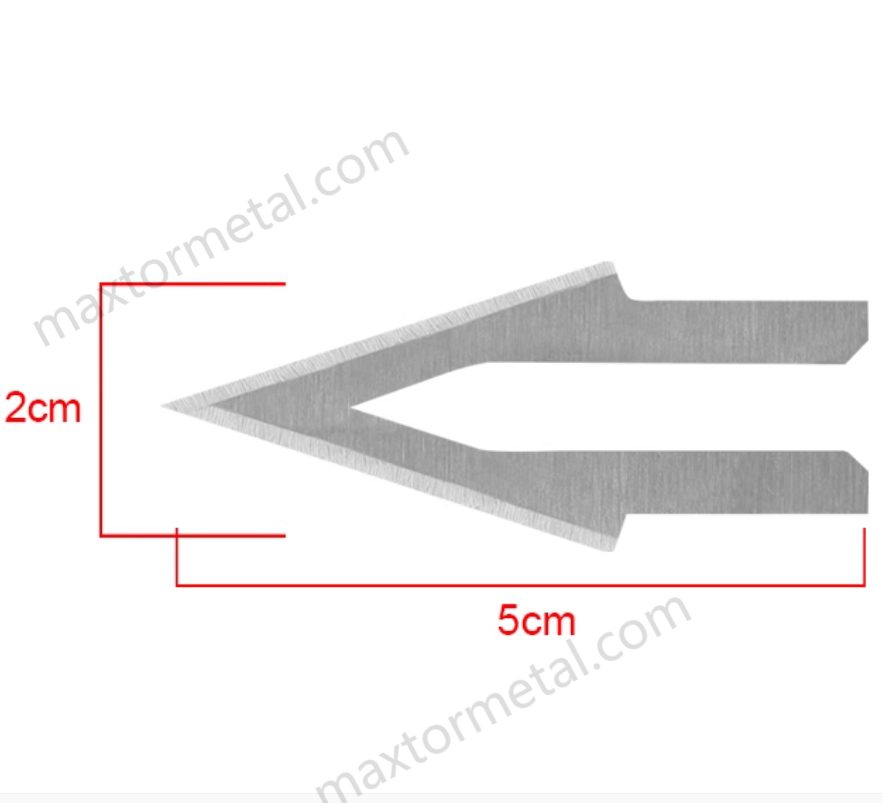
- Measure and record your current ‘known-good’ blade (hole/slot pattern, clamp-zone thickness, working edge length).
- Build an internal accept/reject rule as “match the known-good blade within your inspection capability,” and tighten it after the first successful lot.
This approach increases repeatability without requiring you to publish proprietary tolerances.
Mounting dimensions and alignment
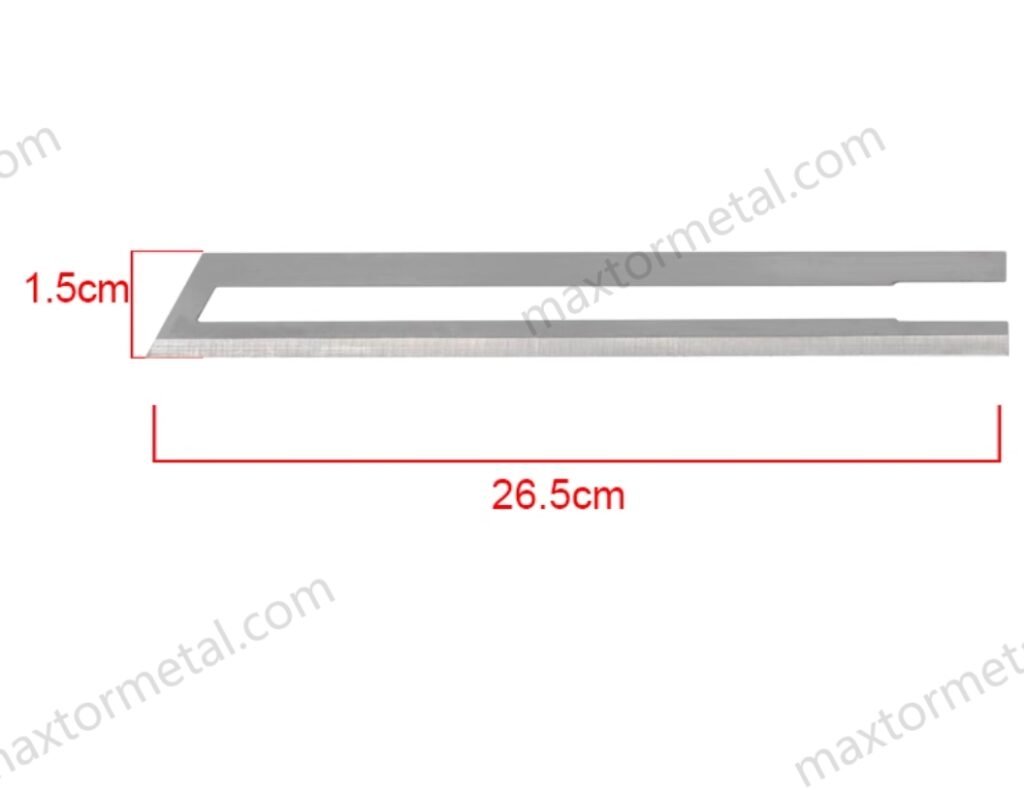
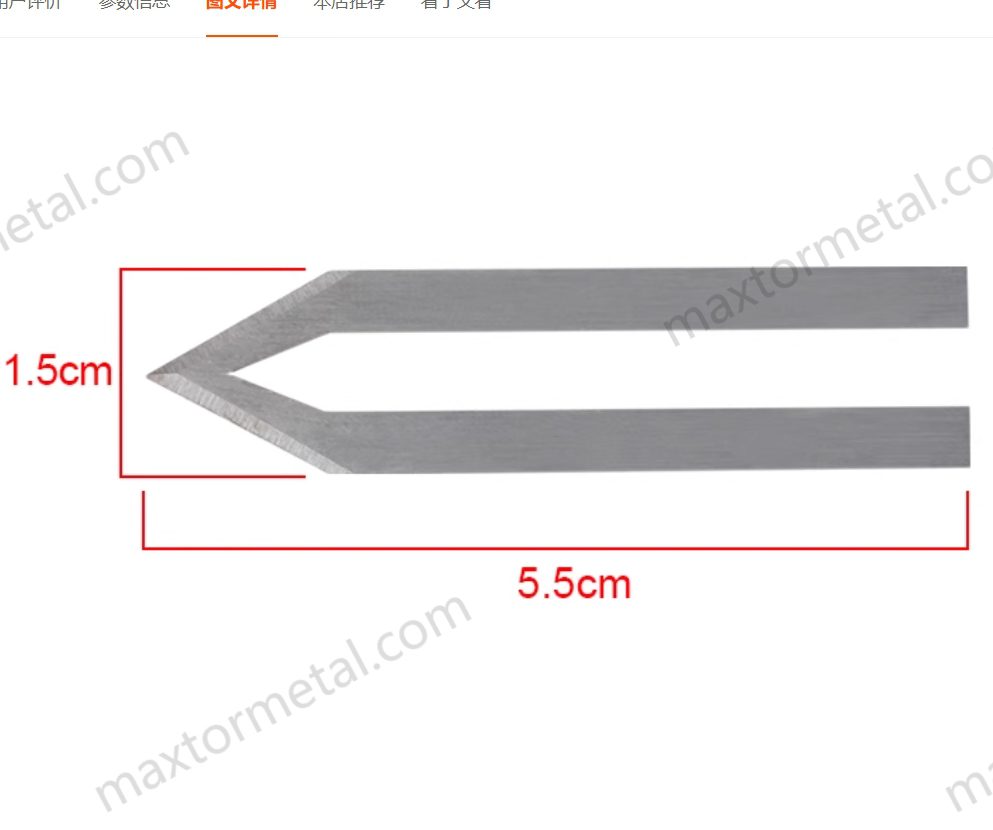
For a thermocutter blade to heat and cut consistently, it must mount consistently. Measure and record:
- Overall blade length and working edge length
- Blade thickness at the clamp/contact area
- Hole/slot pattern (center-to-center spacing, slot width)
- Contact surface condition (flatness, burrs, oxidation)
- Alignment when clamped (does it sit square, or twist under torque?)
Alignment matters for cut quality. A blade that sits slightly off-axis will show up as angled cuts, uneven sealing, and inconsistent edge finish—especially on multilayer stacks.
Adapters and non-interchangeables
Adapters are not “nice to have.” They are part of the electrical and mechanical interface.
Treat any of these as non-interchangeable until proven otherwise:
- Blades that require an adapter (different clamp geometry)
- Blades with a different contact style (how current transfers to the blade)
- Blades with a different thickness class than your tool was designed for
If you’re using a blade family where adapter use is common, confirm adapter part numbers and whether the adapter is included or must be purchased separately. The model/blade organization in Abbeon’s Thermocutters brochure (2019) is an example of how these adapter notes are typically presented.
Verification checklist before ordering
One-page template: PO spec + incoming inspection record
Use this as a copy/paste template for purchasing and receiving.
A) Purchase order must include
- Tool model and variant (including voltage region)
- Blade code / part number (attach the catalog or OEM reference)
- Adapter requirement and adapter part number (if applicable)
- Blade photos (top, side, clamp end) and/or a dimensioned sketch
- Critical dimensions to match (hole/slot pattern, clamp width, clamp-zone thickness, working edge length)
- Packaging and labeling requirement (part number on label, lot/batch ID)
B) Incoming inspection record (receiving)
- Date received / supplier / PO number
- Visual: burrs, warping, oxidation, contact surface condition
- Measurements: hole/slot center-to-center, slot width, clamp width, clamp-zone thickness, overall length, working edge length
- Fit check: seats square in clamp, no twist under tightening torque
- Electrical contact check (where applicable): stable contact surfaces, no arcing marks after trial
- Disposition: Accept / Hold for review / Reject (reason + photos)
Use this checklist as a binary “go/no-go” gate before purchase:
- Tool model confirmed (including voltage region and variant)
- Blade code/part number confirmed from an authoritative source
- Blade photos match your current blade (top, side, and clamp end)
- Mount interface measured (hole/slot pattern + clamp width)
- Thickness measured at the clamp/contact zone
- Adapter requirement confirmed (and adapter part number recorded)
- Electrical contact surfaces inspected (no burrs or warping)
- Material and coating documented (for corrosion and cleaning behavior)
- Incoming inspection plan defined (what you will measure on receipt)
Dica profissional: Ask for a dimensioned drawing (even a simple one) and keep it with the PO. It reduces re-order errors and makes second sourcing realistic.
Quality, life, and TCO
“Vida útil mais longa” só importa se for uma vida útil estável. Uma lâmina que dura mais, mas sai lentamente das especificações (mais arrasto, mais derretimento, mais retrabalho) ainda gera custos para você.
Ajuste de parâmetros para reduzir defeitos
A maior parte da redução de defeitos vem da diminuição da variabilidade:
- Padronize uma rotina de inicialização (tempo de aquecimento, teste de refugo no primeiro corte, verificação de alinhamento).
- Bloqueie uma janela de processo (faixa de temperatura/potência + faixa de avanço) em vez de um único setpoint.
- Rastreie os modos de defeito por causa:
- escurecimento/fumaça → excesso de calor ou tempo de permanência
- borda irregular / ondulação → alinhamento ou pressão de avanço inconsistente
- excesso de derretimento / encolhimento → zona afetada pelo calor muito ampla
Se você alterar a geometria ou a espessura da lâmina, trate isso como uma mini alteração de processo: revalide as configurações e atualize a instrução de trabalho.
Planejamento de manutenção e estoque
O TCO melhora quando as trocas de lâminas se tornam planejadas e rotineiras.
- Defina um gatilho para a troca de lâminas (ex.: acabamento da borda falha no padrão visual, desvio dimensional ou aumento no tempo de corte).
- Mantenha um estoque mínimo com base no lead time + taxa de consumo.
- Armazene as lâminas para evitar danos: proteja a extremidade de fixação e mantenha as superfícies limpas para evitar variabilidade de contato.
Estruturação de ROI e custos de ciclo de vida
Uma estrutura simples de ROI que funciona em revisões de compras:
- Custo da lâmina (preço unitário)
- Custo de setup/troca (minutos perdidos × valor da linha por minuto)
- Custo de defeitos (refugo + mão de obra de retrabalho + risco de atraso no envio)
- Custo de estoque (capital imobilizado + risco de obsolescência quando os modelos mudam)
Ao comparar fornecedores, compare a capacidade deles de apoiar essas alavancas de ciclo de vida. Por exemplo, MAXTOR METAL pode ser usado como uma ilustração neutra do que significa “engenharia de lâminas personalizadas + prontidão de fornecimento estável” na prática: um fornecedor que pode trabalhar a partir de desenhos/fotos, controlar dimensões críticas na produção e apoiar pedidos recorrentes com especificações documentadas. O ponto não é a marca — é o resultado de compras: menos surpresas de ajuste e menos compras de emergência.
Segurança e conformidade
Os termocortadores são ferramentas de calor e potência. Os POPs (Procedimentos Operacionais Padrão) mais seguros são simples, repetíveis e aplicados rigorosamente.
Checklist mínimo de conformidade
Use isso como um POP de referência. Sempre alinhe-o com o manual do fabricante da ferramenta e os requisitos de EHS do local.
Ventilação e controle de fumaça
- Usar ventilação exaustora local onde for viável e posicione a captação próxima à zona de corte.
- Mantenha a área de corte livre de resíduos acumulados que possam aumentar a fumaça/odor.
- Se os odores/fumaça aumentarem, trate isso como um sinal de mudança de processo: verifique novamente o calor, o tempo de permanência e a eficácia da ventilação.
Para exemplos práticos de controle de odor de facas quentes, consulte o site da EXAIR Ventilação de odores de corte com faca quente. Para princípios gerais, a OSHA explica como a Ventilação Exaustora Local captura contaminantes perto da fonte, e a norma da OSHA 29 CFR 1926.353 sobre ventilação descreve capelas de exaustão local para ambientes de trabalho a quente.
Isolamento de energia e disciplina na troca de lâminas
- Desconecte a energia antes de qualquer troca de lâmina ou ajuste de fixação.
- Aguarde o tempo necessário para o resfriamento; assume the clamp end retains heat.
- Use tools and torque discipline that prevent clamp distortion and blade twist.
For an example of power-isolation guidance during blade changes, refer to Abbeon’s AZTC-20 start-up and operation manual.
PPE and operator practices
- Vestir heat-resistant gloves when there is any chance of contact with hot metal.
- Keep hands clear of the blade path; stage parts so operators don’t “reach through” the cut.
- Do not bypass guards or safety interlocks; stop and correct misalignment rather than forcing the cut.
Training and documentation
- Maintain an approved list of blade codes/part numbers per tool model and adapter requirements.
- Record incoming inspection checks (critical dimensions, contact surface condition).
- Document the validated process window (power/temperature and feed) and a first-piece acceptance photo.
- Log blade changes and defect modes to support corrective actions and purchasing decisions.
Footnotes
[^a]: Model families and tool groupings (AZTC / ZETZ) are shown in Abbeon’s official Thermocutters brochures, which organize models and accessories together; see Abbeon’s Thermocutters brochure (2019) e Thermocutters brochure (2020).
[^b]: Blade options and blade code groupings are listed in Abbeon’s brochures; see Abbeon’s Thermocutter brochure (2014) e Thermocutters brochure (2019).
[^c]: Adapter/accessory compatibility notes (which adapters fit which Thermocutter models and which blade families they hold) are described in Abbeon’s brochures; see Abbeon’s Thermocutters brochure (2019) e Thermocutters brochure (2020).
[^d]: Thermocutters.com provides a public blade and adaptor catalog useful for cross-checking blade families and adaptor naming conventions: Thermocutters.com blades.
Conclusão
The fastest way to buy the wrong thermocutter blade is to treat it as a commodity. The right way is to treat it as a controlled interface between your tool, your power profile, and your material.
Key takeaways you can apply on your next order:
- Start with compatibility (model + blade code + adapters), then select geometry and thickness for your material and cut type.
- Tune heat and feed together to build a stable process window, not a fragile setpoint.
- Use a verification checklist before ordering to prevent fit-related downtime.
Final validation checklist before procurement:
- Correct tool model and voltage variant confirmed
- Blade code/part number confirmed from an authoritative source
- Mount interface measured and matched (including thickness at clamp)
- Adapter requirement confirmed and included in the order
- Incoming inspection plan documented
- Process window update planned (settings + first-piece check)
Operations handoff tips for consistent results:
- Give operators a one-page “start-up + first cut” standard.
- Define what “good edge” looks like (photo + accept/reject criteria).
- Log blade changes and defect causes so procurement decisions get better over time.
Autor
Tommy Tang — Senior Sales Engineer, Nanjing METAL Industrial
- Industry experience: 12 years supporting industrial blade selection, replacement, and procurement for production environments
- Certificações: CSE, CME, Six Sigma Green Belt, PMP
Questions or corrections: https://maxtormetal.com/contact/

 English
 Spanish
 Italian
 French
 Portuguese
 Russian
 German
 Arabic
 Hindi
 Vietnamese
 Indonesian
 Japanese
 Korean