- Warum Leistungsklassenantriebe Qualität, Geschwindigkeit und Gesamtbetriebskosten reduzieren
- Wo 100 W bzw. 400 W in Textilien, Gurtbändern, Etiketten und Schaumstoffen zum Einsatz kommen
- Wie Sie diesen Leitfaden zur Auswahl und Validierung eines industriellen Heißmessersystems verwenden
Das Schneiden mit einem industriellen Heißmesser sieht einfach aus, bis man es in größerem Maßstab durchführt.
Bei der Serienfertigung entscheidet die gewählte Leistungsklasse darüber, ob Sie bei Liniengeschwindigkeit eine rechtwinklige, versiegelte Kante erhalten – oder einen ständigen Kreislauf aus Verlangsamung, Wulstbildung, Rauchentwicklung und Produktwechseln.
Dieser Leitfaden konzentriert sich auf zwei gängige Klammern –100-W-Heißmesser Systeme und 400-W-Heißmesser Es erklärt die Systeme und zeigt, wie Sie diese an Ihre Materialzusammensetzung, Ihren Produktionszyklus und Ihre Qualitätsziele anpassen. Anschließend erhalten Sie einen Validierungsansatz, den Sie an Ihrer eigenen Produktionslinie testen können, bevor Sie die Systeme standardisieren.
EU-Erstvermerk (CE/EN/IEC): Dieser Leitfaden richtet sich an Produktions- und Maschinenintegrationsumgebungen mit EU-Bezug. Überprüfen Sie ihn stets anhand Ihrer standortspezifischen Risikobewertung und der geltenden EU-Richtlinien/EN-Normen sowie der lokalen Anforderungen in Ihrem Land.
Sicherheitshinweis (wichtig): Das Schneiden mit heißen Messern kann gesundheitsschädliche Dämpfe erzeugen und birgt Verbrennungs- und Maschinengefahren. Dieser Artikel dient lediglich der allgemeinen Orientierung und stellt keine Rechts- oder Sicherheitsberatung dar. Setzen Sie geeignete Schutzmaßnahmen (Belüftung, Schutzvorrichtungen, Verriegelungen, Standardarbeitsanweisungen) entsprechend Ihrem Prozess, den verwendeten Materialien und den gemessenen Expositionsdaten um.
Hinweis: Diese Seite nennt möglicherweise Lieferanten (einschließlich MAXTOR METAL) als Beispiel für die Standardisierung von Klingen und die einheitliche Ersatzteilversorgung. Sie sollten jeden Lieferanten anhand Ihrer eigenen technischen und Compliance-Anforderungen qualifizieren.
Machtklassen im Überblick
Für einen industrielles HeißmessersystemDie schnellste Möglichkeit, die Optionen einzugrenzen, besteht darin, die Leistung an den Wärmebedarf pro Abschaltung und die benötigte Rückgewinnung im stationären Zustand anzupassen.
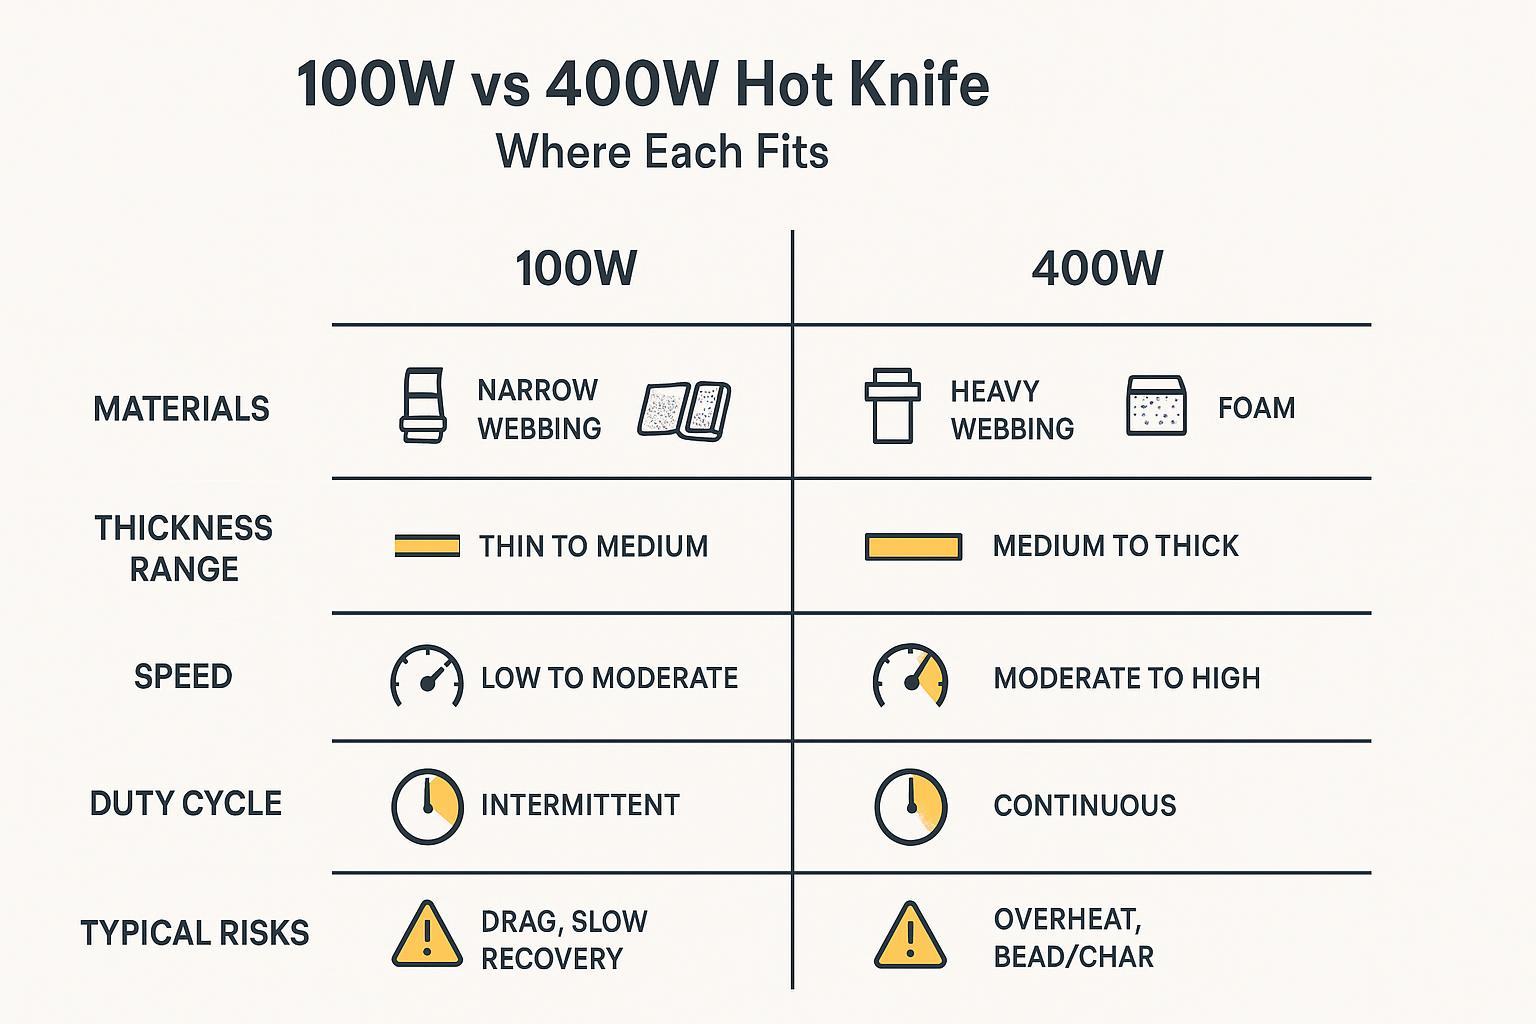
100-W-Leistung und -Grenzen
Ein 100-Watt-System spielt seine Stärken typischerweise dann aus, wenn Ihr Prozess zeitweise und Ihr Schnitt ist kurz:
- Leichte Textilien, schmale Gurtbänder, Etiketten und Heißmesser schneidet Gurtband Anwendungen, bei denen die Schnittlänge kurz und wiederholbar ist
- Kurzer Wärmeweg (geringere Klingenlänge im Schnittbereich)
- Niedrigere Einschaltdauer, bei der die Klinge zwischen den Schnitten Zeit zur Erholung hat.
Die Grenzen von 100W liegen üblicherweise nicht nur in der „Dicke“. Es ist thermische Rückgewinnung.
Wenn sich Ihre Klinge schneller abkühlt als sie sich wieder erhitzt, werden Sie dasselbe Muster beobachten: Die ersten Schnitte sehen gut aus, dann driftet das System in den Schleifen, ungleichmäßige Wulst oder unvollständige Abdichtung es sei denn, der Bediener verlangsamt die Geschwindigkeit oder erhöht die Temperatur (was oft zu verstärkter Rauchentwicklung und Verfärbungen führt).
400-W-Leistung und Grenzen
Für die meisten Anwendungen wird ein System der 400-Watt-Klasse gewählt. höherer Durchsatz und höherer Wärmebedarf pro Schnitt:
- Breiteres oder dickeres Gurtband
- Dichte Textilien, Lagenstapel und robustere Synthetikmaterialien
- Schaumstoff dort, wo gleichmäßiges Eindringen ohne Reißen erforderlich ist.
- Arbeiten mit hohem Arbeitszyklus, bei denen die Erholungszeit begrenzt ist
Der Vorteil liegt in der Spielraumoptimierung: schnellere Aufheizzeit und bessere Erholung unter Last.
Der Nachteil ist, dass man mit mehr Leistung schneller eine Überhitzung erreichen kann. Das kann sich äußern als Randrückgang bei Schaumstoffen, übermäßige Perlengröße, Verfärbungoder Rauch, wenn Temperaturregelung und Luftstrom nicht für die Produktion ausgelegt sind.
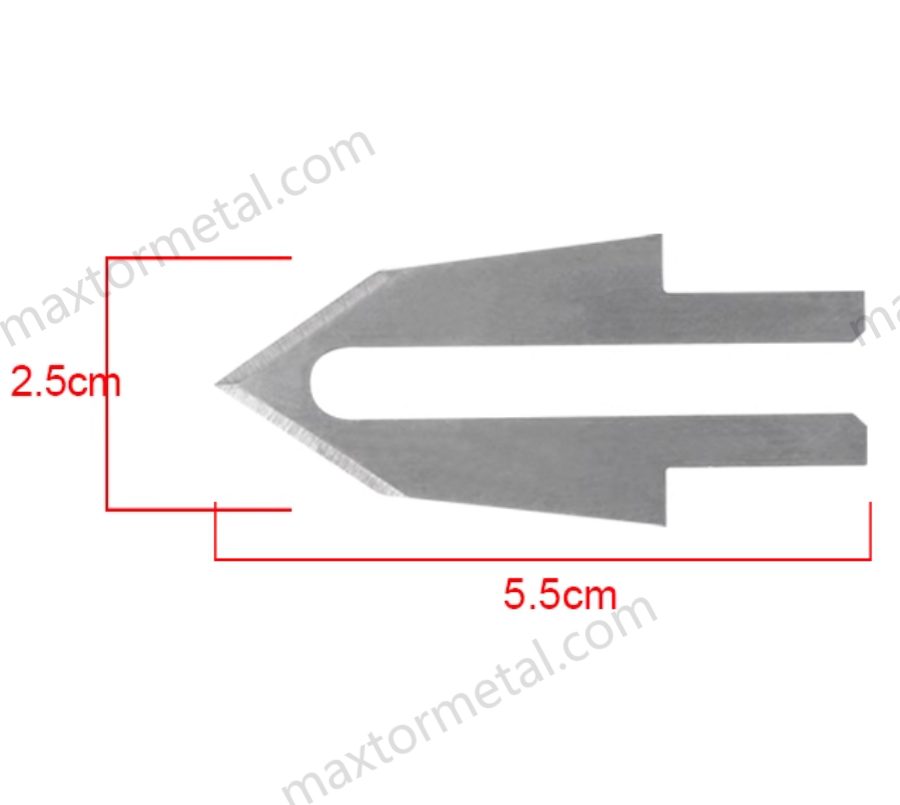
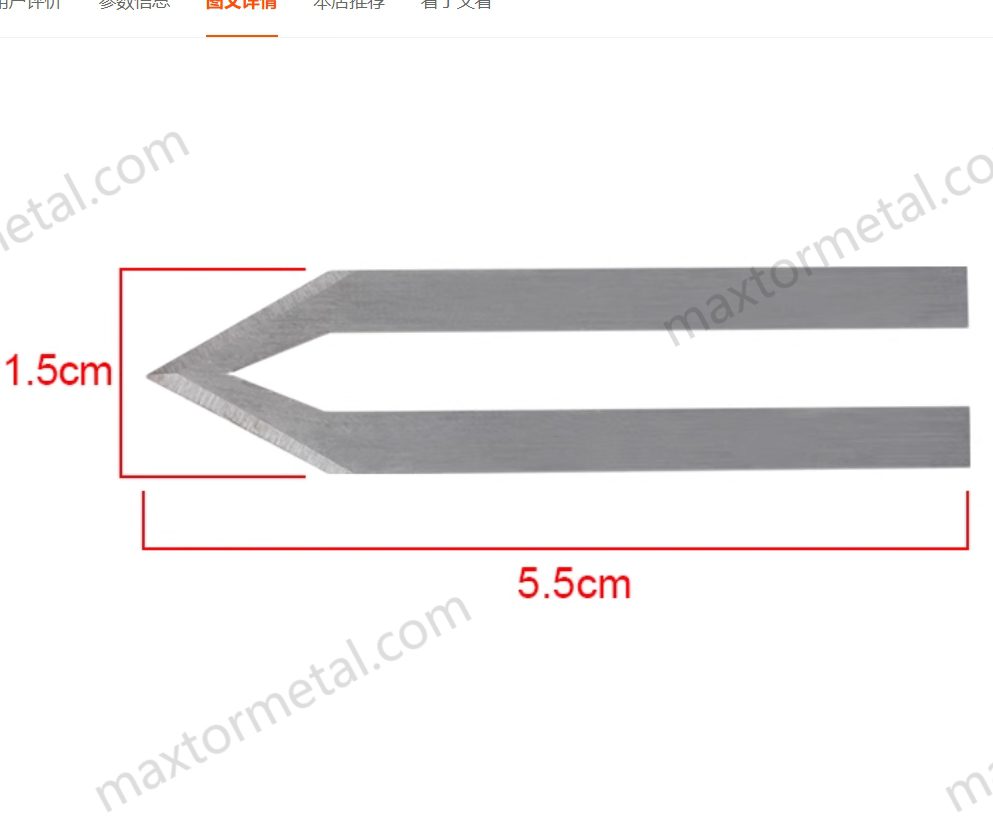
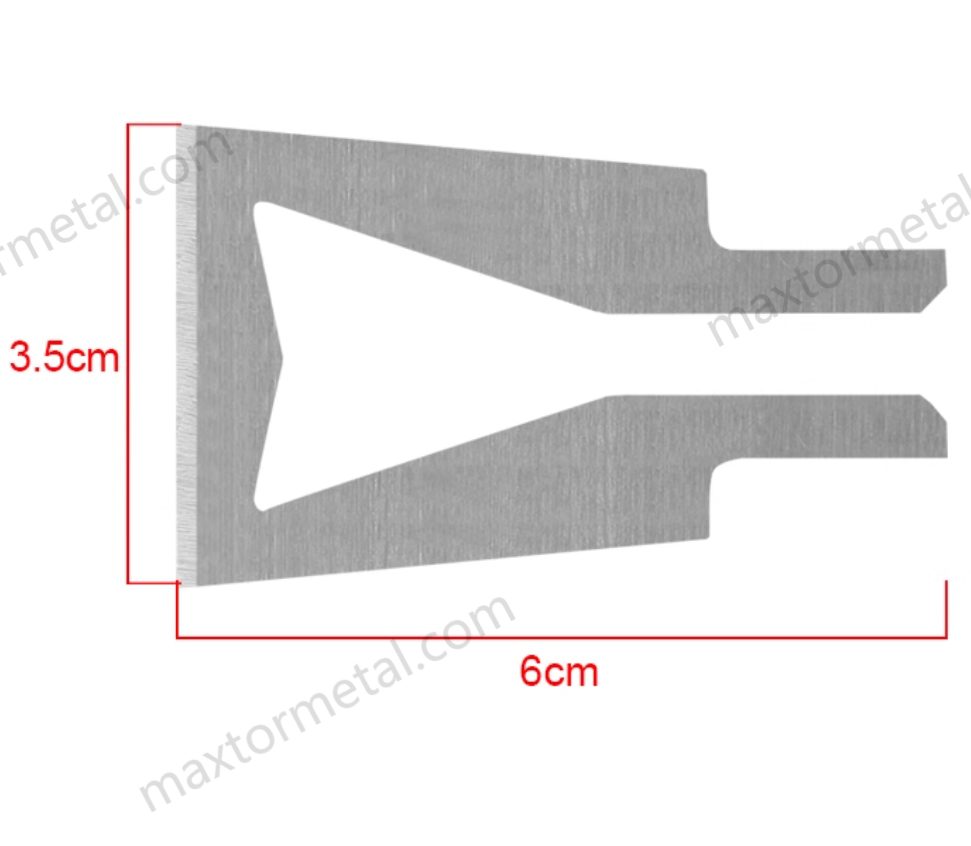
Anpassung von Schaufelmasse und -geometrie an die Leistung
Leistungsklasse und Klingenwahl sind untrennbar miteinander verbunden.
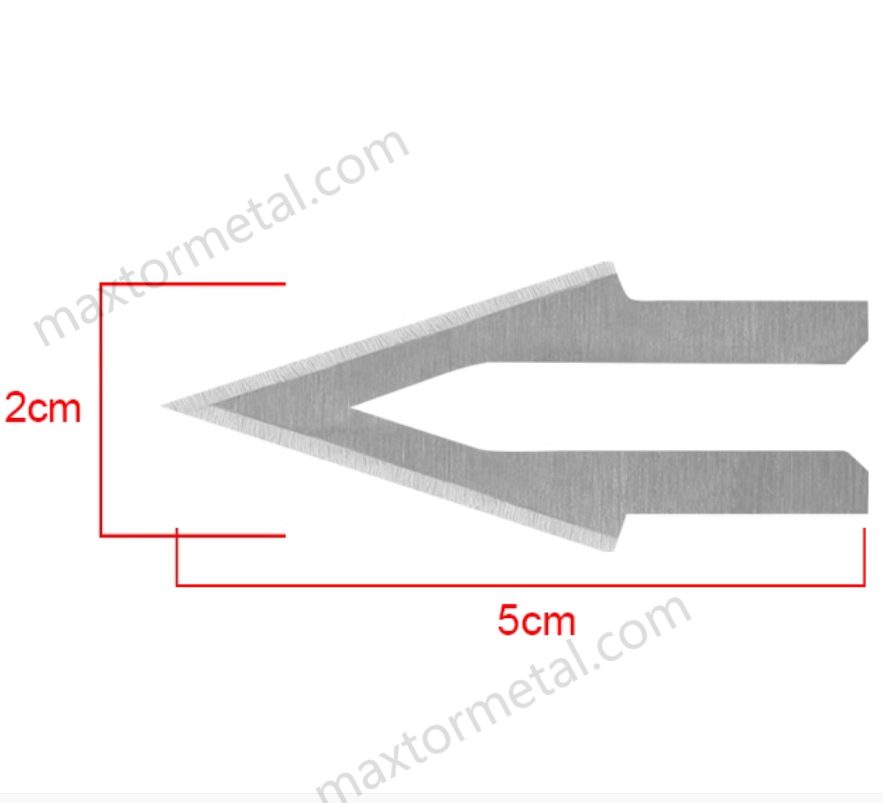
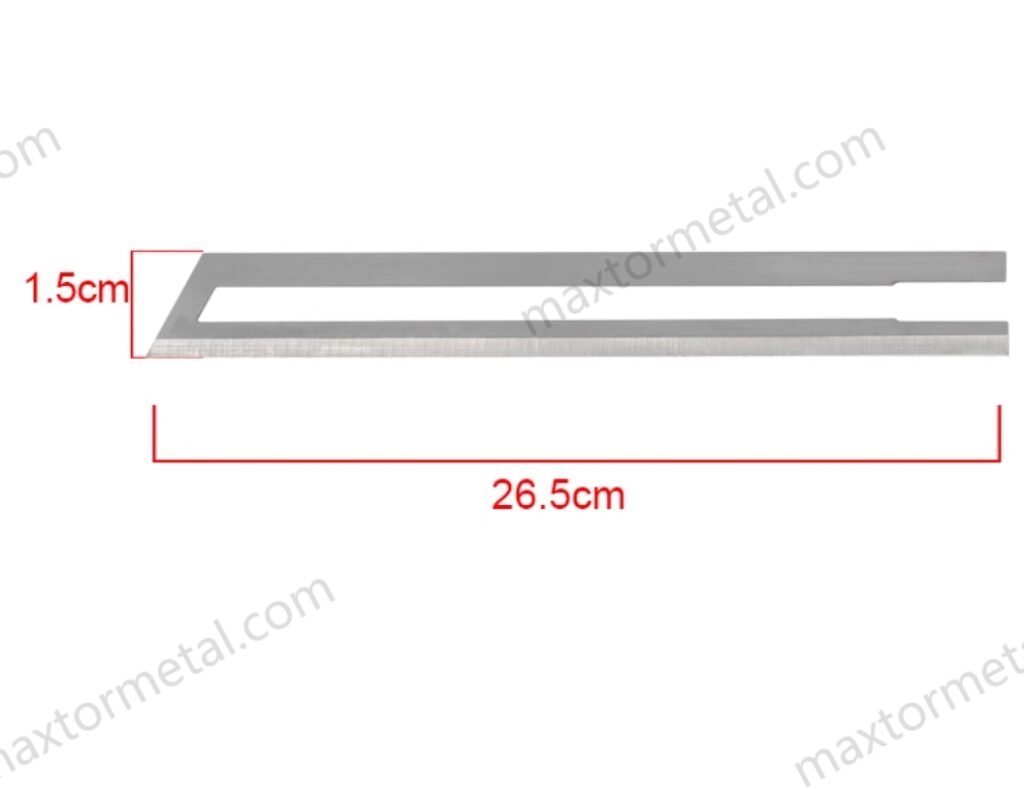
Heißmesser sind so konstruiert, dass sie die Wärme entlang der Schneide konzentrieren. Die Temperaturen der Klinge vor dem Einsetzen können je nach Klingentyp und System stark variieren. Die Klinge kühlt beim Eintritt in das Material ab, und die thermischen Eigenschaften des Materials beeinflussen die Schnittgeschwindigkeit und das Temperaturverhalten (wie im Abschnitt „…“ beschrieben). Auslegung von Thermoschneidklingen und Temperaturbereichsrichtlinien).
In der Praxis:
- Höhere Klingenmasse Gleicht Temperaturschwankungen aus, benötigt aber mehr Energie für eine schnelle Wiederherstellung.
- Längere Schneidkantenverriegelung (Mehr Klinge im Schnittbereich) erhöht die Wärmeaufnahme.
- Geometrie (Haken-, Schräg-, Doppelkanten-, verstärkter Flansch) beeinflusst die Materialzufuhr und ob der Schnitt rechtwinklig bleibt.
Bei Verwendung eines schweren Sägeblatts mit geringer Leistung läuft das System im Leerlauf stabil, verliert aber bei kontinuierlichem Schneiden an Leistung. Verwendet man hingegen ein leichtes Sägeblatt mit hoher Leistung, kann die Temperatur schnell überhitzen und Material verbrennen, das eigentlich versiegelt werden sollte.
Auswahlrahmen
Materialaufbau und Dicke/Dichte definieren
Beginnen Sie mit dem tatsächlichen Zuschnittzustand – nicht mit einer einzelnen „Materialbezeichnung“. Dokumentieren Sie:
- Materialart (Textil, Gurtband, Etikettenmaterial, Schaumstoff)
- Lagenaufbau (einlagig vs. mehrlagig)
- Dicke und Dichte (insbesondere bei Schäumen)
- Additive/Beschichtungen (oft die eigentliche Ursache für Rauch, Geruch und Verfärbungen)
Bei gleicher nomineller Dicke kann sich das Material sehr unterschiedlich verhalten, wenn eine Rolle dichter gewebt ist, eine andere Harzbeschichtung aufweist oder die Wärme anders speichert.
Entscheidungsabkürzung: Wenn Sie regelmäßig mehrlagige Materialstapel, breite Gurte oder dichten Schaumstoff schneiden, sollten Sie mit einer größeren Rückstellreserve rechnen und frühzeitig eine Leistung von 400 W in Betracht ziehen. Bei schmalen, dünnen und nur gelegentlichen Arbeiten können 100 W ausreichen – vorausgesetzt, die Temperaturregelung ist stabil.
Zielliniengeschwindigkeit und Arbeitszyklus einstellen
Zwei Fragen sind wichtiger als die Spitzenleistung:
- Wie viele Schnitte pro Minute benötigen Sie im stationären Zustand?
- Wie lange bleibt das Sägeblatt bei jedem Schnitt im Material (effektive Verweilzeit)?
Ein System der 100-Watt-Klasse arbeitet bei moderater Schnittleistung gut, solange das Sägeblatt genügend Zeit zur Erholung hat. Bei höheren Einschaltdauern wird der Prozess jedoch durch die Erholungsphase begrenzt: Das Sägeblatt geht kühler in den nächsten Schnitt, was entweder einen langsameren Vorschub oder einen höheren Sollwert erfordert.
Ein System der 400-Watt-Klasse wird oft gewählt, wenn man es sich nicht leisten kann, zwischen den Schnitten auf die richtige Temperatur zu warten.
Wichtigste ErkenntnisDie Leistung nicht anhand des ersten Schnitts bemessen. Die Leistung anhand des zweiten Schnitts bemessen. 100. Schnitt bei Ihrem angestrebten Arbeitszyklus.
Temperaturregelung und Wärmerückgewinnung aufeinander abstimmen
Für die Produktion reicht ein Blick über das Zifferblatt hinaus nicht aus.
Sie benötigen einen Regelkreis, der Folgendes kann:
- Temperatur konstant halten mit minimalem Überschwingen (reduziert das Perlenwachstum und die Verfärbung)
- Schnelle Wiederherstellung nach jedem Schnitt (reduziert Abweichungen und Bedienerkorrekturen)
- Bleibt auch bei wechselnden Luftströmungen stabil (die Rauchabsaugung kann die Klinge kühlen).
Prüfen Sie außerdem, wie und wo die Temperatur gemessen wird. Ein Regler kann am Sensor zwar „genau“ sein, aber dennoch eine ungleichmäßige Schnittqualität liefern, wenn die Klingenspitze starken Temperaturschwankungen ausgesetzt ist.
Natürlicher Markenhinweis (einmalig): Wenn Ihre Produktionslinie von einer nicht standardisierten Klingenform, Montagefläche oder Schneidengeometrie abhängt, wird die Versorgungssicherheit Teil der Qualitätskontrolle. In der Praxis reduzieren Teams das Qualifizierungsrisiko, indem sie Zeichnungen/Toleranzen standardisieren und mit einem Lieferanten wie beispielsweise [Name des Lieferanten einfügen] zusammenarbeiten. MAXTOR METAL das unterstützt Maßgefertigte Industrieklingen nach Zeichnungen oder Skizzen So bleibt die Qualität der Ersatzklingen von Charge zu Charge gleich.
Schnittqualität und Prozesskontrolle
Dichtigkeit und Rechtwinkligkeit der versiegelten Kanten
„Gute Schnittqualität“ bedeutet in der Regel zwei Dinge:
- Die Kante ist ausreichend versiegelt, um ein Ausfransen oder Herausziehen von Fasern zu verhindern (bei Synthetikfasern und Gurtbändern).
- Der Schnitt ist so rechtwinklig, dass nachfolgende Arbeitsschritte (Nähen, Kleben, Stapeln) nicht zu Abweichungen führen.
Macht beeinflusst beides, aber indirekt.
Mehr Leistung bietet mehr Spielraum bei der Rückstellkraft und Geschwindigkeit. Sie garantiert jedoch nicht automatisch eine bessere Abdichtung. Eine heiße, instabile Kante kann Ecken abrunden, Schaumstoffzellen verformen oder eine große Wulst bilden, die die Passform beeinträchtigt.
Umgang mit Verfärbungen, Rauch und Perlengröße
Wenn Sie mit Verfärbungen und Rauch zu kämpfen haben, behandeln Sie dies als ein Problem der Wärmezufuhr und der Belüftung:
- Den Sollwert senken und die effektive Verweilzeit erhöhen. (wenn möglich) anstatt mit maximaler Temperatur zu arbeiten.
- Futterkonsistenz erhöhenUngleichmäßiger Druck und ungleichmäßiger Zufuhrwinkel führen zu lokaler Überhitzung.
- Halten Sie die Kante sauberRückstände wirken wie eine Isolierung und verändern die Wärmeübertragung in das Material.
Eine gute Belüftung ist wichtig, da beim Heißschneiden Dämpfe aus Polymeren, Lacken und Klebstoffen entstehen können.
Ein praktischer Richtwert ist Heißmesserrauchabsaugung das den Rauch direkt an der Quelle erfasst, anstatt ihn im Raum zu verdünnen. Die OSHA-Richtlinien zur Kontrolle gefährlicher Dämpfe betonen Lokale Abluftanlage in der Nähe der Quelle positioniertDie Erfassung ist am effektivsten, wenn die Haube/Düse nahe an der Rauchfahne gehalten wird (siehe OSHA-Leitfaden zur Platzierung lokaler Abluftanlagen).
Bei der Festlegung von Überwachungs- und Kontrollstrategien beziehen sich viele Programme zur Arbeitshygiene bei der Festlegung von Expositionszielen auf TLVs/BEIs als gesundheitsbasierte Richtwerte (nicht auf gesetzliche Grenzwerte). ACGIH-TLV/BEI-Richtlinien.
Auswirkungen auf Klingenverschleiß, Umrüstungen und Betriebszeit
Klingenverschleiß äußert sich selten durch einen sauberen Ausfall. Er zeigt sich durch Abweichungen:
- mehr Luftwiderstand an der Schnittstelle
- wachsende Perlengröße
- aufsteigender Rauch und Verfärbung
- häufigere manuelle Anpassungen der Einstellungen durch den Bediener
Umrüstungen sind ein OEE-Thema, keine Randnotiz in der Instandhaltung. Nachverfolgen:
- Schnitte pro Klinge (oder Stunden) bis zum Erreichen der Qualitätsschwelle
- Umschaltzeit (einschließlich Aufheiz-/Stabilisierungsphase)
- Ausschussquote gegen Ende der Lebensdauer
Wenn eine höhere Leistungsklasse die Umrüstungen reduziert, indem sie ein stabiles Schneiden bei geringerer Belastung ermöglicht (geringeres Überschwingen, weniger Bedienerkompensation), kann sie sich in Bezug auf die Gesamtbetriebskosten auch bei höherem Energieverbrauch durchsetzen.
Grundlagen für Sicherheit und Compliance
Belüftung und Expositionskontrollen (OSHA/ACGIH)
Das Heißmesserschneiden sollte zumindest als ein raucherzeugender Vorgang betrachtet und entsprechende Kontrollmaßnahmen zur Absaugung der Abgasquellen vorgesehen werden.
- Priorisieren Sie die lokale Absaugung in der Nähe der Schnittzone; das OSHA-Prinzip der Quellenerfassung ist klar dargelegt in OSHA-Leitfaden zur Platzierung lokaler Abluftanlagen (siehe das OSHA-Informationsblatt, das weiter oben in diesem Artikel verlinkt ist).
- Wenden Sie Expositionsbewertungs- und Überwachungsverfahren an, die auf Ihr Standortprogramm abgestimmt sind; TLVs/BEIs sind gängige Richtwerte für Arbeitsmediziner, wie in [Referenz einfügen] beschrieben. ACGIH-TLV/BEI-Richtlinien (siehe Link weiter oben in diesem Artikel).
Elektrische Anlagen und Schutzeinrichtungen (UL/NFPA/CE-Grundlagen)
Bei Produktionsanlagen ist die Heißmesserstation als Industriemaschine zu behandeln:
- Die elektrische Konstruktion und Dokumentation sollten den Erwartungen der Normen für Industriemaschinen entsprechen; in Nordamerika. NFPA 79 (Elektrischer Standard für Industriemaschinen) ist ein gemeinsamer Bezugspunkt.
- Viele Maschinenbauer orientieren sich an den IEC/EN-Prinzipien; IEC 60204-1 Elektrische Ausrüstung von Maschinen stellt umfassende Anforderungen an die elektrische Ausrüstung von Maschinen.
Wenn Sie in die EU/den EWR liefern, ist die CE-Kennzeichnung eine systemweite Verantwortung (Risikobewertung, Dokumentation, Konformität). Ein praktischer Ausgangspunkt ist die Übersicht der EU zu CE-Kennzeichnung. Anforderungen an die CE-Kennzeichnung und der Europäischen Kommission Überblick über die Einhaltung der Maschinenvorschriften.
Verriegelungen, Not-Aus-Schalter und SOP-Dokumentation
Leistungsklassenentscheidungen sind nutzlos, wenn ein sicherer Betrieb nicht durchgängig gewährleistet ist.
Für jede Station, die mit hoher Geschwindigkeit genutzt wird:
- Schützen Sie die Gefahrenzone und definieren Sie sichere Zugangspunkte.
- Verwenden Sie Verriegelungen dort, wo beim Öffnen einer Schutzvorrichtung eine heiße Kante oder ein sich bewegender Zufuhrbereich freigelegt wird.
- Sorgen Sie für einen Not-Aus-Schalter, der sowohl vom Bedienerplatz als auch vom Be- und Entladebereich aus erreichbar ist.
- Dokumentieren Sie die Standardarbeitsanweisung (SOP): Inbetriebnahme, Aufwärmen/Stabilisierung, Parameteränderungen, Reinigung, Schaufelwechsel, Belüftungsprüfungen und Abschaltung.
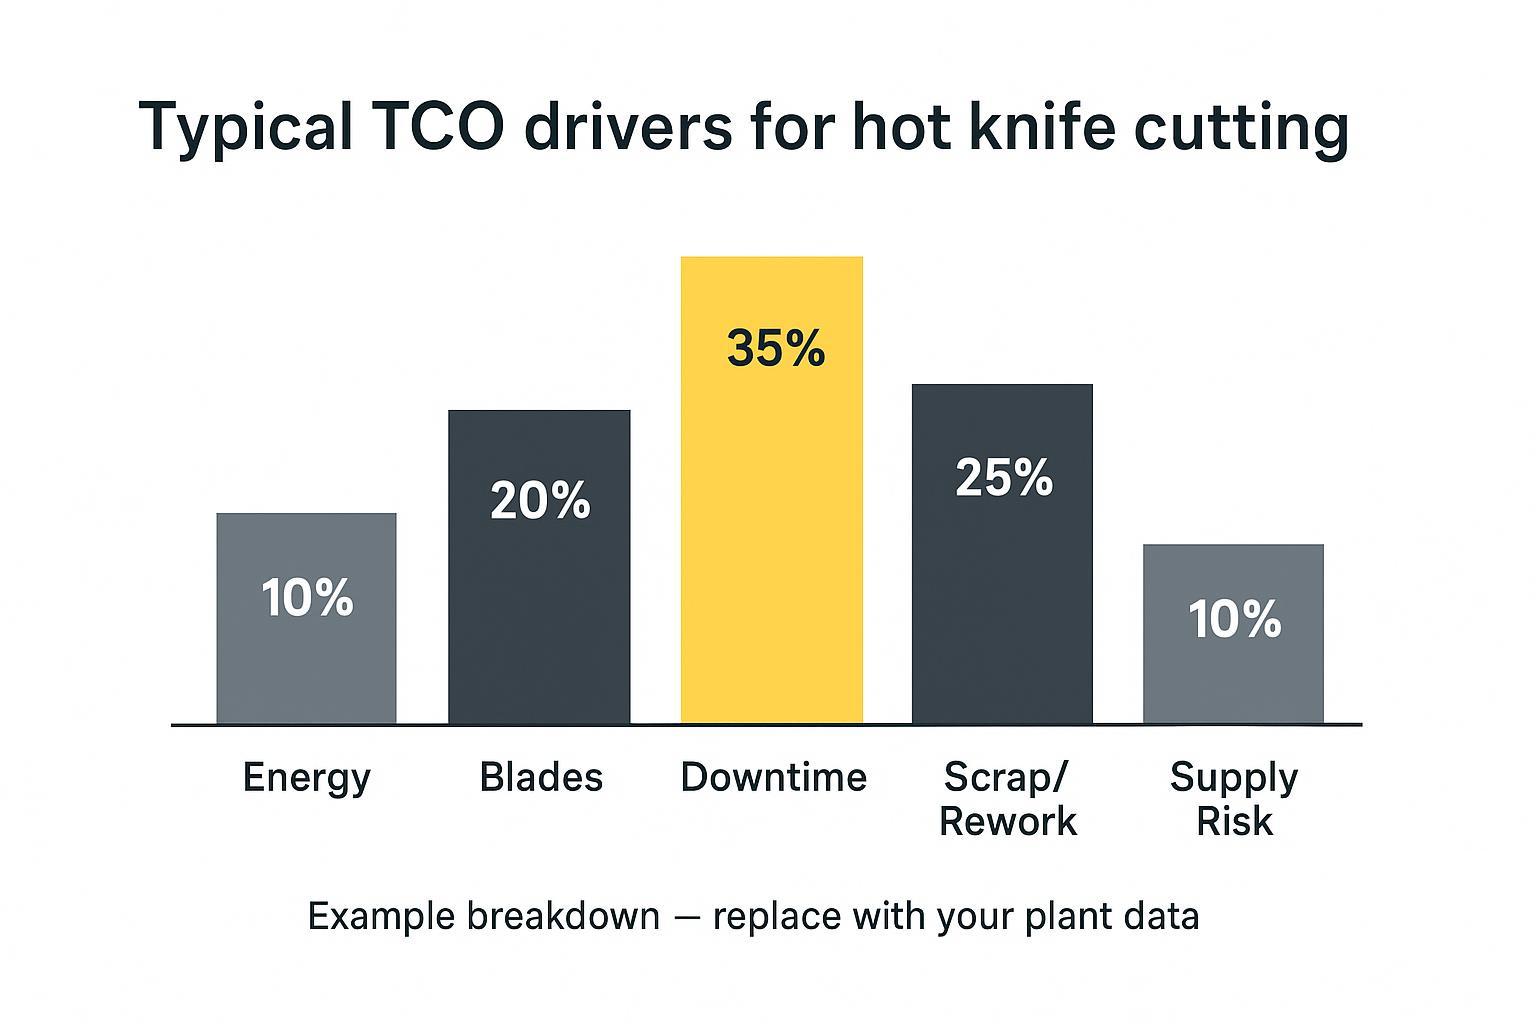
TCO- und ROI-Hebel
Energieverbrauch im Vergleich zu Durchsatz und Ausschuss
Energie ist in der Regel nicht der dominierende Kostenfaktor. Der dominierende Kostenfaktor ist das, was durch Energie ermöglicht wird:
- Zykluszeit
- Stabilität bei hoher Geschwindigkeit
- Reduzierung von Ausschuss und Nacharbeit
Wenn 400 W es Ihnen ermöglichen, mit der Zielgeschwindigkeit zu arbeiten, ohne zu überhitzen (stabile Regelung, richtiges Rotorblatt), kann der kWh-Anstieg gering sein im Vergleich zum Wert der reduzierten Ausfallzeiten und des Ausschusses.
Lebensdauer der Klingen, Ausfallzeiten und Lagerkosten
Modellblattkosten als Systemkosten, nicht als Stückkosten:
- Klingenpreis × Nutzungsrate
- Ausfallzeit pro Umrüstung × Leitungskosten
- Lagerhaltungspolitik (Sicherheitsbestand vs. Expressbestellungen)
Ein System mit niedrigerer Wattzahl, das häufigere Änderungen zur Aufrechterhaltung der Qualität erfordert, kann teurer sein als ein System mit höherer Wattzahl, das konstant läuft.
Lieferrisiko, Lieferzeit und Qualifizierungsversuche
Wenn Ihre Klinge nicht dem Standard entspricht, wird das Lieferrisiko zu einem Produktions-KPI.
Behandeln Sie die Qualifizierung wie eine kontrollierte Studie:
- Zeichnung und Toleranzstapel sperren
- die Spezifikationen für Klingenmaterial und Wärmebehandlung qualifizieren
- Konsistenz der Passform und des Kantenverhaltens über mehrere Chargen hinweg validieren
Hier kommt es auch auf die Lieferzeit an: Wenn man die Klingen nicht planbar nachbestellen kann, muss man entweder mit einem Überschuss an Lagerbeständen leben oder das Risiko von Ausfallzeiten in Kauf nehmen.
Implementierung und Validierung
Führen Sie repräsentative Materialversuche durch und protokollieren Sie die Parameter.
Die Leistungsklasse sollte nicht auf einem einzigen „Best-Case“-Wurf basieren.
Stellen Sie ein Testpaket zusammen, das Folgendes beinhaltet:
- ungünstigste Dicke und Dichte
- alle beschichteten/klebenden Varianten
- repräsentative Stapel
Protokoll:
- Sollwert und Aufwärmzeit
- Schnittrate (Schnitte/min oder Vorschubgeschwindigkeit)
- Tastverhältnisprofil (Dauerbetrieb vs. Impulsbetrieb)
- Lüftungseinstellung (Änderungen des Luftstroms können das thermische Verhalten beeinflussen)
- Geometrie und Zustand der Klinge
Akzeptanzkriterien: Dichtigkeit, Rechtwinkligkeit, Verfärbung, Rauchindex
Vorlage für das Prozessprotokoll (Kopieren/Einfügen)
Verwenden Sie eine einfache Tabelle, damit in jeder Schicht dieselben Felder protokolliert werden:
| Artikel | Was aufgezeichnet werden soll | Beispiel |
|---|---|---|
| Material & Stapelaufbau | Materialbezeichnung, Schichten, Dicke/Dichte, Beschichtungen | 2-lagiges Gurtband, 1,8 mm, PU-beschichtet |
| Leistungsklasse & Klinge | 100 W/400 W, Schaufelgeometrie, Schaufelmasse (falls bekannt) | 400 W, Hakenklinge, 2,0 mm Schneide |
| Sollwert und Stabilisierung | Sollwert, Aufwärmzeit, Stabilisierungszeit | 420 °C, 6 Minuten aufwärmen, 3 Minuten stabilisieren. |
| Tastverhältnis | Schnitte/min, Verweilzeit, Dauerbetrieb vs. Impuls | 30 Schnitte/min, 0,6 s Verweilzeit, konstant |
| Belüftung | Erfassungsmethode und Einstellungen | LEV-Düse 80 mm von der Schnittzone entfernt |
| Qualitätsergebnisse | Dichtungsqualität, Rechtwinkligkeitstoleranz, Verfärbungsgrad, Rauchindex | Dichtung A, ±1°, ΔE < 2, Rauch 2/5 |
| Hinweise | Rückstände, Wulstbildung, Bedienereinstellungen | Alle 30 Minuten reinigen. |
Schnelle Fehlerbehebung (häufigste Driftmuster)
- Die Perlengröße nimmt mit der Zeit zu: Überschwingen der Schaufeltemperatur oder isolierende Rückstände an der Kante → Sollwert senken, Regelung verbessern, Reinigungsfrequenz erhöhen, Zufuhrgleichmäßigkeit überprüfen.
- Rauch-/Geruchsspitzen: Sollwert zu hoch für Beschichtungen/Klebstoffe oder Erfassung zu weit von der Quelle entfernt → Sollwert reduzieren, Erfassung näher heranbringen, sicherstellen, dass der Luftstrom während des Schneidens stabil ist.
- Unvollständige Versiegelung / Ausfransungen treten bei hoher Geschwindigkeit auf: Erholung begrenzt (Sägeblatt tritt kühler in den Schnitt ein) → Leistungsklasse erhöhen, Einschaltdauer reduzieren, Eingriffslänge verkürzen oder eine Sägeblattgeometrie verwenden, die die Wärme an der Schneide konzentriert.
- Schaumstoffkantenrückgang / Zurückschmelzen: zu hohe Wärmezufuhr oder Verweilzeit → Sollwert senken, Vorschubgeschwindigkeit erhöhen, Temperaturstabilität verbessern, Schaufelgeometrie für Schaum validieren.
Definieren Sie die Akzeptanzkriterien, bevor Sie Tests durchführen. Praktische Kennzahlen sind beispielsweise:
- Siegel: Ausfransfestigkeitsprüfung und Kantenzugprüfung, geeignet für Ihr Produkt
- Rechtwinkligkeit: Schnittwinkeltoleranz und Kantengeradheit über eine definierte Länge
- Verfärbung: visueller Standard (A/B-Muster) oder ΔE-Schwellenwert, falls Sie die Farbe messen
- Rauchindex: einfache, für den Bediener sichtbare Bewertung plus Überprüfung der Effektivität der Belüftungserfassung
Entscheidend ist die Wiederholbarkeit: Das System sollte die Qualität im angestrebten Arbeitszyklus ohne ständige manuelle Anpassungen aufrechterhalten.
Übergabe: Standardarbeitsanweisungen, Wartung und Schulungsplan
Wenn Sie standardisieren, frieren Sie den Prozess ein:
- Standardarbeitsanweisung mit Parameterbereichen und Grenzwerten, die nicht überschritten werden dürfen
- Wartungsplan (Reinigung, Inspektion, Auslöser für Umrüstungen)
- Schulung für den Normalbetrieb und für Störfälle (Rauchspitzen, Abdrift, Beschädigung der Klinge).
- Ersatzteilliste und Nachbestellstellen
Schlussfolgerung
Falls Sie eine einfache Regel benötigen: 100 W eignet sich für intermittierende, leichtere Arbeiten, bei denen eine Wiederherstellungszeit vorhanden ist; 400 W eignet sich für höhere Einschaltdauer und höhere Wärmeaufnahme, bei denen Sie sich keine Abweichungen leisten können. Die richtige Entscheidung kommt aber von stationärer Arbeitszyklus und Akzeptanzmetriken, nicht der erste Schnitt oder das Namensschild.
Wichtigste Erkenntnisse (umsetzbare Hinweise)
- Größe Leistung für Thermische Rückgewinnung unter Last: Qualität bestätigen auf 100. Schnitt mit der Zielgeschwindigkeit.
- Betrachten Sie das System als eine Menge: Leistungsklasse + Schaufelmasse/Geometrie + Temperaturregelung + Belüftung.
- Rauchkontrolle als technisches System: Quellerfassung Überprüfen Sie zunächst Ihr Website-Präsentationsprogramm.
- Standardisieren Sie erst nach einer repräsentativen Testpackung und klaren Bestehens-/Nichtbestehenskriterien.
Checkliste für die nächsten Schritte (führen Sie diese auf Ihrer Linie aus)
- Worst-Case-Materialien definieren: dickste/dichteste Schichtanordnung, alle Beschichtungen/Klebstoffe.
- Legen Sie ein Tastverhältnis-Ziel fest: Schnitte/min, Verweilzeit und Schaltprofil (konstant vs. stoßweise).
- Führe A/B-Versuche durch (100 W oder 400 W, falls Sie sich nicht sicher sind) mit möglichst gleicher Flügelgeometrie.
- Protokollparameter: Sollwert, Aufwärmzeit, Schnittgeschwindigkeit, Belüftungseinstellung und Klingenzustand.
- Güteklasse: Siegel, Rechtwinkligkeit, Verfärbung und ein einfacher Rauchindex.
- Sichern Sie sich die Gewinnerkonfiguration: Parameterfenster, Reinigungsintervall, Auslöser für den Klingenwechsel und Zeichnung/Toleranzen für die Wiederholgenauigkeit der Versorgung.
Autor: Das MAXTOR METAL Prozessentwicklungsteam (Industrieklingen & Warmschneidanwendungen) verfügt über mehr als 15 Jahre Erfahrung in der Unterstützung von OEMs und Endanwendern bei kundenspezifischen, präzisionsgeschliffenen Klingen und der Qualifizierung von Ersatzklingen.
Qualität und Inspektion: MAXTOR METAL wendet einen dokumentierten Qualitätskontrollprozess an, der die Materialprüfung, die Fertigungsbegleitenden Kontrollen und die Endkontrolle umfasst. (Falls Sie formale Zertifizierungen wie ISO 9001 besitzen, geben Sie hier bitte die Zertifikatsnummer und den Geltungsbereich an.)
Referenzen und Standards (Ausgangspunkte)
- OSHA: Prinzip der Platzierung lokaler Abluftanlagen (Leitfaden zur Quellenerfassung): https://www.osha.gov/sites/default/files/publications/OSHA_FS-3647_WELDING.pdf
- ACGIH: Überblick über die TLVs/BEIs-Richtlinien: https://www.acgih.org/science/tlv-bei-guidelines/
- NFPA 79 (Elektrik von Industriemaschinen): https://www.nfpa.org/product/nfpa-79-standard/p0079code
- IEC 60204-1 (Elektrische Ausrüstung von Maschinen): https://webstore.iec.ch/en/publication/26037
- Überblick über die CE-Kennzeichnung der EU: https://europa.eu/youreurope/business/product-requirements/labels-markings/ce-marking/index_en.htm
- Überblick der Europäischen Kommission über die Einhaltung der Vorschriften für Maschinen: https://single-market-economy.ec.europa.eu/sectors/mechanical-engineering/machinery_en
Revisionshistorie
- 26.04.2026: Erstveröffentlichung.