

- Why power class drives cut quality, speed, and TCO
- Where 100W vs 400W fits across textiles, webbing, labels, and foams
- How to use this guide to select and validate an industrial hot knife system
Industrial hot knife cutting looks simple until you scale it.
At production volume, the power class you pick determines whether you get a square, sealed edge at line speed—or a constant cycle of slowdown, bead buildup, smoke complaints, and changeovers.
This guide focuses on two common brackets—100W hot knife systems and 400W hot knife systems—and shows how to match them to your material stack-up, duty cycle, and quality targets. Then it gives you a validation approach you can run on your own line before you standardize.
EU-first note (CE/EN/IEC): This guide is written for EU-facing production and machine integration contexts. Always validate against your site-specific risk assessment and the applicable EU directives/EN standards, as well as local requirements in your country.
Safety disclaimer (important): Hot knife cutting can generate hazardous fumes and involves burn and machinery hazards. This article provides general guidance only; it is not legal or safety advice. Implement controls (ventilation, guarding, interlocks, SOPs) based on your process, materials, and measured exposure data.
Thông báo: This page may mention suppliers (including MAXTOR METAL) as an example for blade standardization and replacement consistency. You should qualify any supplier based on your own technical and compliance requirements.
Power classes at a glance
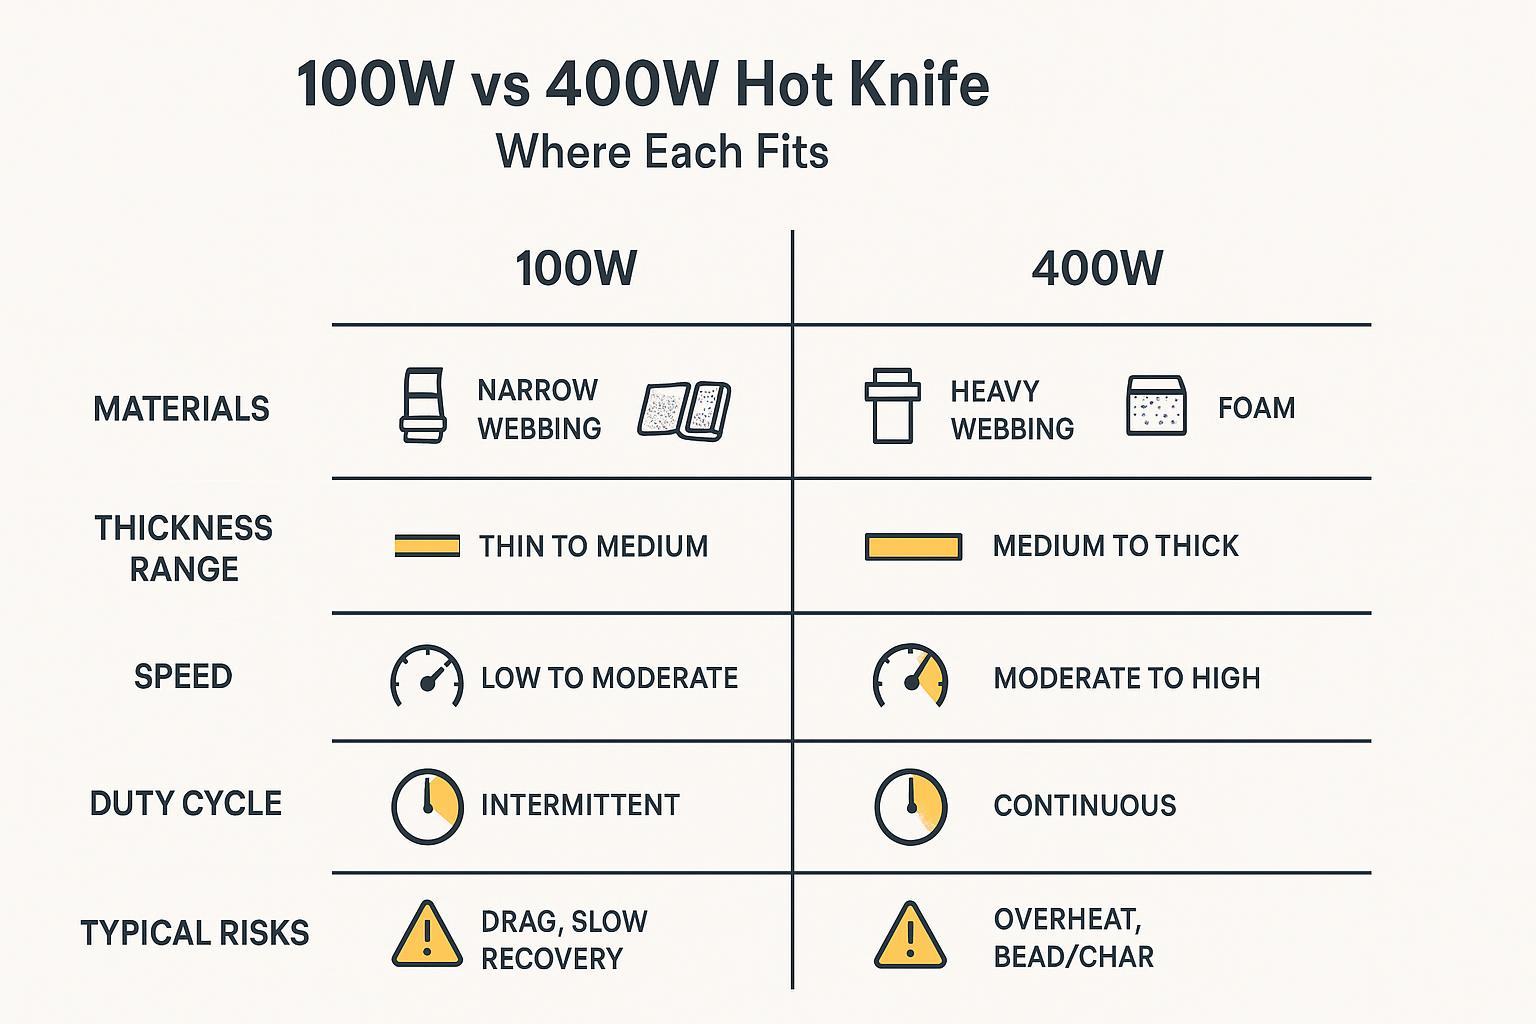
For an industrial hot knife system, the fastest way to narrow options is to match power to heat demand per cut and the recovery you need at steady-state.
100W capabilities and limits
A 100W system typically shines when your process is intermittent and your cut is short:
- Light textiles, narrow webbing, labels, and hot knife cutting webbing applications where the cut length is short and repeatable
- Short heat path (less blade length inside the cut)
- Lower duty cycle where the blade gets time to recover between cuts
Where 100W usually runs out of margin isn’t just “thickness.” It’s thermal recovery.
If your blade cools down faster than it reheats, you’ll see the same pattern: the first few cuts look fine, then the system drifts into dragging, uneven bead, or incomplete sealing unless the operator slows down or turns the temperature up (which often increases smoke and discoloration).
400W capabilities and limits
A 400W class system is usually chosen for higher throughput Và higher heat demand per cut:
- Wider or thicker webbing
- Dense textiles, layered stacks, and tougher synthetics
- Foam where you need consistent penetration without tearing
- Higher duty cycle work where recovery time is limited
The upside is margin: faster heat-up and better recovery under load.
Điểm đánh đổi là khi công suất lớn hơn, lưỡi dao có thể đạt mức “quá nhiệt” nhanh hơn. Điều này có thể dẫn đến hiện tượng co mép ở mút xốp, kích thước vệt nóng chảy quá lớn, biến màu, hoặc sinh ra khói nếu hệ thống kiểm soát nhiệt độ và luồng khí không được thiết kế cho quy mô sản xuất.
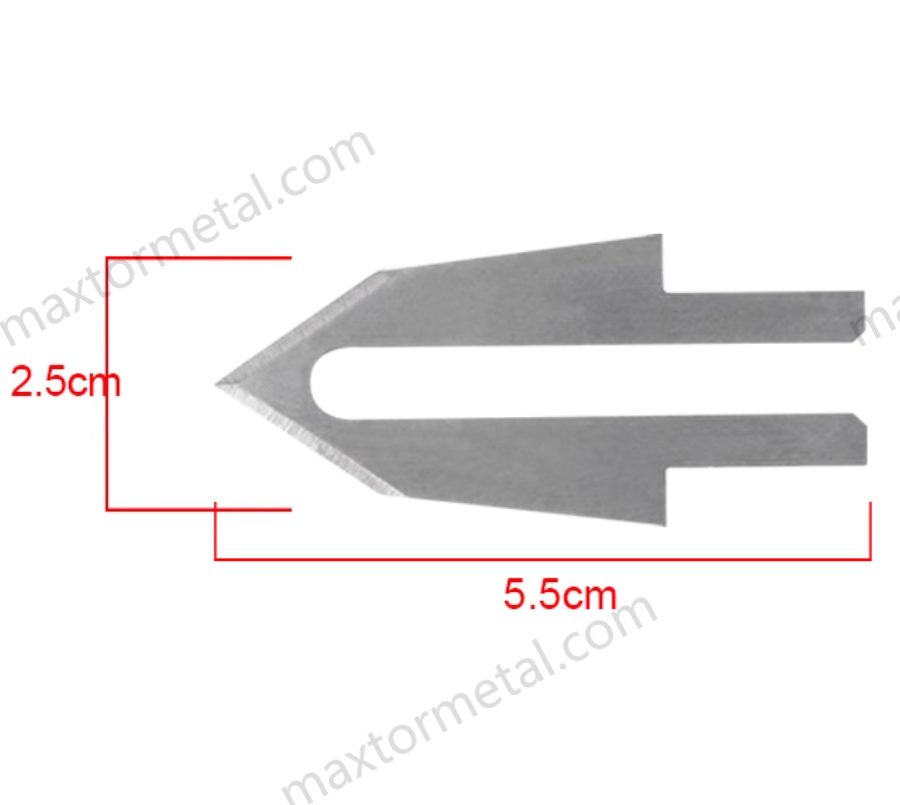
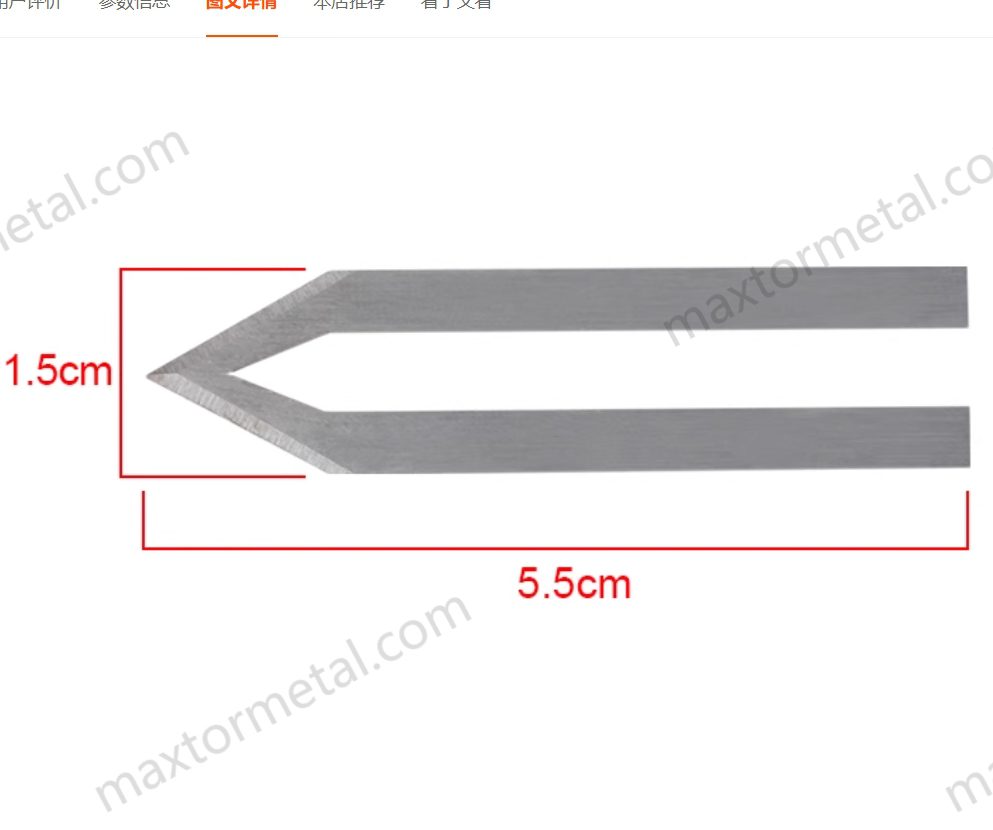
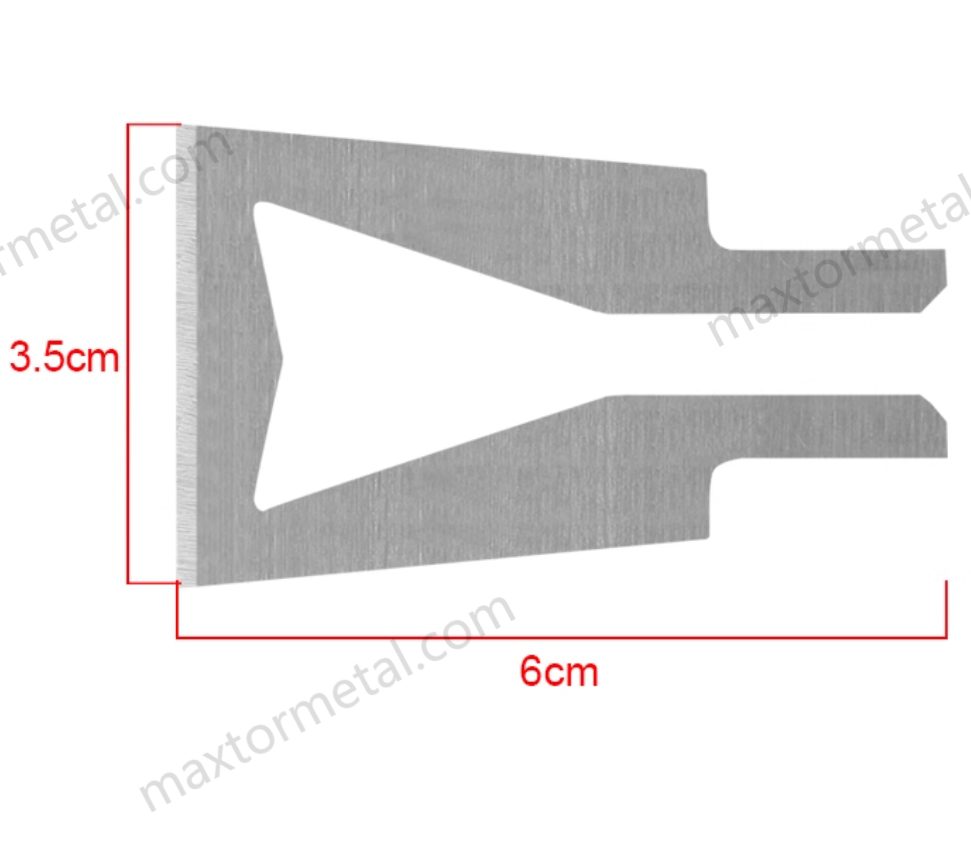
Tương thích khối lượng và hình dạng lưỡi dao với công suất
Cấp công suất và việc lựa chọn lưỡi dao luôn đi liền với nhau.
Lưỡi dao cắt nhiệt được thiết kế để tập trung nhiệt dọc theo cạnh cắt, và nhiệt độ lưỡi dao trước khi cắt có thể chênh lệch đáng kể tùy thuộc vào loại lưỡi dao và hệ thống; lưỡi dao sẽ nguội bớt khi đâm vào vật liệu, và đặc tính nhiệt của vật liệu sẽ ảnh hưởng đến tốc độ cắt cũng như diễn biến nhiệt độ (như được mô tả trong hướng dẫn thiết kế và dải nhiệt độ của lưỡi dao cắt nhiệt).
Trên thực tế:
- Khối lượng lưỡi dao lớn hơn giúp giảm thiểu sự biến động nhiệt độ nhưng cần nhiều công suất hơn để hồi nhiệt nhanh chóng.
- Mức độ tiếp xúc của cạnh cắt dài hơn (nhiều phần lưỡi dao nằm trong đường cắt hơn) sẽ làm tăng mức tiêu hao nhiệt.
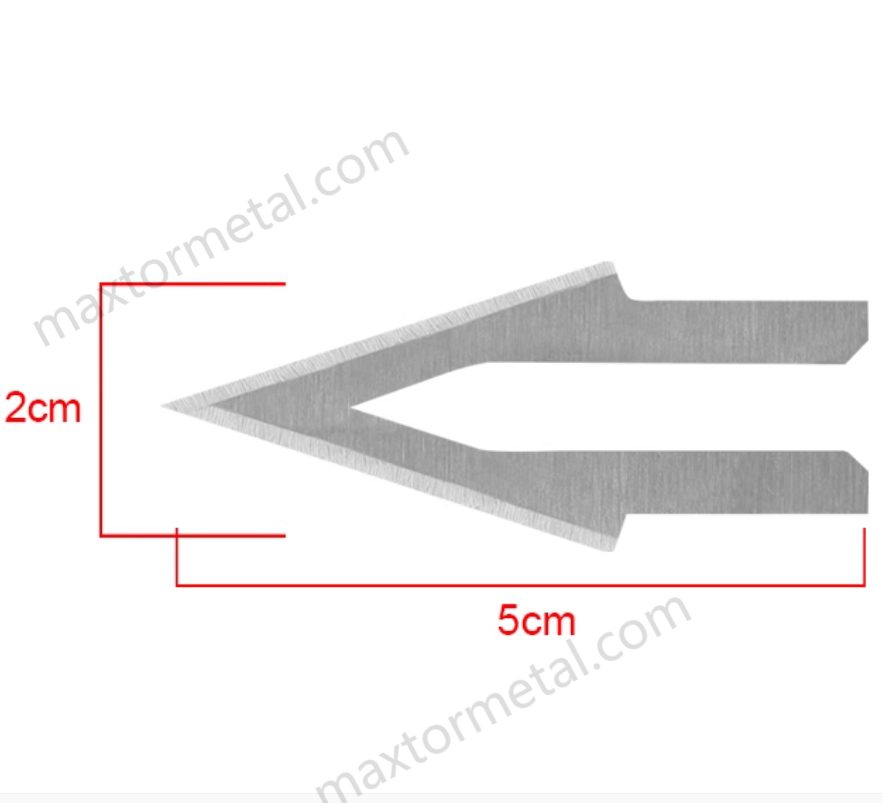
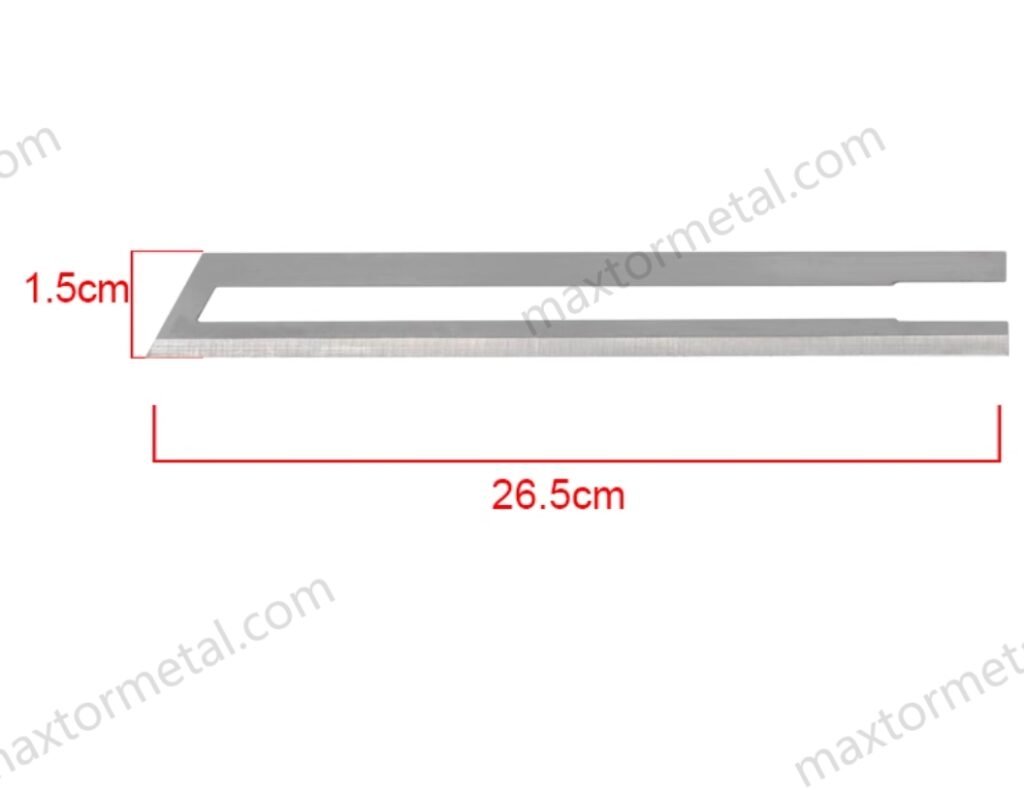
- Hình học (móc, vát cạnh, hai lưỡi, mặt bích gia cường) làm thay đổi cách cấp vật liệu và độ vuông góc của đường cắt.
Nếu bạn dùng lưỡi dao nặng với công suất thấp, hệ thống thường “có vẻ ổn định” khi chạy không tải nhưng sẽ bị hụt nhiệt khi cắt liên tục. Nếu vận hành lưỡi dao nhẹ ở công suất cao, nhiệt độ có thể vượt ngưỡng rất nhanh và làm cháy vật liệu mà bạn vốn chỉ muốn hàn niêm phong.
Khung lựa chọn
Xác định cấu trúc lớp vật liệu và độ dày/tỷ trọng
Bắt đầu từ điều kiện cắt thực tế của bạn—thay vì chỉ dựa vào “tên vật liệu”. Hãy ghi nhận:
- Loại vật liệu (vải dệt, dây đai webbing, nhãn in, mút xốp)
- Cấu trúc xếp lớp (lớp đơn so với nhiều lớp)
- Độ dày và mật độ/tỷ trọng (đặc biệt đối với mút xốp)
- Phụ gia/lớp phủ (thường là nguyên nhân chính gây ra khói, mùi và biến màu)
Cùng một độ dày danh nghĩa nhưng đặc tính cắt có thể rất khác nhau nếu một cuộn dệt chặt hơn, có lớp phủ nhựa khác hoặc giữ nhiệt khác nhau.
Tóm tắt quyết định nhanh: nếu bạn thường xuyên cắt các chồng nhiều lớp, dây đai bản rộng hoặc mút xốp tỷ trọng cao, hãy xác định cần có biên độ hồi nhiệt lớn hơn và nên xem xét mức 400W từ sớm. Nếu công việc của bạn chỉ cắt bản hẹp, mỏng và ngắt quãng, mức 100W có thể là đủ—miễn là kiểm soát nhiệt độ ổn định.
Thiết lập tốc độ dây chuyền mục tiêu và chu kỳ làm việc (duty cycle)
Hai câu hỏi quan trọng hơn cả công suất đỉnh:
- Bạn cần bao nhiêu lần cắt mỗi phút ở trạng thái ổn định?
- Lưỡi dao nằm trong vật liệu bao lâu ở mỗi lần cắt (thời gian tiếp xúc hiệu dụng)?
Hệ thống cấp công suất 100W có thể hoạt động tốt ở tốc độ cắt vừa phải khi lưỡi dao có đủ thời gian hồi nhiệt. Nhưng ở chu kỳ làm việc cao hơn, quá trình này bị giới hạn bởi khả năng hồi nhiệt: lưỡi dao đi vào lần cắt tiếp theo ở nhiệt độ thấp hơn, buộc bạn phải giảm tốc độ cấp phôi hoặc tăng nhiệt độ cài đặt.
Hệ thống cấp công suất 400W thường được lựa chọn khi bạn không thể “chờ nhiệt” giữa các lần cắt.
Điểm chính: Đừng chọn công suất dựa trên vết cắt đầu tiên. Hãy chọn công suất dựa trên vết cắt thứ 100 ở chu kỳ làm việc mục tiêu của bạn.
Đồng bộ hóa kiểm soát nhiệt độ và khả năng hồi nhiệt
Đối với quy mô sản xuất, không nên chỉ nhìn vào núm điều chỉnh đơn thuần.
Bạn cần một vòng điều khiển có khả năng:
- Duy trì nhiệt độ với độ vượt ngưỡng tối thiểu (giúp giảm độ phồng đường hàn và biến màu)
- Hồi nhiệt nhanh chóng sau mỗi lần cắt (giảm hiện tượng trôi nhiệt và sự can thiệp thủ công của người vận hành)
- Giữ ổn định trước những thay đổi của luồng khí (hệ thống hút khói có thể làm nguội lưỡi dao)
Đồng thời, hãy kiểm tra cách đo và vị trí cảm biến nhiệt độ. Bộ điều khiển có thể “chính xác” tại vị trí cảm biến nhưng vẫn tạo ra chất lượng mép cắt không đồng đều nếu đầu lưỡi dao gặp biến động nhiệt lớn.
Ghi chú về thương hiệu: nếu dây chuyền của bạn phụ thuộc vào hình dạng lưỡi dao, giao diện lắp đặt hoặc hình học cạnh cắt phi tiêu chuẩn, sự ổn định nguồn cung sẽ trở thành một phần của kiểm soát chất lượng. Trên thực tế, các đội ngũ kỹ thuật giảm thiểu rủi ro thẩm định bằng cách chuẩn hóa bản vẽ/sai số và hợp tác với nhà cung cấp như KIM LOẠI MAXTOR đơn vị hỗ trợ lưỡi dao công nghiệp tùy chỉnh theo bản vẽ hoặc bản thảo để đảm bảo lưỡi dao thay thế duy trì tính đồng nhất giữa các lô sản xuất.
Cut quality and process control
Tính toàn vẹn của mép hàn và độ vuông góc
“Chất lượng cắt tốt” thường bao gồm hai yếu tố:
- Mép cắt được hàn kín đủ để chống tưa mép hoặc rút sợi (đối với sợi tổng hợp và dây đai)
- Đường cắt đủ vuông góc để các công đoạn sau (may, dán, xếp chồng) không bị lệch
Công suất ảnh hưởng đến cả hai yếu tố này, nhưng theo cách gián tiếp.
More power gives you recovery and speed headroom. It does not automatically guarantee a better seal. A hot, unstable edge can round corners, distort foam cells, or create a large bead that interferes with fit.
Managing discoloration, smoke, and bead size
If you’re fighting discoloration and smoke, treat it as a heat-input and ventilation problem:
- Lower the setpoint and increase effective dwell (when possible) rather than running maximum temperature.
- Increase feed consistency: inconsistent pressure and feed angle create local overheating.
- Keep the edge clean: residue acts like insulation and changes how heat transfers into the material.
Ventilation matters because hot cutting can generate fumes from polymers, finishes, and adhesives.
A practical benchmark is hot knife fume extraction that captures smoke at the source rather than relying on room dilution. OSHA’s guidance on controlling hazardous fumes emphasizes local exhaust ventilation positioned close to the source—capture is most effective when the hood/nozzle is kept near the plume (see OSHA’s guidance on local exhaust ventilation placement).
For exposure targets, many industrial hygiene programs reference TLVs/BEIs as health-based guidance values (not legal limits) when setting monitoring and control strategy, per ACGIH’s TLV/BEI Guidelines.
Blade wear, changeovers, and uptime impact
Blade wear rarely shows up as a clean failure. It shows up as drift:
- more drag at the cut
- growing bead size
- rising smoke and discoloration
- more frequent operator “touch-ups” to settings
Changeovers are an OEE issue, not a maintenance footnote. Track:
- cuts per blade (or hours) to quality threshold
- changeover time (including heat-up/stabilization)
- scrap rate near end-of-life
If a higher power class reduces changeovers by allowing stable cutting at lower stress (lower overshoot, less operator compensation), it can win on TCO even if energy draw is higher.
Safety and compliance essentials
Ventilation and exposure controls (OSHA/ACGIH)
At minimum, treat hot knife cutting as a fume-generating operation and design controls around source capture.
- Prioritize local exhaust ventilation close to the cut zone; OSHA’s source-capture principle is clearly stated in OSHA’s guidance on local exhaust ventilation placement (see the OSHA fact sheet linked earlier in this article).
- Use exposure evaluation and monitoring practices aligned with your site program; TLVs/BEIs are commonly used guidance values for industrial hygienists, as described in ACGIH’s TLV/BEI Guidelines (linked earlier in this article).
Electrical and guarding (UL/NFPA/CE basics)
For production installations, treat the hot knife station as industrial machinery:
- Electrical design and documentation should align with industrial machinery standards expectations; in North America, NFPA 79 (Electrical Standard for Industrial Machinery) is a common reference point.
- Many machine builders align with IEC/EN principles; IEC 60204-1 electrical equipment of machines provides broad requirements for machine electrical equipment.
If you ship into the EU/EEA, CE marking is a system responsibility (risk assessment, documentation, conformity). A practical starting point is the EU’s overview of CE marking requirements and the European Commission’s machinery compliance overview.
Interlocks, E-stops, and SOP documentation
Power-class decisions are useless if safe operation is inconsistent.
For any station used at speed:
- Guard the hot zone and define safe access points.
- Use interlocks where opening a guard exposes a hot edge or moving feed.
- Provide an E-stop that is reachable from the operator position and the load/unload area.
- Document the SOP: startup, warm-up/stabilization, parameter changes, cleaning, blade change, ventilation checks, and shutdown.
TCO and ROI levers
Energy use vs throughput and scrap
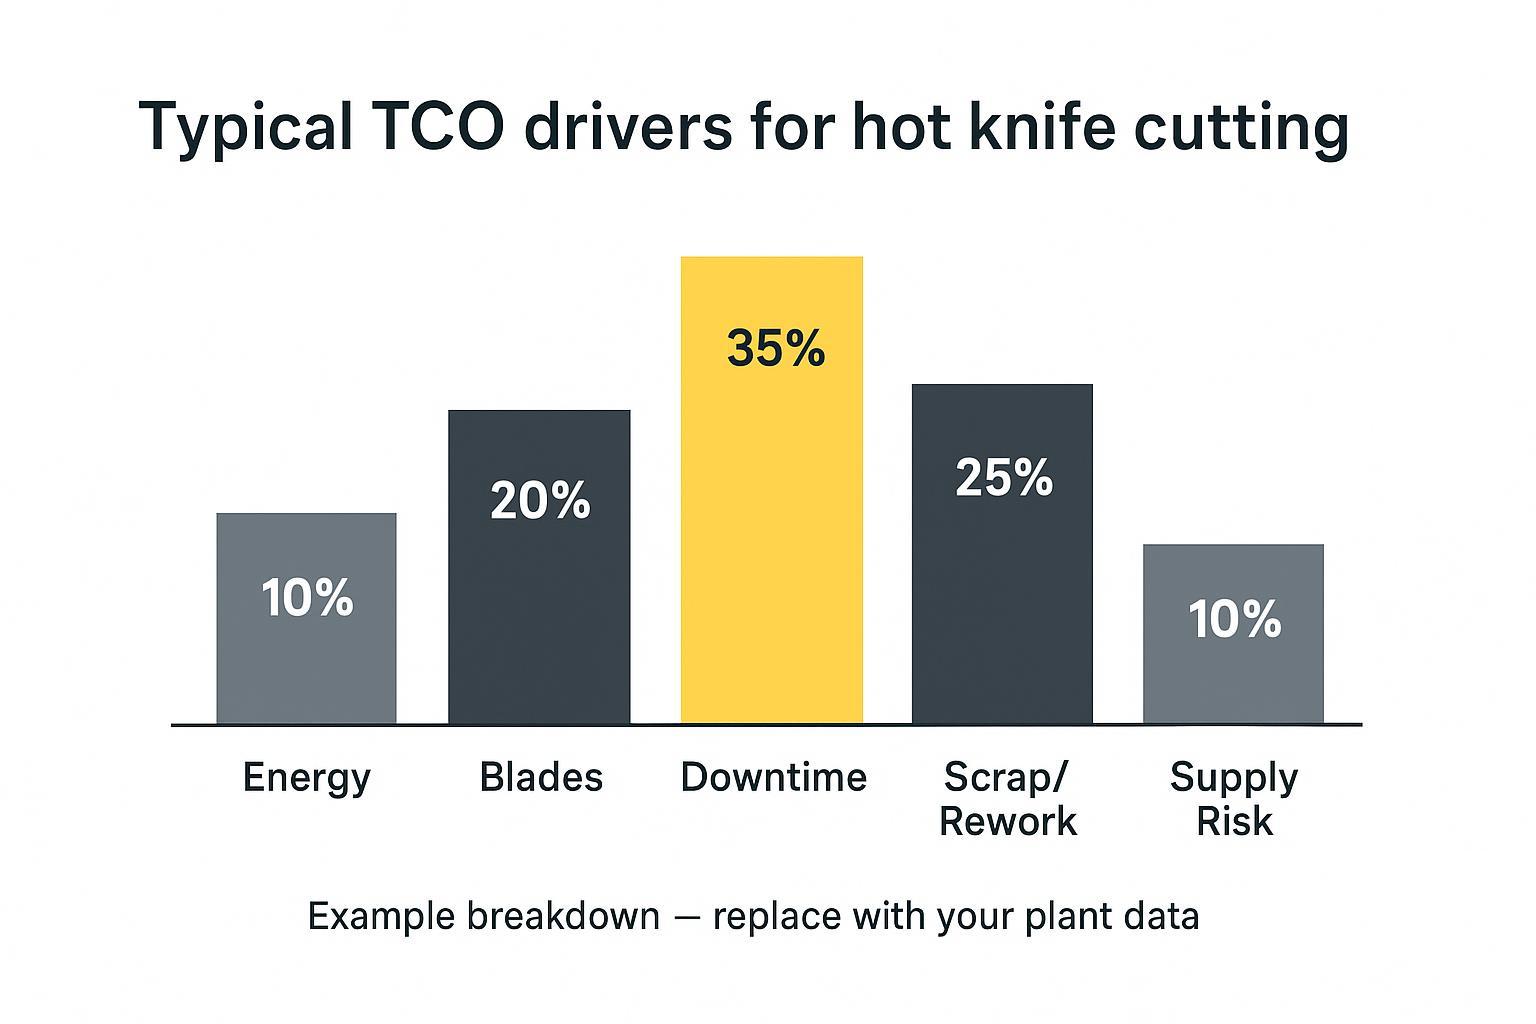
Energy is usually not the dominant cost. The dominant cost is what energy enables:
- cycle time
- stability at speed
- scrap and rework reduction
If 400W lets you run at target speed without overheating (stable control, right blade), the kWh increase can be small compared to the value of reduced downtime and scrap.
Blade life, downtime, and inventory costs
Model blade cost as a system cost, not a unit cost:
- blade price × usage rate
- downtime per changeover × line cost
- inventory policy (safety stock vs expedited orders)
A lower-watt system that forces more frequent changes to maintain quality can cost more than a higher-watt system that runs consistently.
Supply risk, lead time, and qualification trials
If your blade is nonstandard, supply risk becomes a production KPI.
Treat qualification like a controlled trial:
- lock the drawing and tolerance stack
- qualify the blade material and heat treatment spec
- validate consistent fit and edge behavior across multiple batches
This is also where lead time matters: if you can’t replenish blades predictably, you’ll either carry excess inventory or accept downtime risk.
Implementation and validation
Run representative material trials and log parameters
Don’t qualify power class on a single “best case” roll.
Build a trial pack that includes:
- worst-case thickness and density
- any coated/adhesive variants
- representative stack-ups
Log:
- setpoint and warm-up time
- cut rate (cuts/min or feed speed)
- duty cycle profile (steady vs burst)
- ventilation setting (airflow changes can alter thermal behavior)
- blade geometry and blade condition
Acceptance metrics: seal, squareness, discoloration, smoke index
Mẫu nhật ký thử nghiệm (sao chép/dán)
Use a simple table so every shift logs the same fields:
| Mục | Cần ghi lại những gì | Ví dụ |
|---|---|---|
| Material & stack-up | material name, layers, thickness/density, coatings | 2-layer webbing, 1.8 mm, PU-coated |
| Power class & blade | 100W/400W, blade geometry, blade mass if known | 400W, hook blade, 2.0 mm edge |
| Setpoint & stabilization | setpoint, warm-up time, stabilization time | 420°C, warm-up 6 min, stabilize 3 min |
| Duty cycle | cuts/min, dwell time, steady vs burst | 30 cuts/min, 0.6 s dwell, steady |
| Ventilation | capture method & setting | LEV nozzle 80 mm from cut zone |
| Quality results | seal grade, squareness tolerance, discoloration grade, smoke index | Seal A, ±1°, ΔE < 2, Smoke 2/5 |
| Ghi chú | residue, bead buildup, operator adjustments | clean every 30 min |
Quick troubleshooting (most common drift patterns)
- Bead size grows over time: blade temperature overshoot or residue insulating the edge → lower setpoint, improve control tuning, increase cleaning frequency, verify feed consistency.
- Smoke/odor spikes: setpoint too high for coatings/adhesives or capture too far from source → reduce setpoint, bring capture closer, verify airflow is stable during cutting.
- Incomplete sealing / fray appears at speed: recovery-limited (blade enters cut cooler) → increase power class, reduce duty cycle, shorten engagement length, or use a blade geometry that concentrates heat at the edge.
- Foam edge recession / melting back: too much heat input or dwell → lower setpoint, increase feed speed, improve temperature stability, validate blade geometry for foam.
Define acceptance before you run trials. Practical metrics include:
- Seal: fray resistance test and edge pull test suitable for your product
- Squareness: cut angle tolerance and edge straightness over a defined length
- Discoloration: visual standard (A/B samples) or ΔE threshold if you measure color
- Smoke index: simple operator-visible scoring plus ventilation capture effectiveness check
The point is repeatability: the system should hold quality at the target duty cycle without constant operator tuning.
Handover: SOPs, maintenance, and training plan
When you standardize, freeze the process:
- SOP with parameter ranges and “do not exceed” limits
- maintenance schedule (cleaning, inspection, changeover triggers)
- training for normal operation and abnormal conditions (smoke spike, drift, blade damage)
- spare parts list and reorder points
Kết luận
If you need a simple rule: 100W fits intermittent, lighter-duty work where recovery time exists; 400W fits higher duty cycle and higher heat draw where you can’t afford drift. But the correct decision comes from steady-state duty cycle Và acceptance metrics, not the first cut or the nameplate.
Key takeaways (actionable)
- Size power for thermal recovery under load: confirm quality on the vết cắt thứ 100 at target speed.
- Treat the system as a set: power class + blade mass/geometry + temperature control + ventilation.
- Control smoke as an engineered system: source capture first, then verify your site exposure program.
- Standardize only after a representative trial pack and clear pass/fail criteria.
Next steps checklist (run this on your line)
- Define worst-case materials: thickest/densest stack-up, any coatings/adhesives.
- Set a duty-cycle target: cuts/min, dwell time, and shift profile (steady vs burst).
- Run A/B trials (100W vs 400W if unsure) with the same blade geometry where possible.
- Log parameters: setpoint, warm-up time, cut rate, ventilation setting, and blade condition.
- Grade quality: seal, squareness, discoloration, and a simple smoke index.
- Lock the winning configuration: parameter window, cleaning interval, blade change triggers, and drawing/tolerances for supply repeatability.
Tác giả: MAXTOR METAL Process Engineering Team (industrial blade & hot cutting applications), with 15+ years of experience supporting OEMs and end-users on custom, precision-ground blades and replacement blade qualification.
Quality and inspection: MAXTOR METAL operates a documented quality control process covering material inspection, in-process checks, and final inspection. (If you maintain formal certifications such as ISO 9001, list the certificate number and scope here.)
References and standards (starting points)
- OSHA: Local exhaust ventilation placement principle (source-capture guidance): https://www.osha.gov/sites/default/files/publications/OSHA_FS-3647_WELDING.pdf
- ACGIH: TLVs/BEIs guidelines overview: https://www.acgih.org/science/tlv-bei-guidelines/
- NFPA 79 (industrial machinery electrical): https://www.nfpa.org/product/nfpa-79-standard/p0079code
- IEC 60204-1 (electrical equipment of machines): https://webstore.iec.ch/en/publication/26037
- EU CE marking overview: https://europa.eu/youreurope/business/product-requirements/labels-markings/ce-marking/index_en.htm
- European Commission machinery compliance overview: https://single-market-economy.ec.europa.eu/sectors/mechanical-engineering/machinery_en
Lịch sử sửa đổi
- 2026-04-26: Initial publication.

 English
 Spanish
 Italian
 French
 Portuguese
 Russian
 German
 Arabic
 Hindi
 Vietnamese
 Indonesian
 Japanese
 Korean