If you run Scheer strand pelletizers in the S3500/SGS families, you’re measured on pellet quality, runtime, and cost per ton. This guide shows exactly how to select, install, and validate high-precision replacement rotors and knives—so you can protect pellet geometry, cut fines, and reduce OEM spend without risking compatibility.
What you’ll get here: a practical selection framework, clear tolerance windows for a stable knife gap, duty-matched materials and edge geometry for PP/PE masterbatch (with notes for tougher recipes), an installation and verification SOP, and a QA/traceability checklist that de-risks imports and supports regrind economics.
Principais conclusões
- Focus machines: Scheer S3500/SGS lines (e.g., S3508/3512/3516; SGS 50–300). Confirm working width and rotor form from the nameplate/manual before ordering.
- Target knife gap: 0.05–0.10 mm to minimize fines; 0.10–0.15 mm for long-run stability. Always validate on your line.
- Material picks: Start with D2 or HSS for PP/PE masterbatch; move to PM 10V or WC inserts when abrasives dominate; consider Stellite where heat/corrosion matter.
- SOP discipline wins: Pre-check runout/parallelism, set gap uniformly, and synchronize puller speed to strand feed.
- Documentation reduces risk: Require EN 10204 certs, hardness to ASTM E18/ISO 6508, dimensional reports, and batch traceability. Track runtime/fines and use regrind to lower cost per ton.
Fit and selection
Scheer model mapping
For Scheer S3500/SGS installations, start by confirming the exact model and working width on the machine nameplate and in the OEM manual. Public OEM pages describe these families and applications but do not publish detailed rotor dimensions or tooth-count tables. When model data isn’t readily available, measure on-site: rotor diameter, working width, hub/shaft interface, and any keyway/drive features. According to MAAG’s family overviews, the SGS and S3500 platforms are designed for strand cutting with dry-face configurations, but users must validate dimensional details locally before specifying replacements. For family context from the OEM, see MAAG’s strand pelletizing category (manufacturer overview) and the pelletizing systems overview, which describe system scope without disclosing rotor/tooth-count tables.
- Practical diligence: If you’re planning a Scheer rotary cutter replacement, confirm rotor diameter/width and hub interface against the machine manual or by measurement before issuing a PO.
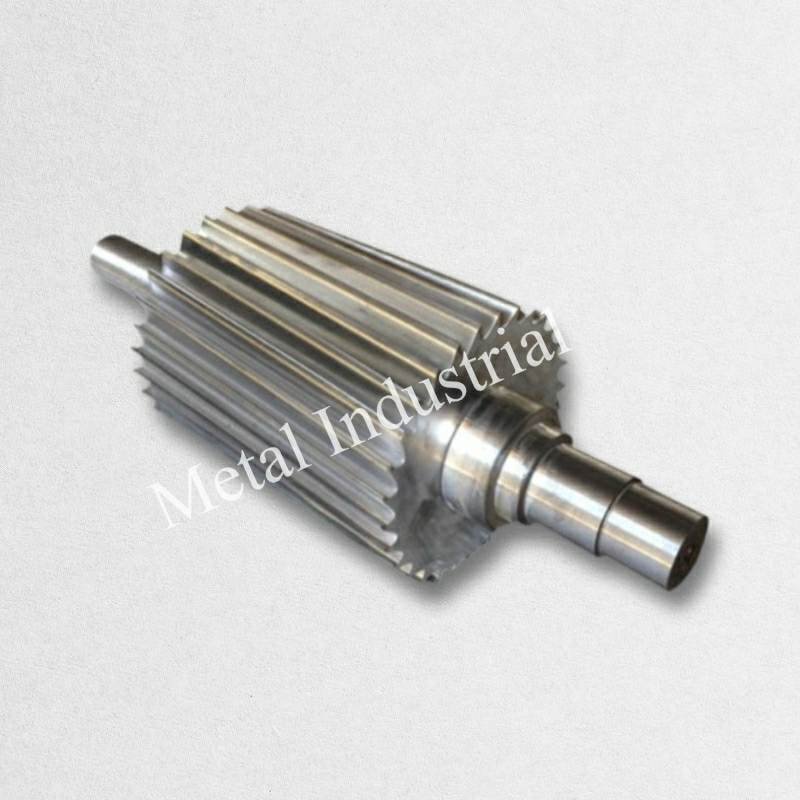
Rotor diameter, width, and tooth count logic
Quick reference (what usually changes when you change geometry):
| Parameter change | Likely upside | Common trade-off | What to verify on your line |
|---|---|---|---|
| Larger rotor diameter (same rpm) | Higher tip speed; potentially cleaner cut | More heat/torque demand | Motor load, temperature, fines trend |
| Higher tooth count (same diameter/rpm) | More cuts/rev; potentially smoother pellet ends | Tighter runout/gap tolerance; less chip room | Vibration, noise, fines, tooth wear pattern |
| Wider working width | Supports more strands/die width | Higher sensitivity to parallelism | Bed-knife parallelism across full width |
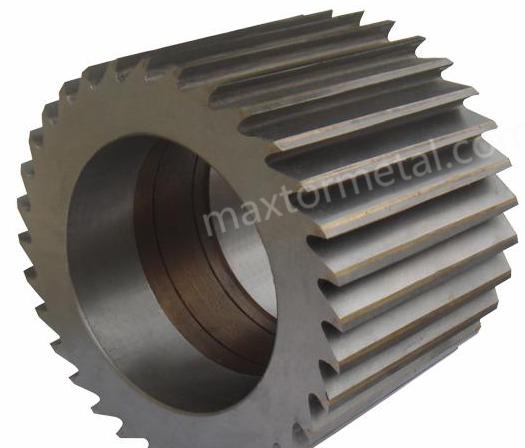
| Segmented rotor | Faster maintenance; swap sections | Interface alignment becomes critical | Segment-to-segment runout and balance |
Think of the rotor like the metronome of your cut. Diameter and rpm define tip speed; tooth count defines how often you impact the strand. Larger diameters (at a given rpm) increase tip speed and can improve cut quality up to a point but raise heat and torque requirements. More teeth increase cuts-per-revolution, potentially refining pellet ends but also tightening alignment and runout tolerances and reducing chip room.
- Width/segmenting: Match rotor working width to the die/strand count and the bed knife contact length. Segmented rotors can simplify maintenance if your line switches die widths.
- Tooth count trade-offs: Fewer, more robust teeth can benefit abrasive or recycled content by improving toughness; higher tooth counts can help finish on PP/PE masterbatch when metrology is tight.
- Practical tip: Before changing tooth count versus your OEM baseline, review motor torque headroom and heat load, and plan a validation run to check fines and surface finish at steady state.
Tolerances for stable knife gap
Your target gap window is small: 0.05–0.10 mm for the lowest fines; 0.10–0.15 mm for balanced stability and longer intervals between adjustments. To hold those numbers, aim for tight mechanicals:
- Radial runout (rotor TIR) and parallelism across the bed knife should be in a precision-machinery band—often on the order of 0.01–0.025 mm—so you don’t “chase” the gap around the rotation. Treat these as practical targets; verify in your plant with indicators and inspection reports.
- Verify at cold install and again at hot steady state; thermal growth can shift the effective gap.
Pellet quality is highly sensitive to upstream handling and cutter setup. For process context on how handling between the extruder and pelletizer drives quality in strand lines, see Plastics Technology’s analysis “From Extruder to Pelletizer—What Happens in Between Influences Quality”. Concepts for synchronization and precise nip control appear in “Precision Extrusion Puller/Cutters Designed for Medical Tubing” and translate well to strand pelletizers.
Materials and geometry

Steel and hardfacing options
Selecting the right metallurgy balances wear resistance, toughness, and regrindability.
- D2: Typical 58–62 HRC. Chromium carbides provide baseline abrasive wear resistance; good for PP/PE masterbatch when impact is moderate. See PM/cold-work context in Uddeholm’s PM steel literature, e.g., Uddeholm Vanadis 4 Extra datasheet.
- M2 HSS: Often 62–65 HRC. Better hot hardness than D2; useful at higher tip speeds or where frictional heating is present.
- PM 10V (high-V PM tool steel): Typically 60–64 HRC in application with very high abrasive wear resistance; lower toughness than general-purpose PM grades; best where fillers dominate. Comparable PM wear/toughness positioning can be seen in Uddeholm Vanadis 30.
- Tungsten carbide inserts: Commonly reported 89–93 HRA (note the HRA scale for carbides; do not convert directly to HRC). Extremely wear resistant, but failure mode can be brittle chipping; regrind differs from steels. Prefer a carbide producer’s technical notes when finalizing specs.
- Stellite (Co–Cr hardfacing): Grades like Stellite 6 (~36–45 HRC) and [**Stellite 12**](https://www.stellite.com/us/en/alloys/stellite/stellite-12-alloy.html) (~45–51 HRC) offer hot hardness and galling resistance, helpful where heat/corrosion matter more than raw abrasive wear.
For internal, brand-agnostic background on metallurgy and heat treatment specific to industrial knives, see MAXTOR METAL’s guides: Industrial Knife Materials Guide e Rotary Shear Blade Heat Treatment Guide.
Edge micro-geometry and coatings
- Micro-bevels: A small secondary bevel improves edge stability and lowers micro-chipping at the expense of razor sharpness. For abrasive fillers, increase micro-bevel slightly to delay chipping and maintain pellet end quality longer.
- Edge prep: Light edge honing can reduce initiation sites for cracks. Keep it consistent around the circumference.
- Coatings: TiN/TiAlN or DLC-like films on steel edges can reduce friction and fines; verify coating compatibility with regrind practices and ensure coating thickness doesn’t distort your effective gap.
Duty-matched recommendations
Priority scenario: PP/PE masterbatch on S3500/SGS lines.
- Start point: D2 or M2 HSS with a fine, uniform edge prep and minimal micro-bevel, targeting the 0.05–0.10 mm gap range for the cleanest ends.
- Abrasive/recycled shift: Move to PM 10V or selected WC-inserted designs with a slightly larger micro-bevel and plan for higher verification frequency. Consider Stellite where corrosion or heat-induced galling is a concern.
- Always validate: Knife steel/coating choice should be coupled with a run plan logging fines %, runtime to first adjustment, and post-run edge condition.
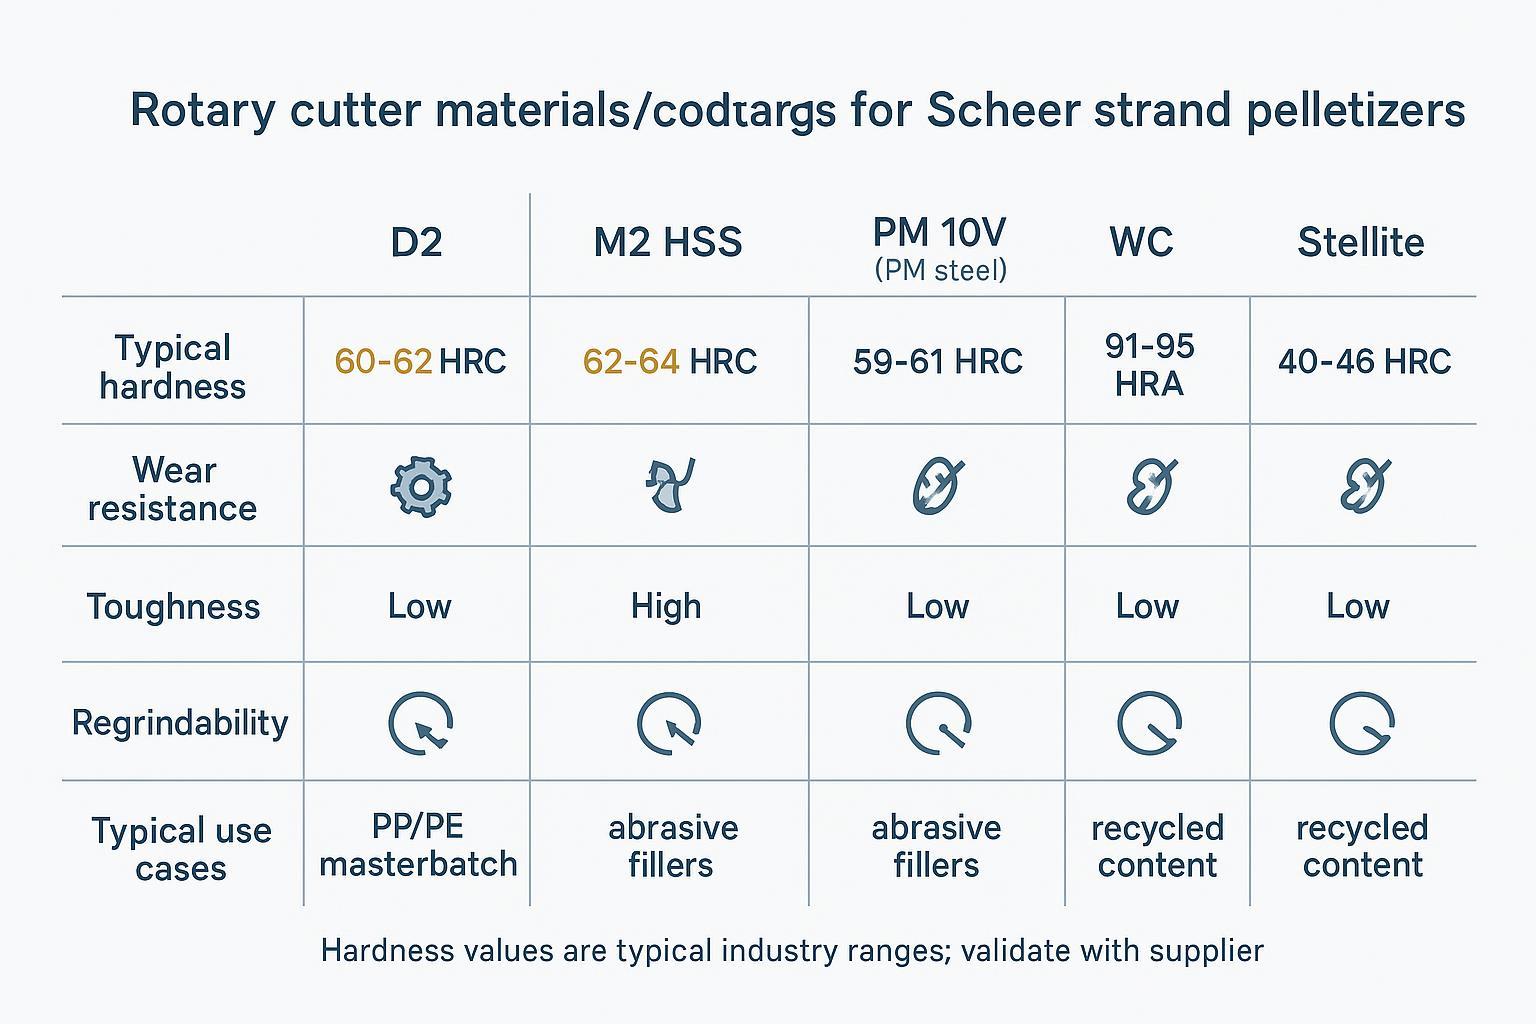
Note: Hardness values above reflect typical industry ranges; confirm actual hardness from your supplier’s certificates and heat-treatment reports.
Installation and knife-gap SOP
Safety first (lockout/tagout and PPE)
Before any setup or measurement:
- Perform lockout/tagout (LOTO) on the pelletizer and puller drives, and verify zero energy.
- Keep guards in place whenever possible; only open the chamber when rotation is mechanically prevented.
- Wear cut-resistant gloves and eye protection; treat all knife edges as sharp even when worn.
- Use a controlled hand-rotation method (never jog under power) when checking tight/loose spots.
Pre-checks: concentricity, parallelism, runout
- Inspect and clean mating faces; remove burrs and debris.
- Mount rotor; measure radial runout (TIR) with a dial indicator at several axial positions. Target a precision band (~0.01–0.025 mm) as a practical goal; record values.
- Verify bed knife flatness and parallelism to the rotor axis across the working width with feeler gauges and indicator sweeps.
- Check dynamic balance certificates if available; imbalance can translate into gap fluctuation at speed.
Set and verify 0.05–0.15 mm gap
Measurement tools and accuracy tips:
- Feeler/shim gauges: use a known grade/set; replace bent blades; keep them clean and oil-free.
- Dial indicator for runout and sweeps: prefer 0.001 mm or 0.01 mm resolution (match your target window) and verify calibration on a reference.
- Record ambient temperature and “hot steady-state” temperature; gap can shift with thermal growth.
- If your plant uses a calibration schedule, align this SOP with it (at minimum, verify indicators quarterly or after any drop/impact).
- With the chamber open and power locked out, bring the bed knife into proximity.
- Use calibrated feeler gauges or shim stock to set the minimum gap. Check at multiple clock positions.
- Slowly rotate the rotor and log tight/loose spots; adjust to achieve a uniform 0.05–0.10 mm for low-fines targets, or 0.10–0.15 mm for long-run stability.
- Warm-up verification: After the machine reaches steady temperature, re-check the gap. Thermal growth can reduce the clearance; re-adjust if any sector drops below your minimum.
Quality responds to small changes in handling and setup. For strand lines, Plastics Technology’s guide to what happens between extruder and pelletizer and its discussion of precision puller/cutter synchronization offer transferable principles.
Synchronize puller, speed, and strand handling
- Match puller belt speed to cutter rpm so strands enter the nip uniformly—avoid bunching or tension spikes that create tails.
- Stabilize upstream strand conditioning (e.g., water-bath length/temperature for strand pelletizing lines) to keep strands consistent. Synchronization keeps the cutter working within your target gap band rather than compensating for feed variation.
For a Scheer rotary cutter replacement project, document the puller/cutter speed relationship during trials; this makes later troubleshooting faster and preserves your validated gap window.
QA, traceability, and lifecycle value

Documents and inspections to require
- EN 10204 certificates: Request at least a 3.1 document for steel components; 3.2 if an independent inspector is required for critical batches.
- Hardness tests to ASTM E18 / ISO 6508: Ask for calibrated machine data and hardness maps across the edge or rotor body.
- Dimensional inspection: Working width, thickness, runout and parallelism readings, and bed-knife flatness verification; include balance data where applicable.
- Heat-treatment cycle summary and batch/lot traceability numbers.
For additional background, MAXTOR METAL’s resources on materials and heat treatment—Industrial Knife Materials Guide e Rotary Shear Blade Heat Treatment Guide—can help align expectations on metallurgy and hardness control. To compare fit/durability considerations across brands, see Pelletizing Blades Comparison—Top Brands (2025).
Runtime, fines, and regrind economics
Track three KPIs on every validation run: runtime to first adjustment or regrind, fines percentage (by sieve method), and pellet-end surface quality.
A simple KPI log (copy/paste into your trial sheet):
| Timestamp | Recipe (PP/PE masterbatch, etc.) | Rotor rpm | Puller speed | Gap min/max (mm) | Fines % | Pellet-end notes | Vibration/noise | Action taken |
|---|---|---|---|---|---|---|---|---|
| Start (cold) | ||||||||
| 1 hr (hot) | ||||||||
| 4 hr | ||||||||
| 8–24 hr |
A simple regrind-versus-replace table illustrates the economics:
| Scenario | What you pay each cycle | Typical cycles before scrap | What to track | When it usually wins |
|---|---|---|---|---|
| Replace only | New rotor/knife set + install downtime | 1 | Baseline fines %, baseline runtime | When regrind quality is inconsistent or lead time risk is high |
| Regrind program | Regrind fee + shorter downtime | 2–4 (site-dependent) | Runtime per cycle, fines %, edge condition photos | When downtime is expensive and edges remain stable after regrind |
Example (replace with your real numbers):
- Assume a knife set costs $1,200, a regrind costs $180, and each changeover costs 1.5 hours of downtime.
- If your line’s downtime cost is $600/hour, then each changeover “costs” $900 in downtime alone.
- A regrind program that adds even 2 additional cycles before scrap can reduce total cost per ton if fines stay within spec.
Plant data checklist to fill in:
- Cost of new set ($)
- Regrind cost ($)
- Downtime hours per changeover (h)
- Downtime cost per hour ($/h)
- Runtime to first adjustment / regrind (h)
- Fines % (sieve method) and acceptance limit
- Notes/photos on edge wear and any chipping
Import, lead time, and risk control
When sourcing outside your region, build a documentation-first checklist into your PO: certificate level (EN 10204 3.1/3.2), hardness standard (ASTM E18/ISO 6508), dimensional report, balance data, and shipping/HS codes. Confirm Incoterms, VAT handling, and expected transit time; keep a buffer stock during initial validation.
Supplier example for Scheer rotary cutter replacement documentation
A supplier like MAXTOR METAL can provide OEM-compatible Scheer rotary cutter replacement components with traceable documentation (material certificates, hardness to ASTM E18/ISO 6508, and dimensional reports) and can support regrind cycles to extend service life. For technical background, see MAXTOR METAL’s Industrial Knife Materials Guide, Rotary Shear Blade Heat Treatment Guide, e Pelletizing Blades Comparison—use these to align expectations before a pilot order. Confirm certificate type (EN 10204 3.1/3.2) and reporting format at order, and validate fit on your line before broad rollout.
Conclusão
Key takeaways on compatibility, materials, SOP, and QA
- Confirm your exact S3500/SGS model and working width from the machine and manual; measure on-site when in doubt.
- Use the 0.05–0.10 mm gap for the lowest fines or 0.10–0.15 mm for longer, steadier runs; re-verify at temperature.
- Match metallurgy to duty: D2/HSS for PP/PE masterbatch; PM 10V or WC inserts for abrasive/recycled streams; Stellite when heat/corrosion are factors.
- Follow a disciplined SOP: metrology pre-checks, uniform gap set, synchronized puller/cutter speeds, and documented verification.
- Demand traceability: EN 10204 certs, ASTM/ISO hardness results, dimensional/balance data, and full batch records. Track runtime, fines, and regrind ROI.
Next steps: validation run plan and supplier checklist
Run an 8–24 hour validation on your primary PP/PE masterbatch grade; log fines %, runtime, and gap drift. Build a supplier checklist specifying EN 10204 certs, ASTM/ISO hardness, and dimensional/balance reports. For an OEM-compatible Scheer rotary cutter replacement pilot, invite a qualified supplier with regrind support for a small-lot trial.
Author’s note
This article was compiled by an applications engineering team for Scheer S3500/SGS strand pelletizers. Dimensions and tolerance windows are provided as practical starting points; always confirm fit, knife gap, and thermal behavior on your own line before standardizing parts or procedures.