

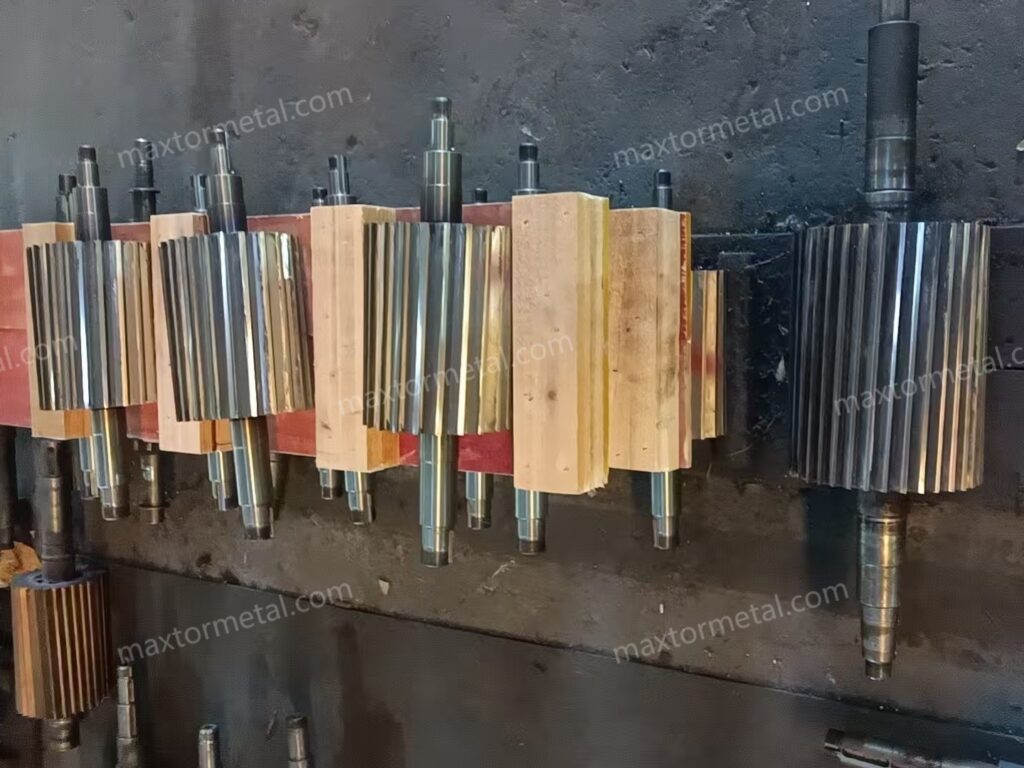
Fines and dust rise on water‑strand pelletising lines when three things overlap: unstable cutting mechanics, strands entering the cutter with residual surface water that promotes slippage, and die‑face wear that encourages tails and chipping. Mixed regrind with moisture fluctuation makes each of these more likely: brittle particles within the melt favour micro‑fracture at the cut, moisture spikes cause hydroplaning on the bed knife, and contamination accelerates wear.
“Reducing pelletising fines” isn’t just a housekeeping win; it’s a cost‑per‑tonne lever. Less dust means lower dryer and filter load, steadier downstream feeding, fewer customer complaints over pellet appearance, and reduced rework. On a 1‑tonne‑per‑hour line, cutting fines from 1.2% to 0.6% preserves 6 kg/h of saleable product and typically trims maintenance clean‑downs.
How to use this guide: set the mechanical baselines first (clearance, speed match, alignment), then stabilise water handling and die hygiene, and finally choose blade metallurgy and SOPs matched to your regrind abrasiveness. Validate each change with simple KPIs and keep the cadences tight for the first two weeks.
Poin-poin penting
- Prioritise tight, uniform blade‑to‑bed clearance and match cutter tip speed to line speed to reduce slippage‑driven fines.
- Lakukan dewatering strand secara agresif (>95% air bebas dihilangkan) sebelum pemotongan; jaga suhu dan panjang bak air dalam rentang yang terkendali.
- Maintain die‑face flatness and filtration; set an inspection cadence instead of reacting to tails.
- Select wear‑matched blade materials/coatings with traceable hardness and tolerances; regrind to a standard and change over before fines spike.
- Track fines by a standard method, residual moisture, blade life and downtime to prove reductions in cost‑per‑tonne.
Cutting mechanics and speed control
Set blade‑to‑bed clearance
Start tight and uniform, then tune empirically while monitoring fines, tails and motor load. As a starting trial window for strand cutters, many shops begin between 0.05–0.15 mm and tighten towards the lower end only if run‑out, thermal growth and vibration are demonstrably under control. Because OEMs rarely publish universal numbers, treat your machine manual and site safety rules as primary, and treat this window as a practical baseline to validate locally.
From an OEM design standpoint, it’s worth noting that many strand pelletisers are built specifically to let operators “dial in” the rotor‑to‑bed‑knife relationship via mechanical adjustment features—for example, MAAG/Scheer describes eccentric mounting and adjustment to dial the rotor into the bed knife for clean cuts in its Scheer S3500 strand pelletiser brochure (PDF). Some OEM training materials also emphasise fine, incremental bed‑knife adjustment methods to compensate for wear, such as the push/pull bed‑knife approach described in Bay Plastics Machinery’s Basics of Strand Pelletizing training document (PDF).
Check at several clock positions with feeler gauges and verify again after heat‑soak.
Two cautions matter on mixed regrind: first, micro‑hard inclusions can chip an over‑tight edge, so balance clearance with metallurgy (see below). Second, water carry‑over between strand and bed can “float” the cut if the gap is too wide, generating smeared edges and fines.
Match cutter surface speed
Tip speed should closely track strand haul‑off speed to avoid slip‑induced rubbing. A transparent way to set an initial RPM is to match tip speed to line speed and then fine‑tune on load and pellet quality:
- Tip speed (m/min) ≈ π × Drotor (m) × RPM
- Therefore, RPM ≈ line speed / (π × Drotor)
Example: If your line speed is 60 m/min and rotor diameter is 0.20 m, RPM ≈ 60 / (π × 0.20) ≈ 95.5 rpm. Start here, allow a small slip factor (0–10%) depending on grip and strand count, and confirm you’re inside gearbox and knife‑material limits. Where pellets show rub marks or fuzz, nudge RPM towards a closer match; where motor current spikes or edges show tearing, reassess clearance and run‑out before pushing speed.
Verify alignment and run‑out
Even a well‑set nominal gap becomes inconsistent if rotor run‑out or bed‑knife misalignment shifts the local clearance along the arc. Use a dial indicator on the rotor and a straightedge on the bed to confirm uniformity across the cut. Record readings pre‑ and post‑changeover. Because OEMs differ, adopt your QA or OEM acceptance limits and re‑check after heat‑soak (it’s common for plants to set tight internal targets, but there is no universal published run‑out number that fits every strand cutter). After any adjustment, manually turn the rotor through a full revolution before restarting—this “verify by hand” habit is explicitly called out in multiple OEM/technical descriptions of rotor‑to‑bed‑knife adjustment for strand pelletisers (for example, MAAG/Scheer notes dial‑in adjustment features in its brochures such as the Scheer S3500 strand pelletiser brochure (PDF).
Variability here maps directly to pellet length variation, tails and fines.
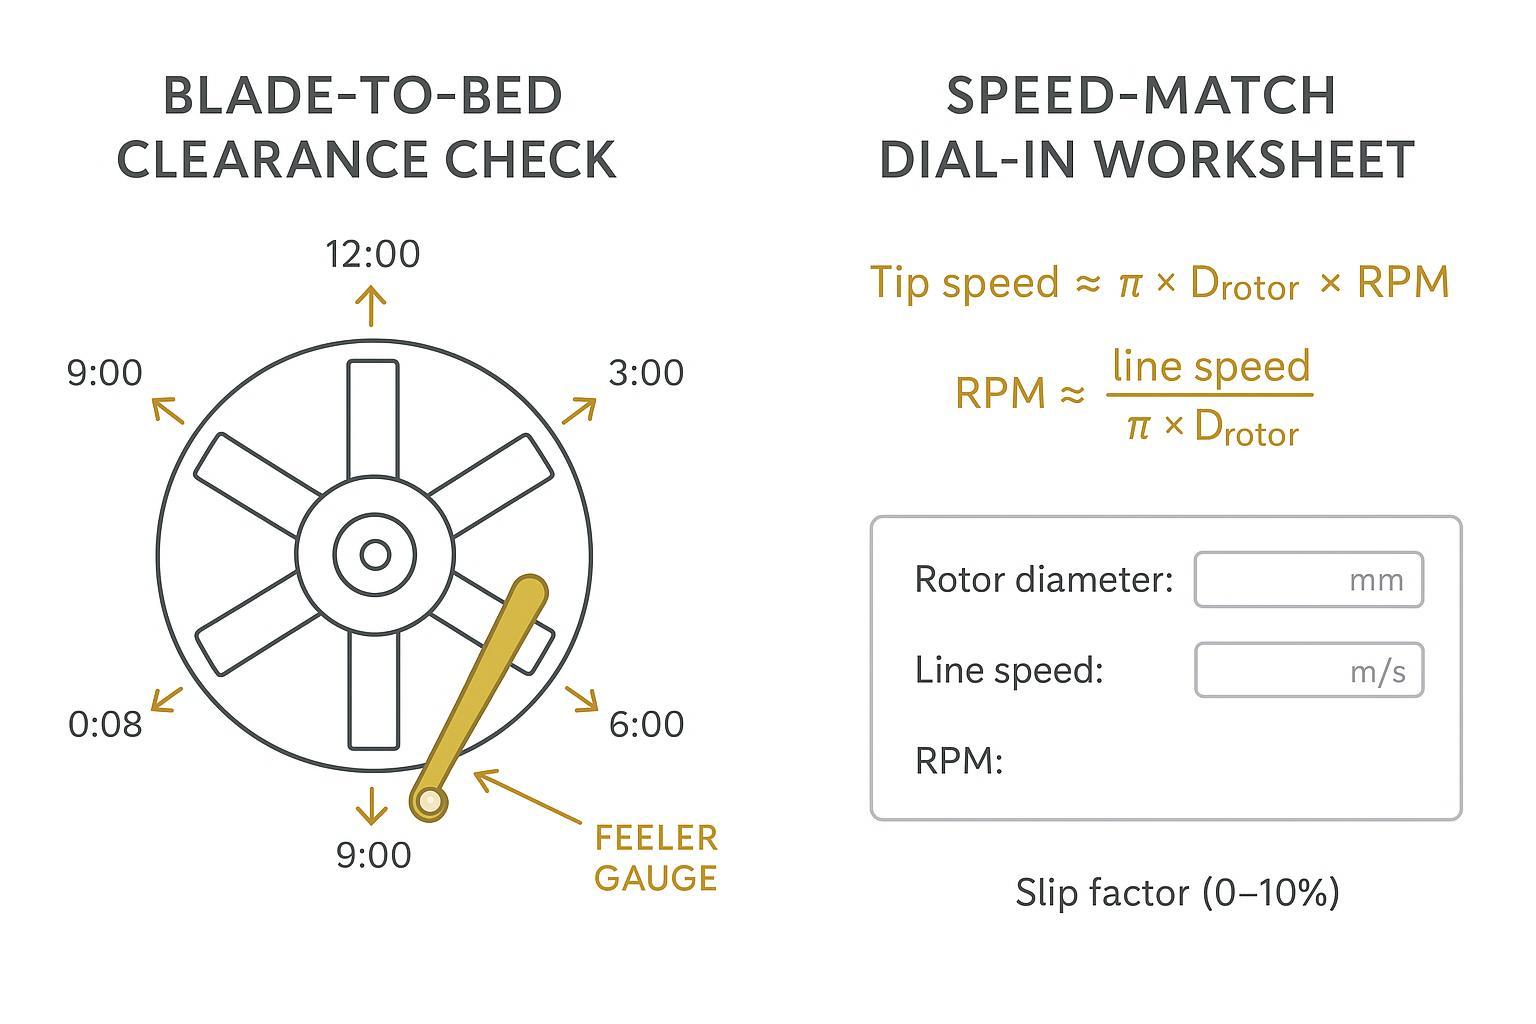
Infographic: Clearance check points and speed‑match worksheet for dial‑in.
Cooling, dewatering, and die hygiene for reducing pelletising fines
Right‑size bath and water temperature
Bath length and temperature set up strand stability long before the cut. A practical way to size the bath is to estimate required cooling time from polymer properties and line speed, then convert to length—a method outlined by Plastics Technology in its guidance on determining water‑bath length for strand pelletising. See the engineering approach in the article “Strand Pelletizing: Follow These Steps to Determine Your Water Bath Length” from Plastics Technology (2013, method still widely used).
For PP/PE, many processors operate between 20–40 °C and adjust based on strand behaviour; warmer baths can help reduce sticking in some copolymers, but avoid drifting above ~45 °C without local trials. Troubleshooting guides such as “The Path to Pellet Perfection” by Plastics Technology (2019) provide useful context for balancing cooling and strand integrity. This tuning contributes directly to pellet dust reduction downstream.
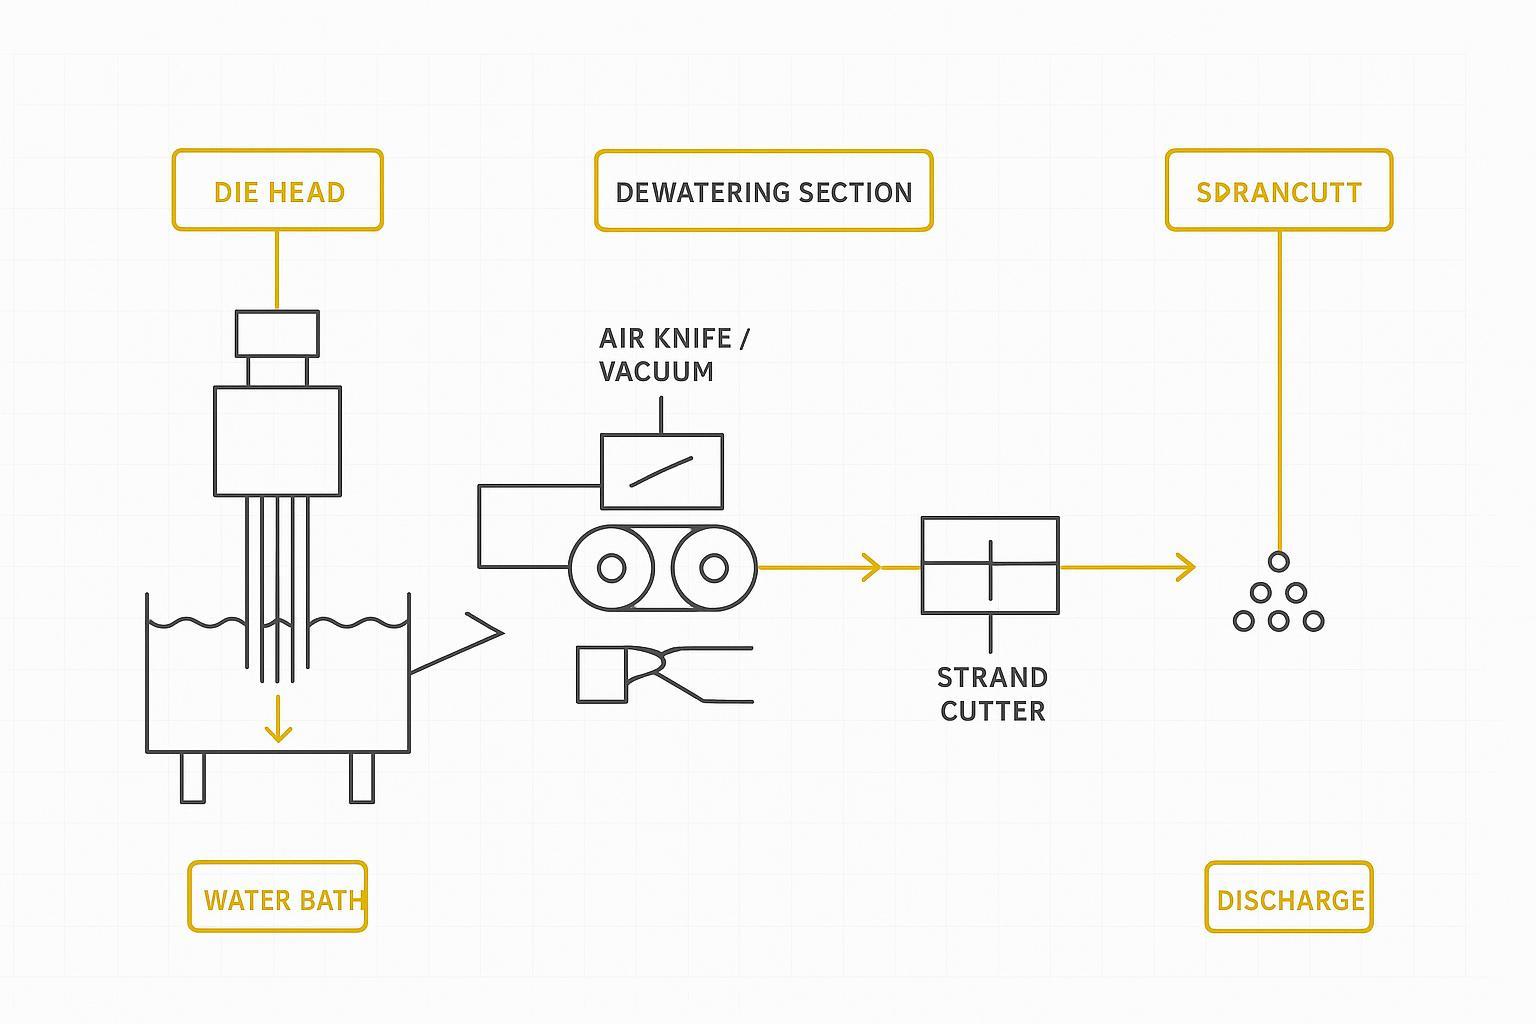
Dewater >95% before cutting
On water‑strand lines, free surface water left on the strand promotes hydroplaning across the bed‑knife, raising fines. As an engineering target, remove >95% of free (surface) water before the strand enters the cutter using an air knife or vacuum slot, followed by nip rollers that establish steady traction. Treat “>95%” as a heuristic starting point (not a published universal standard): what matters is that the strand does not skate at the nip or “float” across the bed knife. Use ISO‑aligned moisture checks downstream to confirm your dewatering decisions are stabilising the process while reducing pelletising fines.
If fines spike suddenly, a quick triage order that usually saves time is:
- Water carry‑over first: check the air‑knife/vacuum performance, strand “shine” (visible wetting), and whether nip rollers are actually gripping or skating.
- Kemudian stabilitas pemotongan: pastikan celah antara pisau dan bed-knife tetap seragam di sepanjang busur (setelah heat-soak), dan periksa apakah ada mikro-chipping pada mata pisau.
- Kemudian penyesuaian kecepatan: verifikasi bahwa kecepatan ujung pisau tidak bergeser (setpoint VFD, slip sabuk, masalah gearbox) dan periksa kembali faktor slip.
- Kemudian kebersihan hulu (upstream): periksa lonjakan ΔP pada screen-pack atau alur pada die-face yang dapat memicu terbentuknya ekor (tails) yang nantinya pecah menjadi debu.
Urutan ini tidak akan menggantikan panduan pemecahan masalah OEM Anda, tetapi membantu tim mengisolasi penyebab paling berpengaruh dengan cepat pada lini wet strand.
Jaga kondisi die-face dan filtrasi
Alur atau undakan pada die-face bertindak seperti tanjakan kecil yang menarik ekor (tails); ekor tersebut kemudian pecah menjadi debu saat dipotong. Tetapkan jadwal inspeksi: pemeriksaan visual cepat setiap giliran kerja (shift), inspeksi dengan pembesaran setiap minggu, dan gerinda die-face saat alur terlihat atau jumlah ekor melebihi batas pemicu Anda. Kolom Plastics Technology “Memitigasi dan Mengatasi Masalah Peletisasi Bawah Air” (2017) membahas bagaimana kerataan die-face dan kondisi pisau berkorelasi dengan terbentuknya ekor—meskipun berfokus pada sistem bawah air (underwater), prinsipnya tetap berlaku untuk sistem strand.
Untuk panduan pemecahan masalah khusus strand mengenai ekor dan peran penyesuaian pemotongan, lihat panduan klasik Plastics Technology “Mengatasi Tujuh Masalah Peletisasi yang Umum” (2012), yang menyoroti ekor sebagai cacat umum yang sering kali dapat diatasi dengan perubahan pengaturan pemotongan.
Filtrasi juga penting. Kenaikan ΔP pada screen-pack menyebabkan ketidakstabilan lelehan dan lonjakan cacat; pilih strategi screen-changer yang sesuai dengan tingkat kontaminasi bahan giling ulang (regrind) Anda dan tetapkan pemicu ΔP untuk penggantian preventif daripada bereaksi setelah terjadi penurunan kualitas.
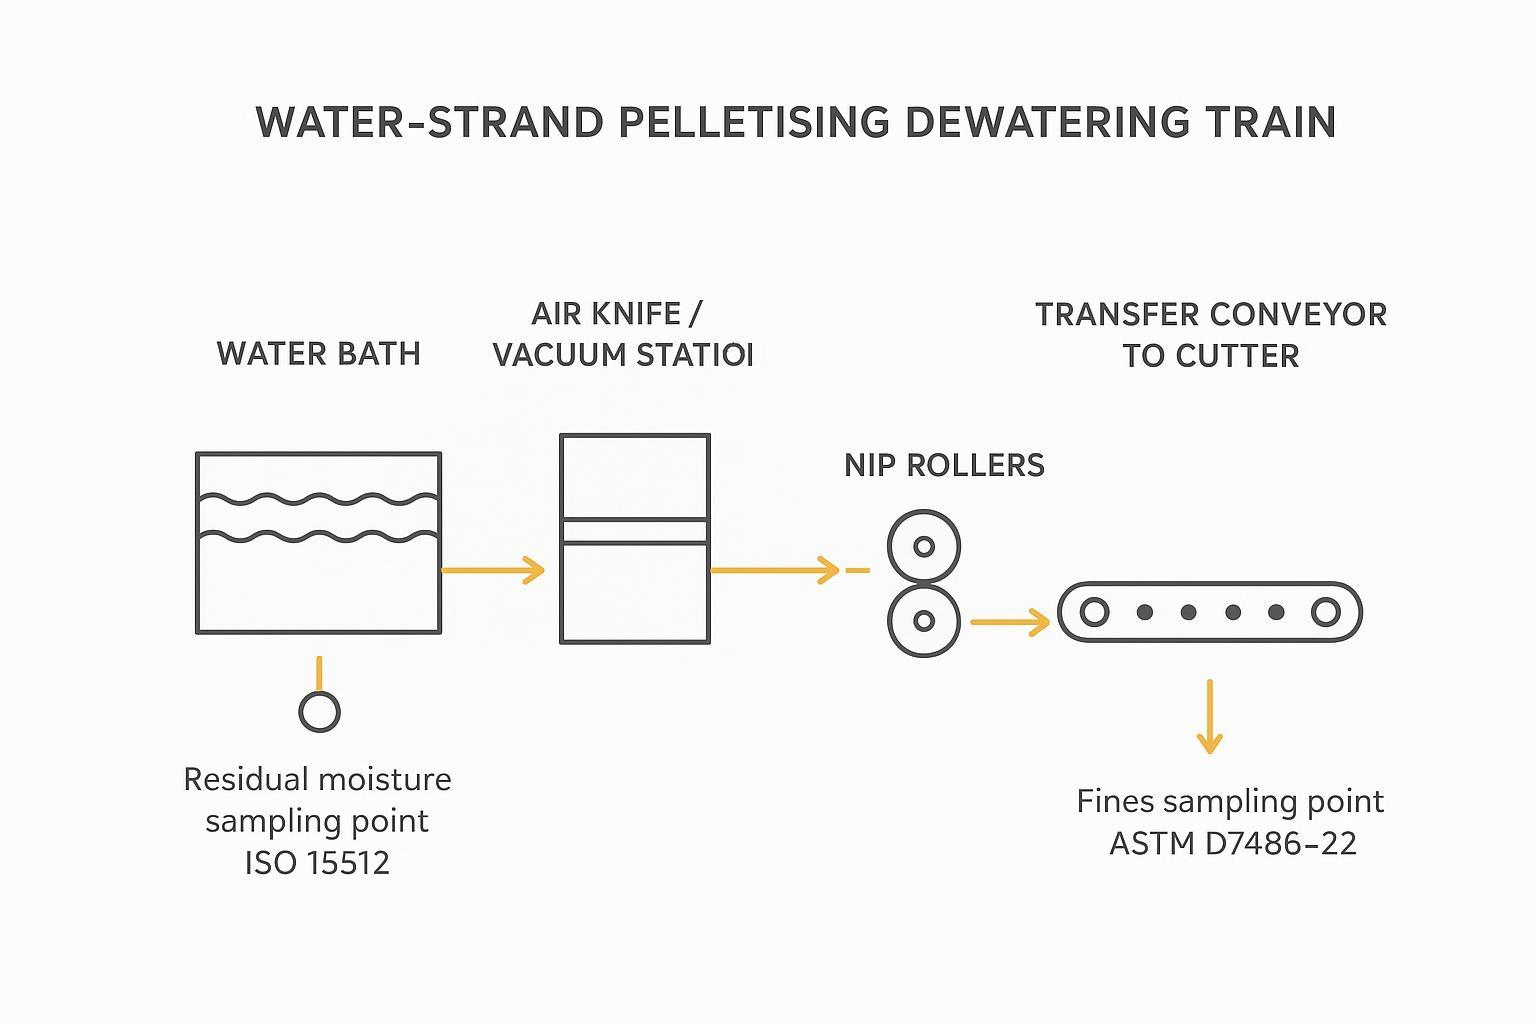
Alur proses: Rangkaian dewatering dengan titik pengambilan sampel yang disarankan untuk kelembapan sisa (ISO 15512) dan pengujian fines (ASTM D7486).
Metalurgi dan perawatan pisau
Pilih material dan pelapis (coating) yang sesuai dengan ketahanan aus
Bahan giling ulang (regrind) campuran dengan kelembapan variabel sangat menantang: inklusi keras dan slip intermiten dapat merusak mata pisau. Memilih metalurgi dan pelapis (coating) yang sesuai dengan ketahanan aus akan mengurangi fines dengan menjaga ketajaman mata pisau untuk interval yang lebih lama.
Opsi dan rentang umum
- Baja perkakas D2 / SKD11: ketahanan aus yang baik dengan biaya moderat; kekerasan biasanya HRC 58–61 untuk tugas pemotongan strand.
- Baja berkecepatan tinggi (HSS) M2: kekerasan panas (hot-hardness) dan ketangguhan yang lebih tinggi; sering kali HRC 62–64.
- Grade PM/CPM (misalnya, kelas CPM-10V): ketahanan aus abrasif yang luar biasa; tentukan kekerasan sesuai data pemasok dan verifikasi stabilitas mata pisau di bawah beban impak Anda.
- Ujung karbida (carbide-tipped) atau sisipan (inserts): untuk tugas ekstrem dengan kandungan serat kaca (glass-filled); memaksimalkan masa pakai tetapi memerlukan pengaturan yang cermat untuk menghindari chipping.
Pilihan pelapis (coating)
- TiN: untuk penggunaan umum, keras dan gesekan rendah, tersedia secara luas.
- TiCN: lebih keras dengan gesekan lebih rendah untuk pemotongan abrasif dan intermiten.
- CrN: ketahanan korosi yang baik; berguna untuk pengoperasian basah dan polimer tertentu.
Contoh kasus (spesifikasi tipe pemasok, ilustratif): Untuk menstabilkan fines pada lini PP/PE giling ulang campuran, sebuah pabrik mungkin menentukan pisau pemotong strand (strand-cutter) berbahan D2 yang di-heat-treat hingga HRC 60 ±2 dengan pelapis TiN dan toleransi gerinda sebesar ±0,02 mm pada dimensi kritis, ditambah kerataan yang diverifikasi terhadap permukaan referensi. Tujuan dari spesifikasi ini adalah keterlacakan dan pengulangan (traceability and repeatability): minta sertifikat material, catatan heat-treat, dan pemeriksaan acak kekerasan (hardness spot-checks), serta konfirmasikan geometri dari sampel atau gambar untuk kesesuaian tingkat OEM.
Jika Anda memerlukan contoh bagaimana dokumentasi tersebut dan dukungan kesesuaian OEM/ODM dapat dikemas oleh pemasok, lihat halaman pisau pelletizer plastik MAXTOR METAL dan panduan toleransi pisau industri. Ini bukan jaminan kinerja—validasikan stabilitas dan masa pakai mata pisau pada lini Anda sendiri di bawah kondisi giling ulang (regrind) dan kelembapan Anda sendiri.
Ilustrasi kecil masa pakai biaya-per-ton
Asumsikan pisau Anda bertahan 80 jam sebelum fines melebihi batas pemicu; D2 HRC 60 ±2 dengan TiN memperpanjang masa pakai hingga 120 jam. Jika harga pisau £240 dan biaya downtime penggantian £180 per kejadian, biaya sebelumnya per 80 jam = (£240 + £180) / 80 = £5,25/jam. Biaya baru per 120 jam = (£240 + £180) / 120 = £3,50/jam. Pada lini 1 t/jam, itu adalah penghematan sebesar £1,75/jam, atau £1,75/ton tidak termasuk keuntungan hasil/fines. Anggap angka-angka ini sebagai placeholder; masukkan biaya dan masa pakai tervalidasi Anda sendiri.
SOP giling ulang (regrind) dan penggantian
Tentukan penerimaan bahan giling ulang (regrind) secara tertulis, bukan berdasarkan kebiasaan. Tentukan sisa lebar pisau minimum, mikro-chipping maksimum yang dapat diterima pada mata pisau (dinilai pada pembesaran ~40×), dan pemeriksaan acak kekerasan pasca-gerinda dalam rentang target. Kemudian, jalankan penggantian yang disiplin:
- Periksa dan bersihkan die-face serta bed-knife; verifikasi kerataan.
- Ukur run-out rotor dengan dial indicator; perbaiki jika di luar batas pabrik/OEM.
- Atur dan catat celah (clearance) pada beberapa posisi jam; putar dengan tangan untuk memastikan tidak ada kontak.
- Kencangkan pengikat (fasteners) sesuai spesifikasi; lakukan heat-soak, periksa kembali celah dan run-out setelah 15–30 menit.
- Catat fines %, ekor (tails), dan arus motor untuk jam produksi pertama.
Snapshot set-point (nilai awal untuk divalidasi pada lini Anda)
| Parameter | Starting target | Catatan |
|---|---|---|
| Blade‑to‑bed clearance | 0.05–0.15 mm | Begin near 0.08 mm for mixed regrind; confirm after heat‑soak; OEM prevails |
| Cutter RPM | line speed / (π × Drotor) | Apply 0–10% slip factor; respect gearbox and edge stability |
| Bath temperature (PP/PE) | 20–40 °C | Adjust on strand behaviour; avoid > ~45 °C without trials |
| Dewatering before cutter | >95% free water removed | Air knife/vacuum + nip; validate locally |
Evidence note: For bath sizing and operating variables, see Plastics Technology bath‑length method (2013) and Jalan Menuju Kesempurnaan Pelet (2019). For fines and moisture measurement standards, reference ASTM D7486‑22 dan ISO 15512.
Kesimpulan
Recap and cadence
- Mechanics: set uniform clearance (validate across the arc), match tip speed to line speed, and verify alignment/run‑out after heat‑soak.
- Water handling: size and temper the bath, then remove free water aggressively before the cutter to stop hydroplaning while reducing pelletising fines.
- Hygiene & metallurgy: keep the die face flat, filters predictable, and choose blade steels/coatings with documented hardness and tolerances. Regrind and change over to a standard rather than waiting for spikes.
Implementation plan and validation KPIs
- KPIs: fines/dust % by ASTM D7486‑22; residual moisture by ISO 15512; blade life (hours or kg to trigger); downtime per event; cost‑per‑tonne including blades and changeovers.
- Cadence: daily clearance/run‑out spot‑checks; per‑shift dewatering check; weekly die‑face magnified inspection; ΔP‑based screen changes; monthly review of KPI trend lines.
- Validation: change one variable at a time; run for a defined tonnage; document conditions and measurement methods.
Two‑week A/B validation template (copy/paste)
- Rule: change one variable at a time (clearance atau RPM slip factor atau dewatering setting atau screen‑pack change trigger).
- Run length: keep each setting for a fixed time or tonnage (e.g., one shift minimum, then confirm after heat‑soak).
- Log fields (per run): resin/regrind mix, strand count, line speed, rotor diameter, RPM (and slip %), clearance at 3–4 clock positions, bath temperature, dewatering method/settings, screen‑pack ΔP, die‑face condition notes, fines % (ASTM D7486), moisture result (ISO 15512, if used), downtime minutes, and “operator notes” (e.g., visible skating, fuzz, tails).
- Decision trigger: accept a change only if it improves fines % dan doesn’t increase downtime or edge damage within the two‑week window.
This small dataset also becomes your internal baseline for future blade‑material and coating trials.
KPI / log sheet (one row per run)
| Bidang | Unit / format | When to record | Owner |
|---|---|---|---|
| Resin + regrind mix | % / notes | Each run start | Proses |
| Strand count | count | Each run start | Operator |
| Kecepatan lini | m/menit | Each run + after heat‑soak | Operator |
| Rotor diameter | M | Once (per machine) | Pemeliharaan |
| Cutter RPM | rpm | Each run + after heat‑soak | Operator |
| Slip factor | % | Each run | Proses |
| Clearance readings | mm at 3–4 clock positions | After set‑up + after heat‑soak | Pemeliharaan |
| Bath temperature | °C | Per jam | Operator |
| Dewatering setting | air‑knife / vacuum / nip notes | Each run + after adjustments | Operator |
| Screen‑pack ΔP | bar or kPa | Per jam | Operator |
| Die‑face condition | short notes / photo ref | Setiap shift | Pemeliharaan |
| Fines / dust | % (ASTM D7486) | Per agreed sample plan | QA |
| Moisture | % (ISO 15512, if used) | Per agreed sample plan | QA |
| Waktu senggang | minutes | Each event | Supervisor |
| Kondisi tepi | 40× notes (chips / burnish) | Daily during trial | Pemeliharaan |
If you want to tighten authority further, you can attach this table as a controlled document (revision number + date + owner) in your plant SOP library.
For custom blade specifications with certificates and OEM/ODM fit, you can request sample validation from LOGAM MAXTOR.
Pengarang
Tommy Tang — Senior Sales Engineer, Nanjing METAL Industrial. 12 years in industrial cutting solutions for plastics processing and pelletising operations. Certifications: CSE, CME, Six Sigma Green Belt, PMP.
Referensi dan bacaan lebih lanjut
- Plastics Technology — Strand Pelletizing: Water Bath Length Method (2013)
- Plastics Technology — The Path to Pellet Perfection (2019)
- Plastics Technology — Solve Seven Common Pelletizing Problems (2012)
- MAAG/Scheer — S3500 Strand and Pultrusion Pelletizer brochure (PDF)
- Bay Plastics Machinery — Basics of Strand Pelletizing training document (PDF)
- ASTM D7486‑22 — Measurement of Fines and Dust on Plastic Pellets and Granules
- ISO 15512 — Plastics — Determination of water content
- MAXTOR METAL — Industrial blade coatings guide; Industrial blade tolerance guide

 English
  Spanish
  Italian
  French
  Portuguese
  Russian
  German
  Arabic
  Hindi
Hindi  Vietnamese
  Indonesian
  Japanese
  Korean