


Máy nghiền một trục không tự nhiên “chậm lại” một cách ngẫu nhiên.
Điểm chính: Nếu đội ngũ của bạn đang phân vân về dao máy nghiền một trục mài sắc hay thay thế quyết định, đừng đoán mò—hãy đo khe hở, xác minh lực siết, và theo dõi xu hướng ampe/tấn cũng như PSD trước.
Hầu hết mọi lúc, nguyên nhân là do hệ thống cắt bị mất biên dạng hình học: các dao cắt/mảnh dao trên rotor và dao tĩnh (stator) không còn cắt đứt ngọt, khe hở bị lệch, hoặc các chi tiết kẹp chặt bị lỏng. Kết quả là điều có thể dự đoán trước—dòng điện (ampe) cao hơn, sinh nhiệt nhiều hơn, kích thước hạt không ổn định và thời gian dừng máy đột ngột.
Hướng dẫn này tập trung vào các bộ phận mà bạn thực sự có thể kiểm soát trong quá trình bảo trì:
- Dao tĩnh (stator) Và dao cắt/mảnh dao trên rotor (vật liệu và thiết kế thay đổi tùy theo nhà sản xuất thiết bị gốc - OEM)
- Các các phép đo và biên bản ghi chép giúp bạn quyết định nên mài lại hoặc thay thế mà không phải đánh cược với sự an toàn hoặc tổng chi phí sở hữu (TCO)
Những dụng cụ bạn sẽ sử dụng (và tại sao chúng lại quan trọng): thước lá (đo khe hở), cờ lê lực (lực siết), thước thẳng (kiểm tra độ phẳng/thẳng của bệ đỡ), chất chỉ thị màu/mực đánh dấu (kiểm tra tiếp xúc) và nhật ký vận hành (kiểm soát xu hướng).
Áp dụng các dụng cụ đó vào các bước kiểm tra định kỳ:
- Khe hở dao máy nghiền: thước lá + sơ đồ đo lường được ghi chép
- Bảo trì dao tĩnh (stator): kiểm tra bằng thước thẳng, tình trạng bệ đỡ và kiểm tra bề mặt tiếp xúc kẹp chặt
- Kiểm tra dao cắt trên rotor: tình trạng lưỡi cắt, độ khít của hốc lắp dao, và kiểm tra độ đảo/độ rơ dọc trục (theo OEM)
- Trình tự siết lực dao máy nghiền: quy trình siết lực theo từng giai đoạn và thời điểm kiểm tra lại
Trọng tâm quyết định rất đơn giản: duy trì thời gian hoạt động và sản lượng ổn định, đồng thời tránh hai sai lầm tốn kém—vận hành dao thép đã cùn quá lâu hoặc thay thế dao thép trong khi chỉ cần mài lại hoặc xoay lưỡi cắt có kiểm soát.
An toàn và Chuẩn bị
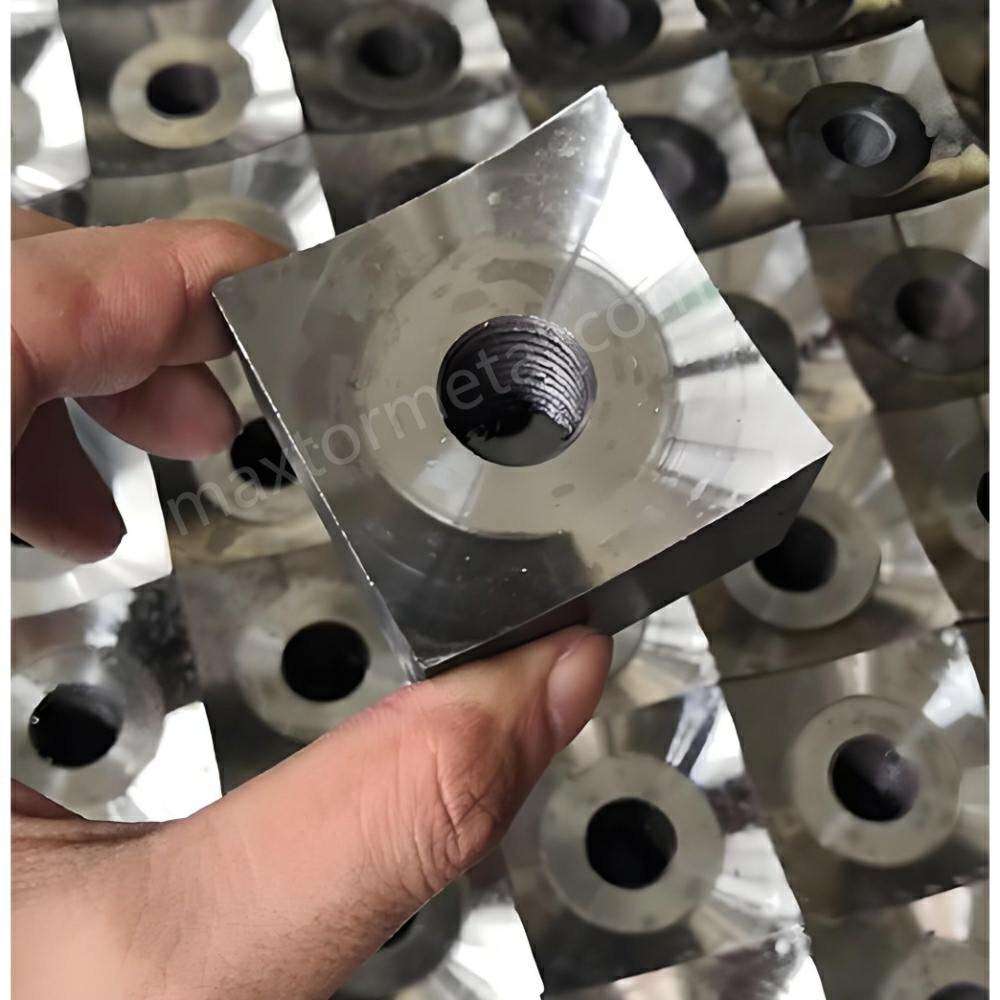
Tuyên bố miễn trừ trách nhiệm an toàn và lưu ý của biên tập viên
Hướng dẫn này phục vụ cho việc lập kế hoạch bảo trì chung và đào tạo. Luôn tuân thủ hướng dẫn sử dụng của nhà sản xuất thiết bị gốc (OEM) máy nghiền và các quy trình EHS tại nhà máy của bạn. Công việc bên trong buồng cắt chỉ được thực hiện bởi nhân sự có chuyên môn sử dụng quy trình lockout/tagout đã được xác minh. Các tác giả không chịu trách nhiệm pháp lý đối với việc sử dụng sai mục đích hoặc sai lệch so với các yêu cầu của OEM.
Lần cuối cập nhật: 2026-04-12 (đánh giá kỹ thuật để đảm bảo tính rõ ràng; thông số kỹ thuật của OEM có thể khác nhau tùy theo từng máy).
Các nguyên tắc cơ bản về LOTO (OSHA 1910.147)
Trước khi tiến hành bất kỳ thao tác bằng tay nào bên trong buồng cắt, hãy coi đây là công việc liên quan đến năng lượng nguy hiểm.
OSHA — 147 – Kiểm soát năng lượng nguy hiểm (lockout/tagout) yêu cầu một quy trình kiểm soát năng lượng bao gồm tắt máy, cách ly, áp dụng các thiết bị khóa/gắn thẻ (lockout/tagout), kiểm soát năng lượng tích trữ, và xác minh.
Ở góc độ thực tế:
- Xác định và cách ly tất cả các nguồn năng lượng (điện, thủy lực, khí nén, năng lượng cơ học tích trữ).
- Áp dụng khóa/thẻ cá nhân cho các thiết bị cách ly năng lượng.
- Giải phóng hoặc kìm hãm năng lượng tích trữ (xả áp suất, chặn chuyển động, đỡ các bộ phận treo).
- Verify isolation before work starts (test/try, meter where applicable). OSHA’s Appendix A typical minimal lockout procedure is a good baseline for building or auditing your site steps.
⚠️ Cảnh báo: Never “bump” the drive to check clearance or seating. Any rotation checks should be manual and only after energy isolation is verified.
Tools, gauges, and reference baselines
Have the tools ready before you loosen hardware:
- Feeler gauges covering your OEM’s specified range
- Cờ lê lực (and multiplier if required)
- Thước thẳng (seat/knife flatness checks)
- Bluing/marking compound for contact pattern confirmation (when your OEM procedure supports it)
- Log sheets (or a digital form) to record clearance, exposure, torque, and symptoms
Baseline data is what turns maintenance into a repeatable decision process:
- No-load amps and typical loaded amps for key materials
- Typical throughput and particle size distribution (PSD)
- Standard “cold” clearance check results and whether you do a “hot recheck” after run-in
Fastener torque and recheck sequence
Blade systems usually fail at interfaces before the steel “wears out.” A knife that isn’t seated or clamped correctly can look like a sharpening problem—until it becomes a broken bolt, a chipped edge, or rotor/stator contact.
Follow your OEM’s torque spec and sequence. The general discipline is:
- Clean seats and fastener contact surfaces
- Torque in stages (for example: partial → mid → final) using the OEM pattern
- Recheck after the full pattern is complete
- If your OEM calls for a run-in, plan a post run-in re-torque and (if specified) a hot clearance recheck
Kiểm tra và Đo lường
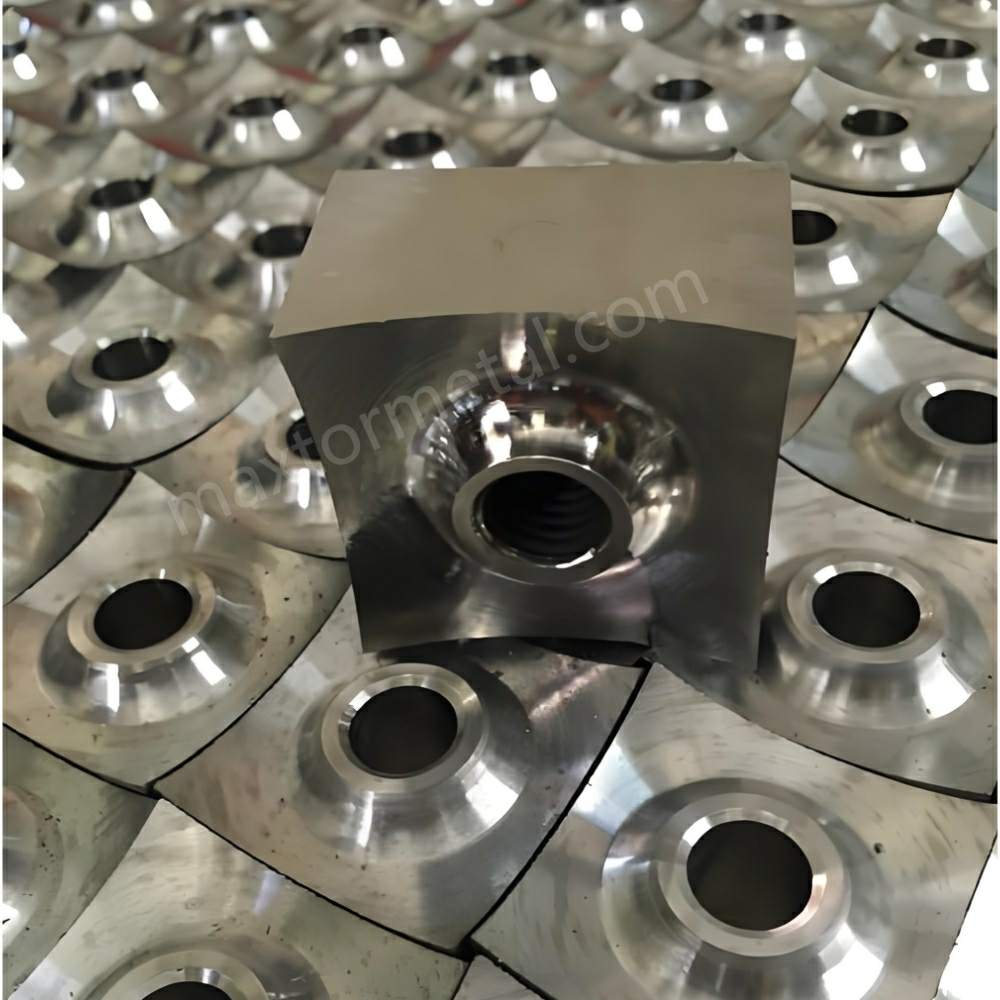
Acceptance checks before you decide sharpen vs replace
To keep decisions consistent across shifts and technicians, define a few acceptance checks your team must record:
- Clearance mapping: measure and log clearance at multiple points along the bed knife (left/center/right) and across multiple rotor positions.
- Clamp integrity: verify seats are clean and flat; torque fasteners in stages per OEM sequence, then perform a documented recheck.
- No-contact confirmation: hand-rotate (only after verified LOTO) to confirm there is no rotor-to-bed contact.
- After-action verification: after resharpen/rotation or replacement, run a controlled check and confirm amps/ton and PSD behavior return near baseline for the same material window.
These checks don’t replace OEM specifications—they make it easier to prove you followed them.
Wear and performance indicators
Use two types of indicators—what you can see, and what the machine is telling you.
Performance indicators that often show up before catastrophic failure:
- Rising motor load (amps/current increases for the same feed and material)
- Heat (higher chamber/drive temperatures, more smearing on plastics)
- Throughput loss (tons/hour drops at the same operating window)
- Particle size instability (more fines/dust, more oversize, inconsistent cut)
- Noise/vibration changes (rubbing, repeating impacts, “new” vibration signatures)
Those symptoms are widely cited as early warnings in shredder maintenance best-practice writeups such as Waste Advantage Magazine’s maintenance best practices for waste shredders (2018) and daily-check guidance like Energycle’s single-shaft shredder maintenance checks (2026).
Visual indicators to check under safe access:
- Edge rounding/rollover, shiny wear lands, nicks
- Chips, cracks, or localized “missing” corners (especially after contamination events)
- Discoloration that suggests overheating/contact
- Uneven wear patterns across a knife length (often points to seating or parallelism issues)
If you’re seeing repeat chipping, treat it as a system issue (contamination, clearance, clamping) before you blame the steel. A structured checklist helps—see Single-Shaft Shredder Blade Chipping: a troubleshooting guide for the common root-cause categories to confirm.
Knife clearance and exposure ranges (verify per OEM)
Knife clearance is not a “set it once” number.
This is where most single-shaft shredder blades sharpen vs replace calls get biased: a dull edge and a drifting clearance can look the same from the outside, but they don’t correct the same way.
It’s a geometry relationship between rotor knives and the bed knife (stator), and it varies by OEM design, rotor diameter, knife style, and material.
What matters in practice:
- Uniform clearance across the full knife length (left/center/right), not just a single gauge point
- Consistency across rotor positions (rotate and re-check to avoid a hidden tight spot)
- Parallelism and seating quality (a burr or debris in a seat can ruin your measurement)
A good field method is to treat clearance as a controlled setup process, not a guess:
- Clean seats and pockets
- Snug-install cutters so they fully seat
- Adjust bed knife position per your machine method (shims/jack screws/wedges)
- Measure with feeler gauges at multiple points, record the values
- Torque in stages, then remeasure
- Hand-rotate and confirm there’s no contact
For a step-by-step approach that mirrors this discipline (while still emphasizing OEM-specific targets), see MAXTOR METAL’s shredder blade clearance setup guide.
Documentation and QA controls
How to set your own intervention thresholds (without guessing)
If you can’t publish or confirm OEM numeric targets in the field, you can still avoid “feel-based” decisions by defining site-specific triggers based on your own baselines:
- Step 1 — Establish baselines: record amps/ton (or kWh/ton), PSD, and “cold” clearance readings when knives are known-good.
- Step 2 — Define drift limits: set an internal trigger when amps/ton rises by a defined % for the same material mix, or when PSD variability crosses your downstream acceptance limits.
- Step 3 — Link triggers to checks: when a trigger trips, require a clearance map (multiple points/rotor positions) and a torque-to-spec verification before deciding sharpen vs replace.
- Step 4 — Validate after action: after a resharpen/rotation or replacement, confirm the metric returns near baseline during a controlled run-in.
Note: These triggers help you decide when to inspect and intervene. They do not replace OEM clearance, geometry, or torque specifications, which remain the final authority.
If your goal is predictable uptime, the logbook is part of the cutting system.
Minimum QA controls that pay off quickly:
If you want, we can provide a simple clearance map + torque confirmation + symptoms log sheet template (spreadsheet or printable checklist) aligned with the fields listed below.
- Record clearance readings (by position), knife exposure, Và torque values (or confirmation of torque-to-spec)
- Ghi chú material mix and any known contamination events (tramp metal, glass, stones)
- Track amps/ton trend (or another normalized energy proxy) and PSD drift
- Require a second-person sign-off after any cutter/bed-knife intervention
Brief brand note (non-promotional, evidence-based): MAXTOR METAL supports shredder knife programs with traceable documentation and compatibility support.
Brief brand note (transparency): the maintenance guidance above is intended to be educational; product/service mentions below are provided only as an optional sourcing/support path.
Depending on the application, their fixed-blade offerings include multiple material options and standard QC steps (material certificates, first article and in-process checks). They also offer OEM/ODM assistance to match drawings/samples and help validate fit-up and compatibility—see the material and QC notes on MAXTOR METAL single-shaft shredder fixed blade materials and QC notes.
Mài sắc so với Thay thế (Dao máy nghiền một trục)
When to resharpen (limits and geometry)
Resharpening (or rotating indexable edges) is the right move when you can restore cutting geometry không có compromising clamp interfaces or creating a clearance control problem.
Resharpen tends to make sense when:
- Wear is progressive and uniform (dull/rounded edges) with no structural damage
- The knife body still meets your OEM geometry requirements (angles, land width, minimum thickness)
- You can reestablish clearance consistently after reassembly
- Bolts, washers, and seats remain in good condition and hold torque
Practical checks before you commit to a resharpen cycle:
- Straightedge check for obvious bowing or seat distortion
- Marking compound/bluing (when used in your procedure) to confirm contact patterns are sane
- A “cold” clearance measurement plan and a post run-in recheck plan
When to replace (damage, limits, persistent loss)
Replacement is the safer and cheaper decision when the steel (or the interfaces around it) can’t reliably return to spec.
Replace is usually the right call when:
- Bạn có chips, cracks, fractures, or missing corners that act like stress risers
- The knife has reached OEM minimum dimensions after prior grinds/rotations
- Bạn thấy đấy persistent performance loss after a proper resharpen and correct clearance setup (amps stay high, PSD remains unstable)
- Fasteners don’t hold torque, or seats/pockets are damaged such that you can’t maintain parallelism
- You’re seeing recurring rotor-to-bed contact or rub marks after setup (indicates a higher-risk underlying issue)
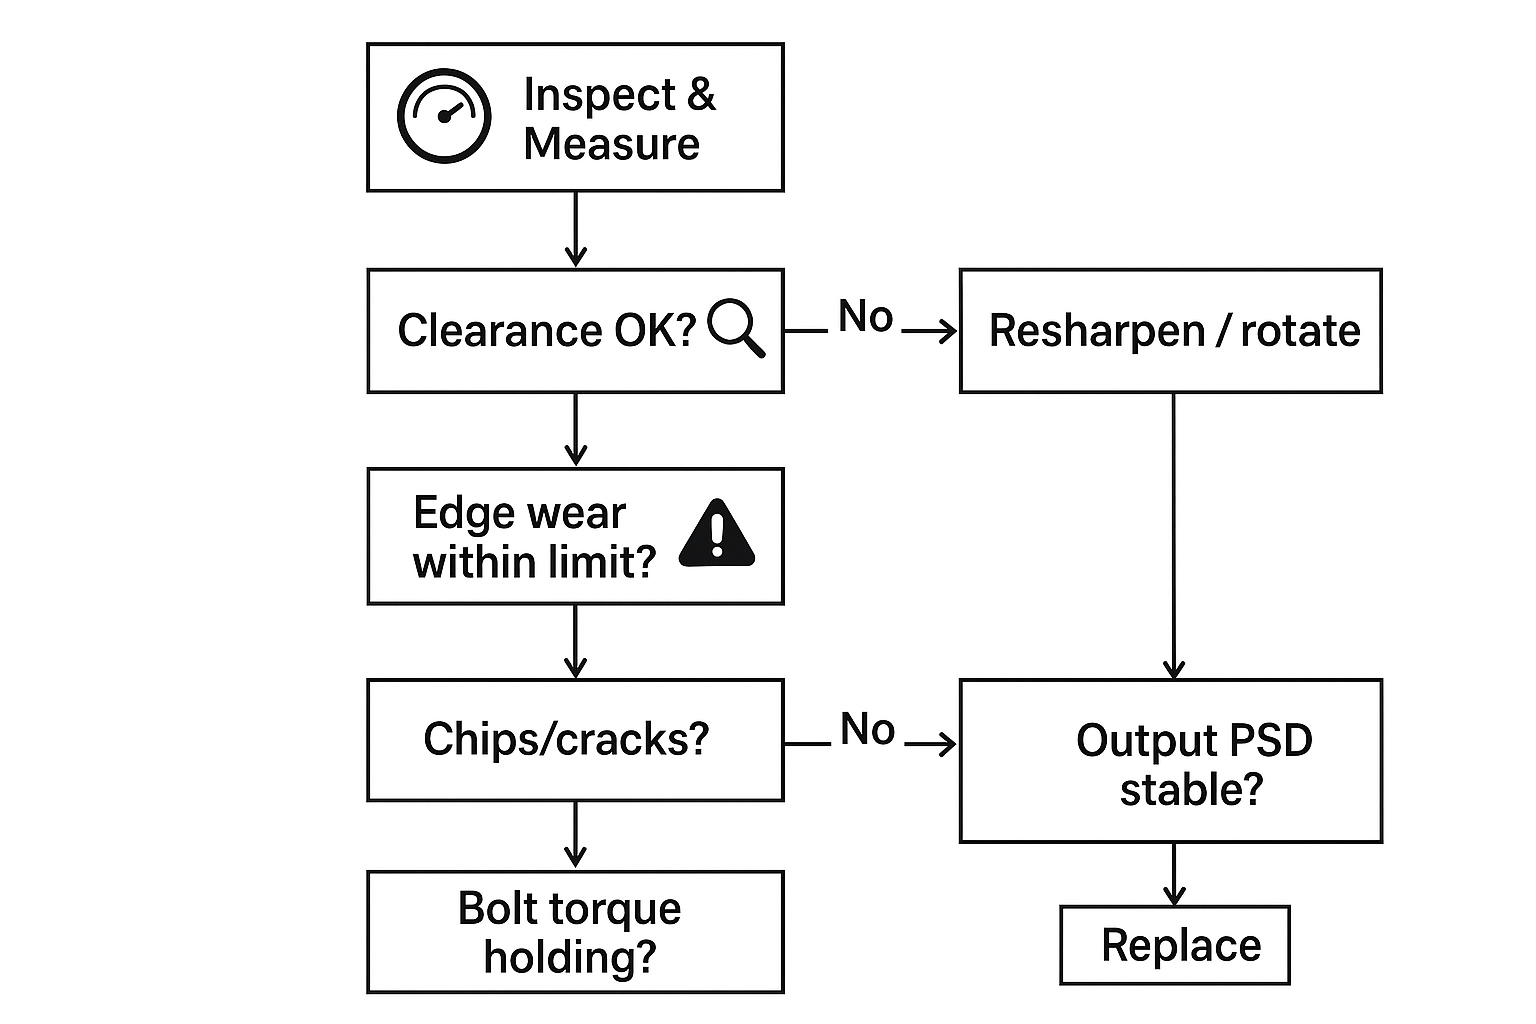
Decision workflow and sign-off
A repeatable workflow reduces downtime because it prevents “try it and see” maintenance.
Use a simple decision workflow:
- LOTO + verify zero energy.
- Inspect edges and seats; document damage modes.
- Measure clearance at multiple points and rotor positions (verify per OEM).
- Confirm torque-to-spec and recheck after staged torquing.
- Decide:
- Geometry restorable + clamping stable → resharpen/rotate.
- Damage/limits/persistent loss or clamping instability → replace.
- Two-person sign-off: maintenance + operations (and EHS if your site requires).
Tần suất và Các yếu tố tác động đến TCO
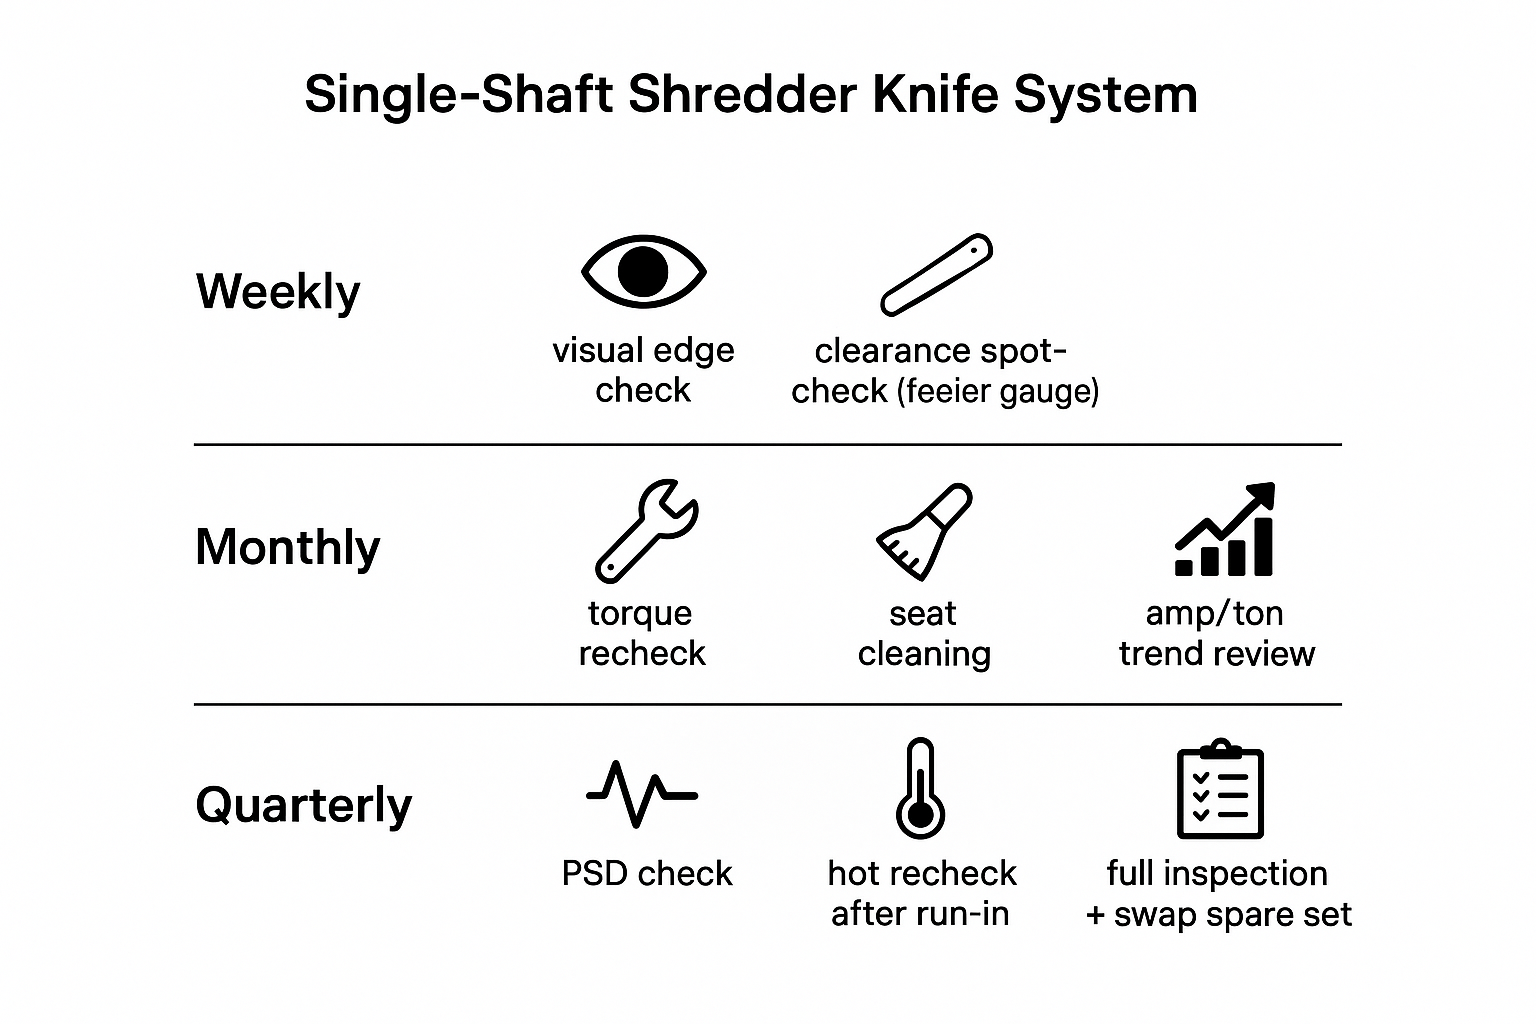
Maintenance intervals by duty and material
Interval planning should reflect reality: duty cycle, contamination, and abrasiveness drive wear more than calendar time.
Use the OEM manual as the baseline, then adjust based on what your logs show:
- Higher contamination/abrasives → shorter inspection and torque recheck intervals
- Film-heavy feeds that smear → pay closer attention to heat and clearance drift
- Hard inclusions/tramp metal risk → increase inspection frequency and strengthen incoming material controls
The key is consistency: do smaller checks more often rather than waiting for a full-blown teardown.
Spare-set and swap strategy
The fastest way to reduce downtime isn’t heroic maintenance—it’s a planned swap.
A practical spare strategy:
- Giữ một spare set of rotor cutters and bed knives (and critical fasteners) ready to install
- Standardize shim packs and measurement tools so clearance setup is repeatable
- Treat sharpened sets like calibrated tools: label, record grind history, and store to prevent edge damage
This approach lets you pull worn steel, install a verified set, and sharpen offline without turning the shredder into a maintenance project for the whole shift.
Trend metrics: amps/ton, PSD, and service life
To protect TCO, track a small set of metrics that correlate strongly with knife condition:
- Amps/ton (or kWh/ton): a normalized energy signal that often rises as knives dull or clearance drifts
- PSD stability: fines/oversize trend, screen-loading behavior, downstream complaints
- Service life by set: time-in-service, material mix notes, number of rotations/grinds
When PSD becomes the pain point, it helps to standardize “what good looks like” (acceptable fines/oversize) and align that with knife-change triggers. For a deeper look at stabilizing size outcomes through maintenance and part quality, see replacement shredder blades for stable output size.
Tài liệu tham khảo và đọc thêm
- OSHA — 147 – Kiểm soát năng lượng nguy hiểm (lockout/tagout)
- OSHA — 1910.147 App A – Typical minimal lockout procedures
- OSHA — Control of Hazardous Energy (Lockout/Tagout) overview
Phương pháp luận và Hiệu chỉnh
- OEM-first principle: clearance ranges, torque values, and geometry limits must come from your shredder OEM documentation.
- How this guide is written: the procedures emphasize repeatable measurement (clearance mapping, torque rechecks) and operational trending (amps/ton, PSD) so maintenance decisions can be audited.
- Corrections and updates: if you spot an error or have an OEM-specific note that should be added, please contact us via MAXTOR METAL’s contact page so we can review and update the guide.
The sharpen-vs-replace decision gets easier when you stop relying on feel and start relying on thresholds you can verify:
- Symptoms you can trend (amps/ton, heat, PSD, vibration)
- Measurements you can repeat (clearance across positions, exposure, runout/endplay checks)
- Interfaces you can trust (clean seats, staged torque, hot rechecks when specified)
And one reminder that prevents most bad calls: clearance ranges, torque values, and knife geometry limits are OEM-specific. When you can’t verify the spec, you’re not maintaining—you’re guessing.
Next steps:
- Confirm governance: align EHS + maintenance on who is authorized to perform LOTO and cutting-chamber work, and make sure the OEM manual is accessible at the point of use.
- Set baselines and triggers: document baseline amps/ton (or kWh/ton), PSD acceptance limits, and a multi-point “cold” clearance map; define what drift triggers an inspection.
- Standardize verification: require torque-to-spec verification (staged pattern + recheck timing) and a recorded clearance map after any knife or bed-knife intervention.
- Plan for controlled swaps: keep a ready spare set (knives + critical fasteners), labeled with grind/rotation history, so changeovers are planned and sharpening happens offline.
- Close the loop: after resharpen/rotation or replacement, run a controlled check and confirm metrics return near baseline; keep a second-person sign-off so decisions stay consistent.
- Optional support: if you need compatibility confirmation or traceable material/heat-treatment documentation for replacement knives, MAXTOR METAL can support OEM matching from drawings/samples and provide the associated QC paperwork on request.

 English
  Spanish
  Italian
  French
  Portuguese
  Russian
  German
  Arabic
  Hindi
Hindi  Vietnamese
  Indonesian
  Japanese
  Korean