
مقدمة
Clustered pellets—twins, triplets, and fused agglomerates—waste throughput, jam dryers and classifiers, and jeopardize customer quality claims. In underwater and die-face pelletizing, most clustering traces back to pellets leaving the die too hot or tacky, insufficient or unstable quench, or imperfect severance at the die face. Blade geometry sits at the heart of clean severance: dialed-in rake and clearance angles reduce cutting force and frictional heat, suppress tails that act like “hooks,” and help pellets separate cleanly in the water stream.
In practice, your first levers are simple and powerful: set the right blade angles, hold a consistent knife-to-die clearance, and stabilize cooling water and melt. Once thermal and mechanical baselines are steady, micro-tune angles by small, deliberate steps and verify the response in sieves and visual checks.
Key takeaways
- Use empirical starting bands for rake and clearance by resin family, then fine-tune ±2–3° by defect signature to reduce tails and agglomeration.
- Establish knife-to-die clearance uniformly and adjust in 0.01–0.03 mm steps; stabilize water temperature and flow before changing geometry.
- Keep melt temperature steady within roughly ±2–5 °C and align cutter RPM to throughput to maintain consistent severance.
- Treat angle changes and clearance moves as controlled experiments; document outcomes with sieve analysis and photo standards.
- For glass-filled or highly filled compounds, bias toward lower rake and higher relief to manage heat and fiber pull-out.
Blade geometry essentials
Rake angle and shear mechanics
Rake is the angle of the cutting edge relative to the die face. A modestly positive rake lowers cutting force in softer polyolefins, which helps prevent smearing and heat buildup at the moment of cut. Too much positive rake, however, can spike local shear heat and soften the pellet skin, increasing the risk of twins or clusters. For tougher or abrasive formulations—especially glass-filled—near-neutral rake preserves edge strength and limits fiber grabbing. Think of rake as your “force vs. heat” dial: more positive often cuts easier but runs hotter; less positive runs cooler and sturdier.
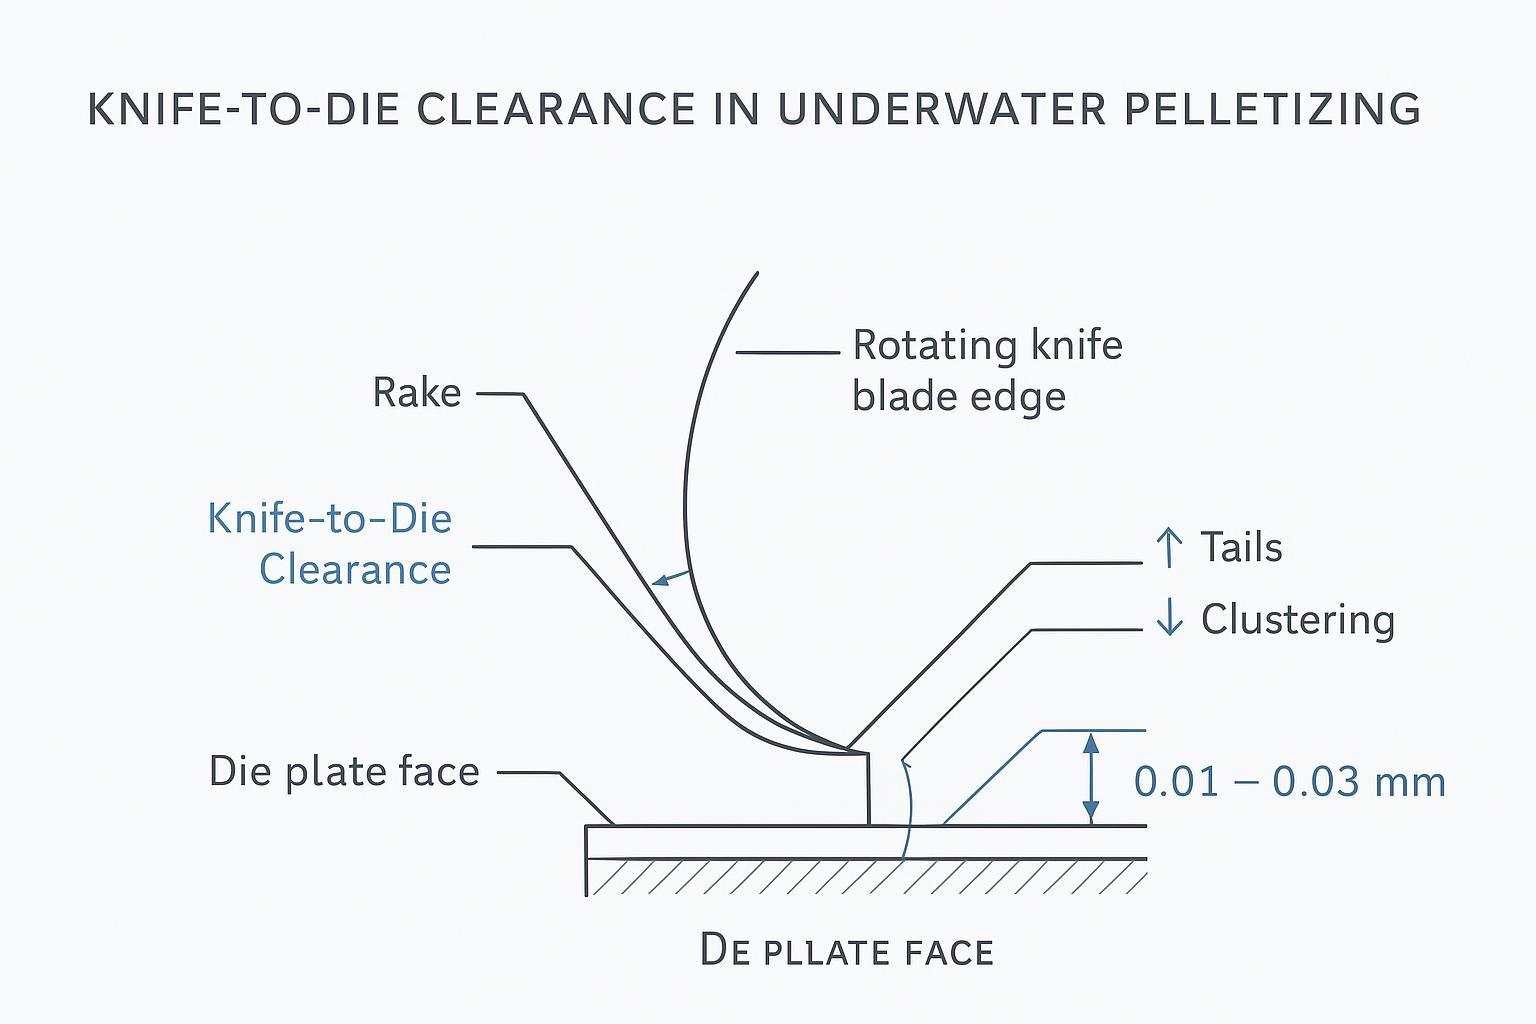
Clearance angle and heat relief
Clearance (relief) is the angle behind the cutting edge. Its job is to keep the blade’s flank from rubbing on the die face. Insufficient clearance drives friction and heat, softening pellet surfaces so they tack together in the water stream. Excessive clearance can destabilize the cut and promote tails. You want just enough relief to minimize rubbing while maintaining a stable, crisp edge path across the die.
Edge sharpness and blade material
A sharp, intact edge is non-negotiable. Dull or micro-chipped edges raise cutting force and heat, leave partial ligaments at the die, and shed fines—each a pathway to clusters. Material and heat treatment matter: tool steels like HSS (e.g., M2) and SKD11 balance hardness and toughness; coatings can further manage wear for abrasive glass-filled compounds. Match material hardness to the resin’s abrasiveness and verify flatness/parallelism so every knife contacts uniformly.
Resin-specific angle setpoints
Polyolefins: PE/PP baselines
- Rake: 5–15° (start near 10°).
- Clearance: 6–12° (start near 8°).
Defect-driven tuning: if you see light tails without signs of overheating, trim rake by 2° or add 2° of clearance. If pellets look smeared or tacky with clusters forming, bias toward slightly less rake and slightly more clearance within the band after confirming water and melt temperatures are stable.
Engineering resins: PA/PET
- Rake: 10–18° (start near 12–14°; maintain good edge strength).
- Clearance: 8–14° (start near 10–12°).
These polymers are more thermally sensitive. Keep melt temperature steady, watch for re-tack in water, and adjust angles only after temperatures and flow are locked in. Use the cut surface as your guide: brittle, faceted fracture plus rising fines often benefits from about +2° rake (then confirm water isn’t over-chilling), while smearing/tacky skins and re-tack in water usually calls for -2° rake and/or +2° clearance after thermal stability is confirmed.
Filled and glass-fiber compounds
- Rake: 8–16° (start near 10–12°; many lines benefit from mid-band values to balance heat and edge integrity).
- Clearance: 10–16° (start near 12–14° for more heat relief).
Glass and mineral fillers elevate wear and can promote fiber pull-out. A slightly lower rake than polyolefins and a bit more clearance can reduce heat and snagging. If fines rise, consider a 2° increase in rake within the band and verify the water is not excessively cold.
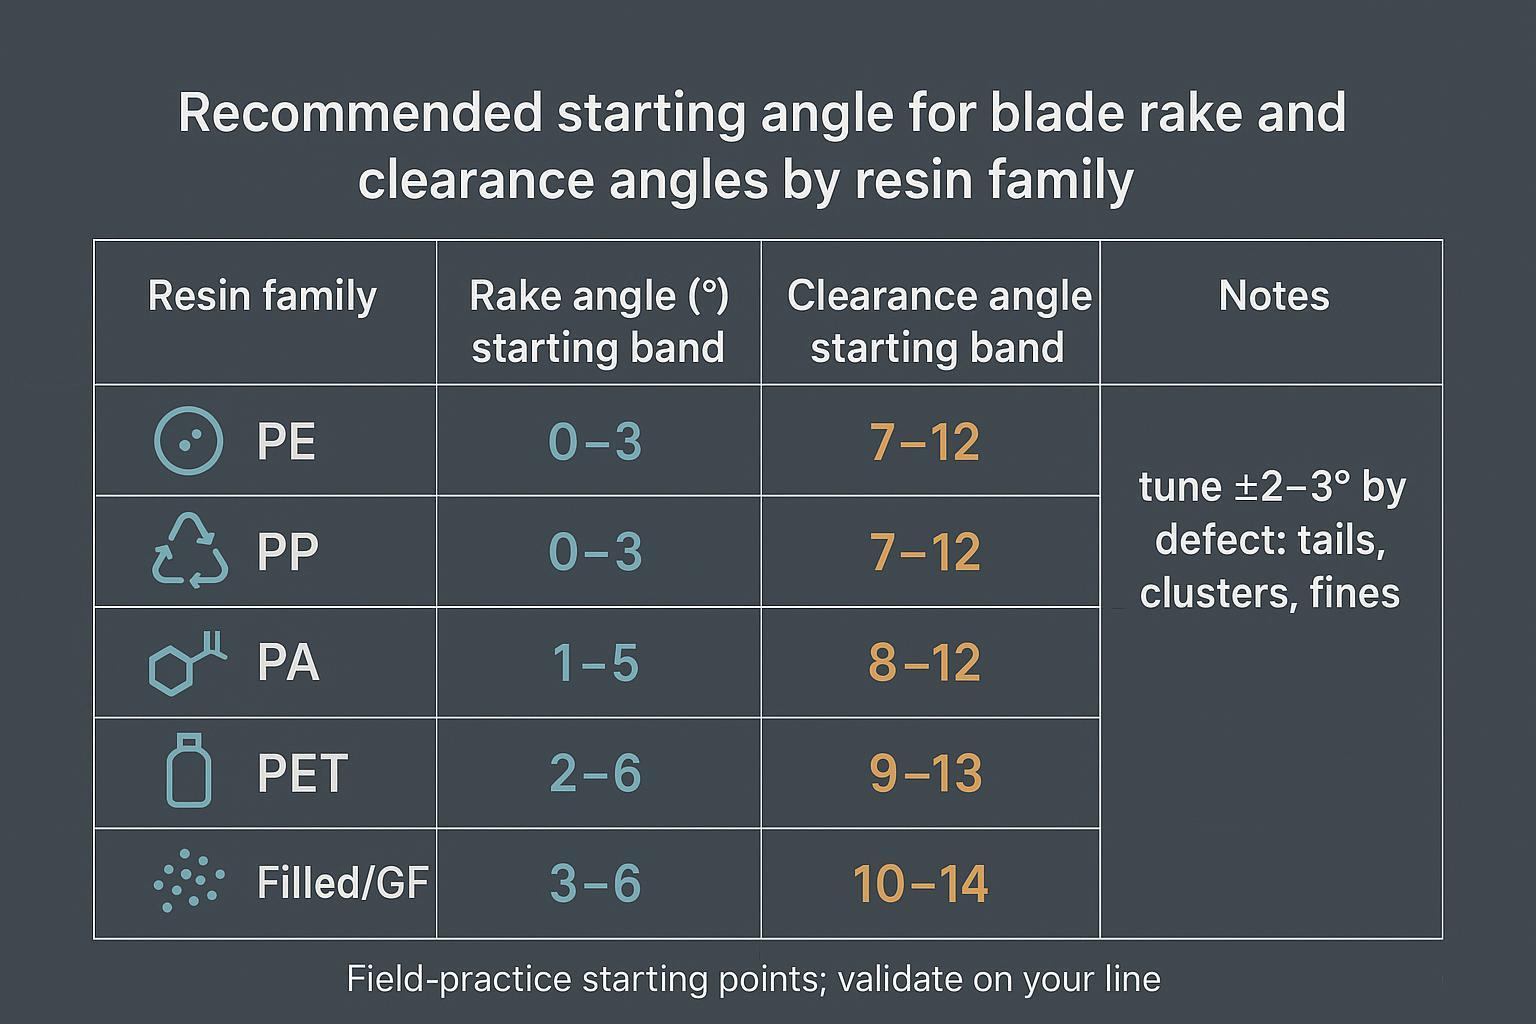
Field-practice note: Angle bands above are widely used starting points; validate on your line and log outcomes. Because most public OEM primers discuss mechanisms but rarely publish resin-specific numeric angle tables, treat these bands as empirical baselines and confirm them against your equipment manual and controlled on-line trials (one change at a time, with sieve/visual verification).
Interacting parameters
Knife-to-die clearance targets
Uniform, minimal clearance at the cutting track is essential. Excessive gap leaves ligaments that become tails; insufficient relief or uneven contact raises heat and smearing. Adjust in small increments (typically 0.01–0.03 mm), confirming uniform contact across all knives. After each change, collect a timed sample and check tails and clustering before moving to the next adjustment. Industry troubleshooting resources flag “excessive knife-to-die gap” as a common tail driver; fix thermal factors first, then refine gap.
Cooling water and melt temperatures
If pellets exit the die hot or the water is too warm or under-flowed, surfaces stay tacky and pair up. Start by lowering melt temperature within the resin’s recommended window and ensuring adequate quench flow. For many lines, process water runs comfortably cool; in specialized approaches like Optimized Temperature Pelletizing, primary water can exceed 100 °C under pressure to improve cut on some engineering resins, followed by a secondary cooler loop to solidify pellets before drying. The principle is the same: stabilize thermal conditions so angles can do clean work without re-tack in the water.
- Guidance on ordered fixes and thermal emphasis is discussed in the Davis-Standard defect guide: see the agglomeration and twins/triplets sections in the Davis-Standard troubleshooting overview (2021).
- For context on quench strategies and OTP, see MAAG’s Gala 12S system brochure و MAAG’s OTP overview.
Cutter RPM vs. throughput
Cutter RPM must track mass flow: too slow, pellets lengthen and can pair; too fast, you add shear heat and fines. Use OEM curves or HMI guidance where provided. In their troubleshooting, Davis-Standard notes “knife speed too high” can contribute to twins and chains in some cases; reduce speed only after stabilizing melt and water. As a practical rule, change RPM in modest steps and immediately evaluate pellet separation, tails, and fines distribution.
Troubleshooting playbook
Diagnose tails and clusters
Start at the die face and the water loop. Tails usually indicate ligaments from excessive gap, worn or chipped edges, or uneven contact; clusters often point to tacky pellet skins from high melt temperature, warm or low-flow water, or unstable cuts that smear. Log melt temperature, die temperature, water temperature and flow, cutter RPM, throughput, and die pressure. Capture photos of pellets against a scale and note defect rates by count and mass.
Adjustment sequence and ranges
- Thermal first: lower melt temperature within spec, reduce water temperature, and verify/increase water flow. Re-check pellet separation.
- Mechanical next: verify edge integrity and replace or re-sharpen if worn. Set uniform contact and adjust knife-to-die clearance in 0.01–0.03 mm steps.
- Angle micro-tuning: within the resin band, change rake or clearance by ±2–3° based on the dominant defect. For tails, bias to slightly less rake or slightly more clearance; for clusters with tacky skins, reduce rake and increase clearance a notch; for fines in filled systems, add ~2° of rake and confirm water not over-chilled.
- RPM alignment: adjust cutter speed to match throughput after the above are steady; avoid inducing extra shear heat.
Preventive maintenance cadence
Inspect cutter edges on a regular schedule; confirm uniform knife tracking and die-face condition after every blade change; and run first-article checks on any new blade batch before committing to a long run. As an example of OEM-grade sourcing and QC alignment, MAXTOR METAL can support first-article inspection packages with dimensional reports, hardness checks, and flatness/parallelism verification to help you lock in angle and clearance performance without guesswork. For practical inspection checkpoints, see their guidance on blade inspection methods and specifying fits in the industrial blade tolerance guide.
Verification and documentation
Sieve analysis and visual standards
Quantify what you see. For particle-size distribution and defect fractions, use a stacked sieve method sized to your nominal pellet. ASTM D1921 describes dry-sieve procedures for plastic pellets; run at least three replicate samples and report percent retained per sieve, percent fines by mass, and percent oversize. For fines and dust quantification in the sub-millimeter range, ASTM D7486 provides methods and reporting guidance suitable for QA acceptance. Pair sieve data with photo panels showing representative defects (tails length thresholds, twin/cluster examples) and annotate acceptance lines to create consistent visual standards.
- Standard methods: ASTM D1921 – Sieve analysis of plastic materials و ASTM D7486 – Measurement of fines and dust on plastic pellets.
Acceptance criteria and defect logs
Define thresholds that match customer specs and your process capability. Common examples include targets like <1% clusters by count and <2% fines by mass, but final values should be agreed contractually.
Copy-paste template: defect log (fill one line per sample)
- Timestamp:
- Line / pelletizer model:
- Resin / grade / lot:
- Throughput (kg/h or lb/h):
- Melt temp (°C) and stability (±°C):
- Die temp (°C):
- Water temp (°C):
- Water flow (L/min) and pressure (bar):
- Cutter RPM:
- Knife-to-die clearance (mm) and adjustment step (mm):
- Knife geometry (rake ° / clearance °) and change (±°):
- Observations (smear/tack, tails length, chains):
- Metrics (same basis each time): % clusters (count), % twins/triplets (count), % fines (mass), % oversize (mass):
- Photo filename(s) / sample ID:
Copy-paste template: sieve report fields (ASTM-aligned)
- Nominal pellet size:
- Sample mass:
- Sieve stack (opening sizes):
- Shaker time / settings:
- Replicates (n=3 recommended):
- Results table: % retained per sieve, % fines by mass, % oversize by mass
- Summary: mean ± SD for fines/oversize; clusters by count (if measured separately)
Example acceptance language (contractual disclaimer)
- Acceptance criteria must be defined in your customer spec and validated on your line.
- Example only: clusters <1% by count; fines <2% by mass; no chained pellets visible in a 100-pellet visual check.
Compliance and traceability artifacts
Copy-paste template: blade FAI / incoming inspection checklist
- Certificate of Conformance (CoC): material, dimensions, heat/lot ID
- Material certs / heat number traceability
- Heat-treatment record (if applicable): target hardness and actual results
- Hardness test results (HRC): method, locations, sample count
- Flatness / parallelism report: measurement method and results
- Edge condition: burr-free, no chips/micro-chips (visual + microscope if used)
- Runout / edge tracking (if measured): method and tolerance
- First-article pellet check: photo standard + sieve report + defect counts
Maintain a bundle for each blade batch and for critical production lots: Certificate of Conformance, material batch and heat-treatment records, hardness data, flatness/parallelism and edge runout measurements, RoHS/REACH declarations, and the first-article pellet sieve report with photos. Vendors can align deliverables to your acceptance criteria; in practice, providing a clear tolerance and inspection checklist up front reduces ramp time and rework on new blade lots.
خاتمة
Keep rake and clearance inside resin-specific bands and fine-tune in ±2–3° steps according to defect signatures. Stabilize knife-to-die clearance, water and melt temperatures, and cutter RPM before making angle moves, then verify results with sieve data and visual standards. With disciplined documentation and consistent QC, you can sustain separation quality and prevent clustered pellets over long production runs.
Author
Tommy Tang is a Senior Sales Engineer at Nanjing METAL with 12 years supporting precision-ground industrial blades for die-face and underwater pelletizing. Certifications: CSE, CME, Six Sigma Green Belt, PMP.
References used in context:
- Ordered fixes and defect causes are summarized in the Davis-Standard troubleshooting overview (2021).
- Quench strategies and OTP context from MAAG’s Gala 12S brochure و MAAG’s OTP overview.
- QA methods per ASTM D1921 و ASTM D7486.