


Note de sécurité et responsabilité : Ce guide fournit des conseils généraux de maintenance pour les trancheuses à pain industrielles. Respectez toujours le manuel d'entretien OEM de votre machine, le programme de consignation (LOTO) de votre site et les réglementations locales applicables. En cas de conflit entre une étape et la documentation OEM, les exigences de l'OEM prévalent.
Revue technique : Revu pour l'accent mis sur la sécurité et la clarté des procédures par l'équipe technique de MAXTOR METAL (les exigences de LOTO et de protection dépendent toujours du programme de votre site et des règles locales).
Besoin d'aide pour confirmer la compatibilité ou la géométrie de la lame ? Contactez MAXTOR METAL : maxtormetal.com/contact.
- À qui s'adresse ce guide et les résultats que vous obtiendrezCe guide s'adresse aux équipes de maintenance, de production et d'approvisionnement des boulangeries industrielles, ainsi qu'aux fabricants d'équipement d'origine (OEM) de trancheuses à pain qui assistent leurs clients sur le terrain. À la fin, vous disposerez d'une procédure de remplacement standardisable, ainsi que d'une méthode de validation qui maintient l'aspect des tranches stable tout en réduisant les temps d'arrêt évitables.
- Où le remplacement des lames de trancheuse à pain impacte la qualité, l'OEE et le TCOL'état et le réglage des lames influencent directement trois résultats que les opérateurs constatent à chaque équipe :
- Qualité: l'usure du tranchant et une tension irrégulière se traduisent par des déchirures, de la compression et une génération excessive de miettes.
- TRG (Taux de Rendement Global): les changements lents et les ajustements incessants après changement réduisent le taux de disponibilité et la fiabilité de la ligne.
- TCO (Coût total de possession): le prix de la lame est rarement le coût principal ; les rebuts, les retouches, la main-d'œuvre de nettoyage et les arrêts imprévus sont généralement prédominants.
- Ce que vous devez préparer : EPI, outils, jeux de rechange et fenêtre de temps d'arrêtAvant d'ouvrir les protections, préparez ce dont vous aurez besoin afin que la machine reste ouverte le moins de temps possible :
- EPI : gants anticoupure, protection oculaire, manchettes ou protège-avant-bras, charlotte/cache-barbe et tablier jetable si votre usine en utilise.
- Outils : clés/outils hexagonaux spécifiques au fabricant, outil de couple/tension si utilisé sur votre modèle, une lampe de poche et un récipient propre pour les fixations.
- Pièces de rechange : un jeu complet de lames assorties (éviter de mélanger anciennes et nouvelles), ainsi que les clips/goupilles utilisés par votre modèle.
- Temps d'arrêt : une fenêtre qui comprend les coupes d'essai et la validation du premier emballage (ne prévoyez pas “ juste assez de temps pour le remplacement ”).
Sécurité, EPI et préparation

Aide-mémoire rapide avant le redémarrage
- LOTO effectué et vérifié ; protections retirées uniquement après confirmation de l'isolation.
- Lames manipulées avec des EPI anticoupure ; les jeux anciens et nouveaux ne sont pas mélangés.
- Toutes les lames sont en place et la quincaillerie est serrée à la main avant la tension finale.
- Trajectoire de la lame confirmée à travers chaque guide prévu (pas de forçage ni de frottement).
- Tension augmentée par étapes selon la méthode spécifiée par l'OEM (jauge/réglage/séquence).
- Protections réinstallées ; zone dégagée ; cycle d'essai contrôlé effectué (si votre modèle le permet).
- Les coupes d'essai respectent la tolérance d'épaisseur et les exigences relatives aux miettes.
- Validation du premier emballage effectuée et approuvée.
Aide-mémoire de consignation (Lockout/Tagout)
Les trancheuses à pain présentent un risque élevé de lacération et d'amputation lors du nettoyage et de la maintenance. L'OSHA indique qu'un programme de consignation (lockout/tagout) est requis lorsque les protections sont retirées pendant l'entretien d'équipements dangereux (voir le guide de l'OSHA : Prévention des coupures et des amputations causées par les trancheuses d'aliments et les coupe-viande (OSHA 3794)). Pour des exigences plus larges en matière de contrôle des énergies, voir la norme de l'OSHA Maîtrise des énergies dangereuses (cadenassage/étiquetage), 29 CFR 1910.147, et les directives consensuelles de l'aperçu de l'ASSP sur la norme ANSI/ASSP Z244.1.
Utilisez une liste de contrôle reproductible :
- Avertissez les employés concernés ; affichez un panneau “ maintenance en cours ”.
- Identifiez toutes les sources d'énergie (électrique ainsi que pneumatique/vide si présentes).
- Arrêtez l'équipement en suivant la séquence d'arrêt normale.
- Isolate energy and apply your lock and tag.
- Release stored energy (bleed air; confirm moving parts are at rest).
- Verify isolation (attempt start; confirm no motion).
⚠️ Avertissement: Never start “just to see if it’s aligned” with guards open. Validation happens with guards in place, at controlled speed, and with a safe stance.
Cut-proof handling and tool setup
- Treat every blade as live. Keep hands out of the cutting plane.
- Use a clean, stable laydown surface with edge protection (cardboard or a dedicated tray).
- Place tools where you don’t reach across blades.
- Replace one side/section at a time if your frame design allows it—your goal is to prevent the frame from twisting or drifting.
Sanitation boundaries and debris control
Blade change is also a hygiene event. Set clear boundaries:
- Establish a “clean side” for new blades and a “dirty side” for removed blades and crumb debris.
- Control crumbs so they don’t migrate into bearings, guide rails, or electrical enclosures.
- Avoid introducing water into areas that your sanitation SOP defines as no-water zones.
MAXTOR METAL’s own maintenance guidance emphasizes routine cleaning and inspection for blade performance and hygiene (see Maintaining & Replacing Bread Slicing Blades).
Étapes de remplacement des lames de trancheuse à pain selon le modèle : Oliver, JAC, Berkel
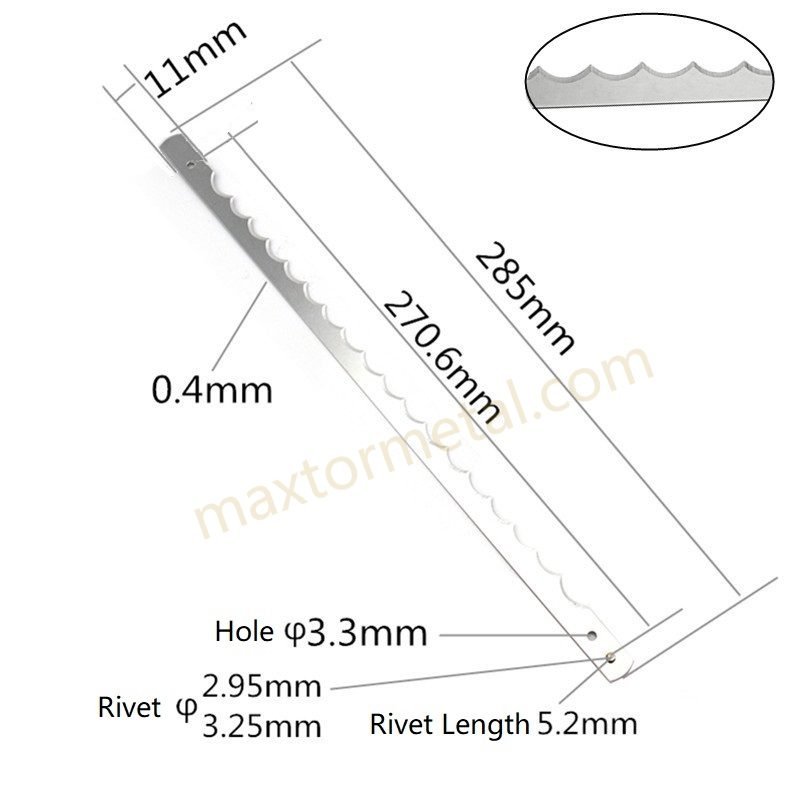
The safe sequence is similar across brands, but the mechanical details that cause trouble differ. The model-aware notes below focus on failure modes: frame distortion, tension inconsistency, and incorrect pathway routing.
Oliver: frame, cams, and tension pins
Oliver-style frames often rely on consistent mechanical indexing. The risk is reassembling with one side “pulled” tighter than the other.
- Relieve tension gradually—alternate adjustments rather than backing one side off fully.
- Photograph or mark the pre-change positions of cams/pins/adjusters.
- Remove blades in a controlled order so the frame doesn’t spring.
- Install the new set with the same order and seating pattern.
Terminé quand : all blades are seated, hardware is finger-tight, and the frame sits square without bias.
Fastener types, guide layouts, and tension mechanisms can vary by sub-model—verify details against your OEM parts diagram and service manual before final tensioning.
JAC: progressive swap without distortion
On JAC-style assemblies, the most common mistake is loosening too much at once and introducing distortion that becomes “mystery thickness drift.”
- Work progressively: relieve → remove → seat → lightly secure → move to the next.
- Keep tension low during initial seating so the blade path finds its track.
- Only bring tension up after every blade is installed and the pathway is confirmed.
Terminé quand : the blade set is installed with even, repeatable low tension and no obvious pathway rubbing.
Sub-model differences (guide hardware, routing points, and tension devices) are common—confirm the exact pathway and adjustment points in your OEM documentation.
Berkel: service pathway and parts mapping
Berkel slicers often have more explicit service pathways, but teams lose time when parts aren’t mapped before removal.
- Map parts before you start: guards, fasteners, clips, guides.
- Keep removed parts grouped by position (left/right, upstream/downstream).
- Follow the service pathway, and don’t “force” a blade into a guide.
Terminé quand : guards and guides return to their original positions and the blade pathway is clean and unobstructed.
If your Berkel variant uses different clips, guide blocks, or guard interlocks, follow the OEM parts diagram/service manual for the correct sequence and reassembly checks.
Tension, alignement et validation (tension et alignement des lames de trancheuse à pain)

Set tension consistently per blade
Your goal isn’t “maximum tight.” Your goal is repeatable tension across the full set. Tension methods and target values vary by brand and model—use your OEM manual’s specified gauge, reading, or adjuster position as the primary reference.
- Bring tension up in stages. Alternate sides and avoid long turns on one adjuster.
- If your model uses a tension gauge/setting, document the reading and keep it consistent per blade.
- If you don’t have a gauge, document the adjuster position and use a fixed pattern (e.g., quarter-turn increments) to reduce variation.
Conseil de pro: If you’re seeing inconsistent crumb load across lanes or edges, treat tension inconsistency as a prime suspect before you blame bread temperature or packaging.
Align spacing and edge orientation (bread slicer blade alignment)
Alignment errors usually show up as:
- thickness variation that won’t “tune out”
- tearing at the same location repeatedly
- unusual rubbing marks, noise, or heat
Contrôles pratiques :
- Confirm every blade is routed through the intended guide pathway.
- Verify spacing is uniform and that blades aren’t twisted in the frame.
- Confirm edge orientation is correct for your blade geometry (serrated/scalloped).
MAXTOR METAL documents bread-blade geometry options and typical tooth pitch ranges—use them as a reference when selecting and verifying blade style (see MAXTOR METAL’s “Essential Guide to Bread Cutting Blades: Optimize Your Bakery…” and MAXTOR METAL’s “How Blade Geometry Impacts Cutting Efficiency”). (Both cited later—only link once per URL.)
Validate with test cuts and SD targets
Do not restart production on “looks okay.” Validate like an OEM would:
- Run a short warm-up cycle at low risk (no product) if your slicer permits.
- Make a controlled set of test cuts.
- Measure and record slice thickness over a small sample.
- Compare to your internal SD/variance target and your packaging tolerance.
- Inspect crumb load and edge finish (tearing vs clean sever).
If results are drifting:
- Re-check pathway routing and blade seating first.
- Adjust tension in small, documented increments.
- Re-test on the same product type and loaf temperature.
Sélection de lames alternatives d'origine (lames de trancheuse à pain alternatives OEM)

Materials, coatings, and edge geometry
For bread slicing, geometry and surface condition matter as much as the base material.
- Matériau: MAXTOR METAL’s Lames pour Trancheuses à Pain are offered in stainless steel with serrated/scalloped cutting edge styles suited to bread.
- Géométrie des bords: tooth pitch and tooth form influence how the edge “grips” crust vs compressing crumb. MAXTOR METAL’s guidance cites serrated pitch ranges (see How Blade Geometry Impacts Cutting Efficiency) and compares blade types by speed and application (see Essential Guide to Bread Cutting Blades: Optimize Your Bakery…).
- Revêtements: if you’re slicing warm or high-sugar product where sticking is a problem, ask your supplier what surface finishes and anti-stick options are available, and validate them with the same crumb + thickness protocol.
Where MAXTOR METAL helps in practice is repeatable manufacturing and controlled geometry for OEM-alternative sets, plus custom build support when the mounting features (holes/tabs) differ between machines.
Match to product mix and throughput
Choose blades to fit your product reality, not a catalog category.
Match by:
- Product mix: sandwich loaves, buns, baguettes, artisan crust—each behaves differently.
- Line rate: higher throughput amplifies small setup errors into scrap.
- Bread condition: loaf temperature and moisture (hot bread sticks; dry crust tears).
When procurement evaluates OEM-alternative blades, push for a short, controlled trial and record three numbers:
- slice thickness variance (your internal tolerance)
- crumb load per unit output (weigh it or at least trend it)
- changeover duration (minutes from stop to first-pack accept)
This turns “OEM vs alternative” into a measurable decision rather than an argument.
Example from industry
A publicly documented example of how slicer design + disciplined upkeep can reduce maintenance burden comes from Bizerba’s case study on the Koch artisan bakery. Bizerba reports the slicer has been “absolutely reliable since start-up,” with “no need for maintenance and no need to change or resharpen the saw blade,” while delivering “up to 200 slices per minute” and a daily cleaning time of “just five minutes” (see Bizerba’s “CSP meets the increased demands of the Koch artisan bakery” case page).
Compliance, documentation, and sourcing
For bakeries and OEMs, “compatible” isn’t just fit—it’s also documentation.
Ask your blade supplier for:
- material grade documentation suitable for food contact use (as required by your market)
- batch traceability and test records
- inspection reports for geometry-critical features
MAXTOR METAL outlines traceability and compliance documentation expectations for food-grade blades—such as traceability papers per batch and supplier certificates—in 5 Faits Rapides sur l'Acier de Qualité Alimentaire pour des Lames Plus Sûres.
Changements, maintenance et registres

Rapid swap SOPs and spare staging
Changeovers get faster when the work is staged:
- Keep one complete, labeled spare set sealed on the “clean side.”
- Pre-stage fasteners, clips, and any model-specific pins.
- Use a fixed replacement sequence and a sign-off step for tension/alignment.
MAXTOR METAL’s maintenance guidance also reinforces the operational value of routine inspections and replacement discipline.
Cleaning cadence and no‑water zones
Crumbs are both a quality issue and a sanitation issue.
- Clean crumbs on a cadence that matches output and product type.
- Respect no-water zones to avoid corrosion and contamination risk.
- Keep blades dry after cleaning and before storage.
Traceability, KPIs, and review cadence
Treat blades like a controlled consumable:
- Record blade set ID / batch, install date, and running hours.
- Track: crumb load trend, slice thickness drift, and changeover minutes.
- Review weekly for the first month after a new blade source or geometry change.
TCO note (method, not marketing): If you want an apples-to-apples comparison, model TCO as:
- (blade set cost + changeover labor + sanitation labor + scrap/rework + downtime cost) / total good output
Even when you don’t publish the number, tracking the inputs makes procurement decisions defensible.
Dépannage après un changement de lame
| Symptom you see | Likely cause | First checks to run |
|---|---|---|
| Thickness drift or lane-to-lane variation | Uneven tension, frame distortion, misrouting | Confirm routing through guides; verify even, repeatable tension using the OEM method; check for frame bias |
| Tearing at the same location on every loaf | Blade twist, incorrect edge orientation, damaged guide | Verify blade seating and twist; confirm edge orientation matches blade geometry; inspect guide condition |
| High crumb load vs baseline | Edge wear/incorrect tooth form, inconsistent tension, product condition shift | Recheck tension consistency; confirm blade geometry matches product mix; retest at consistent loaf temperature |
| Unusual noise, rubbing marks, or heat | Pathway rubbing, misaligned guide, debris in rails | Stop and inspect for rub points; clean crumbs/debris; confirm guides return to original positions |
If any symptom persists after checks, pause production and compare your setup to the OEM manual for your specific model before making larger adjustments.
Conclusion
- Key checkpoints before restart and first-pack verificationBefore you return the line to normal output:
- LOTO removed only after guards are back in place and the area is clear.
- Tension is set consistently and documented.
- Blade pathway is confirmed (no rubbing, no misrouting).
- Les coupes d'essai respectent la tolérance d'épaisseur et les exigences relatives aux miettes.
- First-pack verification is completed and signed off.
- What to monitor in week one and when to retension or replaceIn the first week after a change (especially when trialing OEM-alternative blades), monitor:
- thickness drift (trend it by shift)
- crumb load changes vs baseline
- any recurring tear patterns (often alignment or routing)
- changeover time and post-change adjustments
À propos de l'auteur
Tommy Tang est un Ingénieur commercial senior à Nanjing METAL Industriel, avec 12 ans of experience supporting industrial blade selection and OEM-alternative replacement projects. Certifications include CSE, CME, Six Sigma Green Belt, and PMP.

 English
  Spanish
  Italian
  French
  Portuguese
  Russian
  German
  Arabic
  Hindi
Hindi  Vietnamese
  Indonesian
  Japanese
  Korean