


Catatan keselamatan & tanggung jawab: Panduan ini memberikan petunjuk pemeliharaan umum untuk mesin pemotong roti industri. Selalu ikuti manual servis OEM mesin Anda, program lockout/tagout (LOTO) fasilitas Anda, dan peraturan lokal yang berlaku. Jika ada langkah yang bertentangan dengan dokumentasi OEM, persyaratan OEM yang diutamakan.
Tinjauan teknis: Ditinjau untuk penekanan keselamatan dan kejelasan prosedur oleh tim teknis MAXTOR METAL (persyaratan LOTO dan pelindung tetap bergantung pada program lokasi dan aturan lokal Anda).
Butuh bantuan untuk memastikan kesesuaian atau geometri pisau? Hubungi MAXTOR METAL: maxtormetal.com/contact.
- Untuk siapa panduan ini ditujukan dan hasil yang akan Anda capaiPanduan ini ditujukan untuk tim pemeliharaan, produksi, dan pengadaan di industri roti—serta untuk OEM mesin pemotong roti yang mendukung pelanggan di lapangan. Pada akhirnya, Anda akan memiliki prosedur penggantian yang dapat distandarisasi, ditambah metode validasi yang menjaga tampilan irisan tetap stabil sekaligus mengurangi waktu henti (downtime) yang tidak perlu.
- Di mana Penggantian Pisau Pemotong Roti memengaruhi kualitas, OEE, dan TCOKondisi dan pengaturan pisau secara langsung mendorong tiga hasil yang dirasakan operator setiap giliran kerja (shift):
- Kualitas: keausan tepi pisau dan tegangan yang tidak konsisten muncul sebagai robekan, kompresi, dan tumpukan remah.
- OEE: pergantian yang lambat dan “penyesuaian ulang” pasca-penggantian mengurangi waktu aktif (uptime) dan keandalan lini produksi.
- TCO: harga pisau jarang menjadi biaya utama; produk cacat, pengerjaan ulang, tenaga kerja sanitasi, dan penghentian yang tidak direncanakan biasanya mendominasi.
- Apa yang perlu Anda siapkan: APD, peralatan, set cadangan, dan jendela waktu henti (downtime)Sebelum Anda membuka pelindung, siapkan apa yang akan Anda gunakan agar mesin terbuka dalam waktu sesingkat mungkin:
- APD: sarung tangan tahan potong, pelindung mata, pelindung lengan atau lengan bawah, penutup rambut/janggut, dan apron sekali pakai jika pabrik Anda menggunakannya.
- Peralatan: kunci pas/kunci L khusus produsen, alat pengukur torsi/tegangan jika digunakan pada model Anda, senter, dan wadah bersih untuk pengikat (fastener).
- Suku cadang: satu set pisau lengkap yang cocok (hindari mencampur pisau lama/baru), ditambah klip/pin apa pun yang digunakan model Anda.
- Waktu henti (downtime): jendela waktu yang mencakup pemotongan uji coba dan verifikasi kemasan pertama (jangan memesan “waktu yang hanya cukup untuk menukar”).
Keselamatan, APD, dan persiapan

Daftar periksa cepat sebelum memulai ulang
- LOTO selesai dan diverifikasi; pelindung dilepas hanya setelah isolasi dikonfirmasi.
- Pisau ditangani dengan APD tahan potong; set lama/baru tidak dicampur.
- Semua pisau terpasang di tempatnya dan perangkat keras dikencangkan dengan tangan sebelum pengencangan akhir.
- Jalur pisau dipastikan melewati setiap pemandu yang ditujukan (tidak ada paksaan atau gesekan).
- Tegangan dinaikkan secara bertahap menggunakan metode yang ditentukan OEM (alat pengukur/pengaturan/urutan).
- Pelindung dipasang kembali; area dibersihkan; siklus uji coba terkontrol dilakukan (jika model Anda mengizinkan).
- Pemotongan uji coba memenuhi toleransi ketebalan dan ekspektasi remah.
- Verifikasi kemasan pertama selesai dan disetujui.
Daftar periksa lockout/tagout
Mesin pemotong roti memiliki risiko tinggi terhadap bahaya laserasi dan amputasi selama pembersihan dan pemeliharaan. OSHA mencatat bahwa program lockout/tagout diperlukan ketika pelindung dilepas saat menyervis peralatan berbahaya (lihat panduan OSHA: Mencegah Luka Potong dan Amputasi dari Pemotong Makanan dan Pemotong Daging (OSHA 3794)). Untuk persyaratan kontrol energi yang lebih luas, lihat OSHA Kontrol Energi Berbahaya (Lockout/Tagout), 29 CFR 1910.147, dan panduan konsensus dalam Tinjauan ASSP tentang ANSI/ASSP Z244.1.
Gunakan daftar periksa yang dapat diulang:
- Beri tahu karyawan yang terdampak; pasang tanda “pemeliharaan sedang berlangsung”.
- Identifikasi semua sumber energi (listrik ditambah pneumatik/vakum jika ada).
- Matikan mesin menggunakan urutan penghentian normal.
- Isolasi energi dan pasang kunci serta tag Anda.
- Lepaskan energi yang tersimpan (buang udara; pastikan bagian yang bergerak telah berhenti).
- Verify isolation (attempt start; confirm no motion).
⚠️ Peringatan: Never start “just to see if it’s aligned” with guards open. Validation happens with guards in place, at controlled speed, and with a safe stance.
Cut-proof handling and tool setup
- Treat every blade as live. Keep hands out of the cutting plane.
- Use a clean, stable laydown surface with edge protection (cardboard or a dedicated tray).
- Place tools where you don’t reach across blades.
- Replace one side/section at a time if your frame design allows it—your goal is to prevent the frame from twisting or drifting.
Sanitation boundaries and debris control
Blade change is also a hygiene event. Set clear boundaries:
- Establish a “clean side” for new blades and a “dirty side” for removed blades and crumb debris.
- Control crumbs so they don’t migrate into bearings, guide rails, or electrical enclosures.
- Avoid introducing water into areas that your sanitation SOP defines as no-water zones.
MAXTOR METAL’s own maintenance guidance emphasizes routine cleaning and inspection for blade performance and hygiene (see Maintaining & Replacing Bread Slicing Blades).
Langkah-langkah penggantian pisau pemotong roti berdasarkan model: Oliver, JAC, Berkel
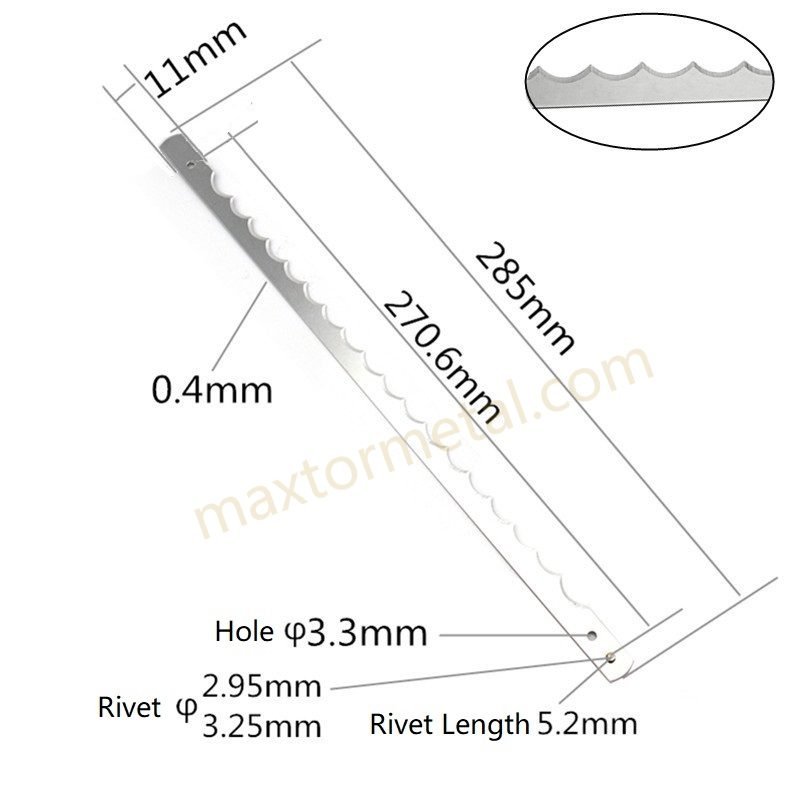
The safe sequence is similar across brands, but the mechanical details that cause trouble differ. The model-aware notes below focus on failure modes: frame distortion, tension inconsistency, and incorrect pathway routing.
Oliver: frame, cams, and tension pins
Oliver-style frames often rely on consistent mechanical indexing. The risk is reassembling with one side “pulled” tighter than the other.
- Relieve tension gradually—alternate adjustments rather than backing one side off fully.
- Photograph or mark the pre-change positions of cams/pins/adjusters.
- Remove blades in a controlled order so the frame doesn’t spring.
- Install the new set with the same order and seating pattern.
Done when: all blades are seated, hardware is finger-tight, and the frame sits square without bias.
Fastener types, guide layouts, and tension mechanisms can vary by sub-model—verify details against your OEM parts diagram and service manual before final tensioning.
JAC: progressive swap without distortion
On JAC-style assemblies, the most common mistake is loosening too much at once and introducing distortion that becomes “mystery thickness drift.”
- Work progressively: relieve → remove → seat → lightly secure → move to the next.
- Keep tension low during initial seating so the blade path finds its track.
- Only bring tension up after every blade is installed and the pathway is confirmed.
Done when: the blade set is installed with even, repeatable low tension and no obvious pathway rubbing.
Sub-model differences (guide hardware, routing points, and tension devices) are common—confirm the exact pathway and adjustment points in your OEM documentation.
Berkel: service pathway and parts mapping
Berkel slicers often have more explicit service pathways, but teams lose time when parts aren’t mapped before removal.
- Map parts before you start: guards, fasteners, clips, guides.
- Keep removed parts grouped by position (left/right, upstream/downstream).
- Follow the service pathway, and don’t “force” a blade into a guide.
Done when: guards and guides return to their original positions and the blade pathway is clean and unobstructed.
If your Berkel variant uses different clips, guide blocks, or guard interlocks, follow the OEM parts diagram/service manual for the correct sequence and reassembly checks.
Pengencangan, penyelarasan, dan validasi (pengencangan dan penyelarasan pisau pemotong roti)

Set tension consistently per blade
Your goal isn’t “maximum tight.” Your goal is repeatable tension across the full set. Tension methods and target values vary by brand and model—use your OEM manual’s specified gauge, reading, or adjuster position as the primary reference.
- Bring tension up in stages. Alternate sides and avoid long turns on one adjuster.
- If your model uses a tension gauge/setting, document the reading and keep it consistent per blade.
- If you don’t have a gauge, document the adjuster position and use a fixed pattern (e.g., quarter-turn increments) to reduce variation.
Kiat Profesional: If you’re seeing inconsistent crumb load across lanes or edges, treat tension inconsistency as a prime suspect before you blame bread temperature or packaging.
Align spacing and edge orientation (bread slicer blade alignment)
Alignment errors usually show up as:
- thickness variation that won’t “tune out”
- tearing at the same location repeatedly
- unusual rubbing marks, noise, or heat
Practical checks:
- Confirm every blade is routed through the intended guide pathway.
- Verify spacing is uniform and that blades aren’t twisted in the frame.
- Confirm edge orientation is correct for your blade geometry (serrated/scalloped).
MAXTOR METAL documents bread-blade geometry options and typical tooth pitch ranges—use them as a reference when selecting and verifying blade style (see MAXTOR METAL’s “Essential Guide to Bread Cutting Blades: Optimize Your Bakery…” and MAXTOR METAL’s “How Blade Geometry Impacts Cutting Efficiency”). (Both cited later—only link once per URL.)
Validate with test cuts and SD targets
Do not restart production on “looks okay.” Validate like an OEM would:
- Run a short warm-up cycle at low risk (no product) if your slicer permits.
- Make a controlled set of test cuts.
- Measure and record slice thickness over a small sample.
- Compare to your internal SD/variance target and your packaging tolerance.
- Inspect crumb load and edge finish (tearing vs clean sever).
If results are drifting:
- Re-check pathway routing and blade seating first.
- Adjust tension in small, documented increments.
- Re-test on the same product type and loaf temperature.
Memilih pisau alternatif OEM (pisau pemotong roti alternatif OEM)

Materials, coatings, and edge geometry
For bread slicing, geometry and surface condition matter as much as the base material.
- Bahan: MAXTOR METAL’s Pisau Pemotong Roti are offered in stainless steel with serrated/scalloped cutting edge styles suited to bread.
- Geometri tepi: tooth pitch and tooth form influence how the edge “grips” crust vs compressing crumb. MAXTOR METAL’s guidance cites serrated pitch ranges (see How Blade Geometry Impacts Cutting Efficiency) and compares blade types by speed and application (see Essential Guide to Bread Cutting Blades: Optimize Your Bakery…).
- Pelapis: if you’re slicing warm or high-sugar product where sticking is a problem, ask your supplier what surface finishes and anti-stick options are available, and validate them with the same crumb + thickness protocol.
Where MAXTOR METAL helps in practice is repeatable manufacturing and controlled geometry for OEM-alternative sets, plus custom build support when the mounting features (holes/tabs) differ between machines.
Match to product mix and throughput
Choose blades to fit your product reality, not a catalog category.
Match by:
- Product mix: sandwich loaves, buns, baguettes, artisan crust—each behaves differently.
- Line rate: higher throughput amplifies small setup errors into scrap.
- Bread condition: loaf temperature and moisture (hot bread sticks; dry crust tears).
When procurement evaluates OEM-alternative blades, push for a short, controlled trial and record three numbers:
- slice thickness variance (your internal tolerance)
- crumb load per unit output (weigh it or at least trend it)
- changeover duration (minutes from stop to first-pack accept)
This turns “OEM vs alternative” into a measurable decision rather than an argument.
Example from industry
A publicly documented example of how slicer design + disciplined upkeep can reduce maintenance burden comes from Bizerba’s case study on the Koch artisan bakery. Bizerba reports the slicer has been “absolutely reliable since start-up,” with “no need for maintenance and no need to change or resharpen the saw blade,” while delivering “up to 200 slices per minute” and a daily cleaning time of “just five minutes” (see Bizerba’s “CSP meets the increased demands of the Koch artisan bakery” case page).
Compliance, documentation, and sourcing
For bakeries and OEMs, “compatible” isn’t just fit—it’s also documentation.
Ask your blade supplier for:
- material grade documentation suitable for food contact use (as required by your market)
- batch traceability and test records
- inspection reports for geometry-critical features
MAXTOR METAL outlines traceability and compliance documentation expectations for food-grade blades—such as traceability papers per batch and supplier certificates—in 5 Fakta Cepat tentang Baja Food Grade untuk Bilah yang Lebih Aman.
Pergantian, pemeliharaan, dan catatan

Rapid swap SOPs and spare staging
Changeovers get faster when the work is staged:
- Keep one complete, labeled spare set sealed on the “clean side.”
- Pre-stage fasteners, clips, and any model-specific pins.
- Use a fixed replacement sequence and a sign-off step for tension/alignment.
MAXTOR METAL’s maintenance guidance also reinforces the operational value of routine inspections and replacement discipline.
Cleaning cadence and no‑water zones
Crumbs are both a quality issue and a sanitation issue.
- Clean crumbs on a cadence that matches output and product type.
- Respect no-water zones to avoid corrosion and contamination risk.
- Keep blades dry after cleaning and before storage.
Traceability, KPIs, and review cadence
Treat blades like a controlled consumable:
- Record blade set ID / batch, install date, and running hours.
- Track: crumb load trend, slice thickness drift, and changeover minutes.
- Review weekly for the first month after a new blade source or geometry change.
TCO note (method, not marketing): If you want an apples-to-apples comparison, model TCO as:
- (blade set cost + changeover labor + sanitation labor + scrap/rework + downtime cost) / total good output
Even when you don’t publish the number, tracking the inputs makes procurement decisions defensible.
Pemecahan masalah setelah penggantian pisau
| Symptom you see | Kemungkinan penyebab | First checks to run |
|---|---|---|
| Thickness drift or lane-to-lane variation | Uneven tension, frame distortion, misrouting | Confirm routing through guides; verify even, repeatable tension using the OEM method; check for frame bias |
| Tearing at the same location on every loaf | Blade twist, incorrect edge orientation, damaged guide | Verify blade seating and twist; confirm edge orientation matches blade geometry; inspect guide condition |
| High crumb load vs baseline | Edge wear/incorrect tooth form, inconsistent tension, product condition shift | Recheck tension consistency; confirm blade geometry matches product mix; retest at consistent loaf temperature |
| Unusual noise, rubbing marks, or heat | Pathway rubbing, misaligned guide, debris in rails | Stop and inspect for rub points; clean crumbs/debris; confirm guides return to original positions |
If any symptom persists after checks, pause production and compare your setup to the OEM manual for your specific model before making larger adjustments.
Kesimpulan
- Key checkpoints before restart and first-pack verificationBefore you return the line to normal output:
- LOTO removed only after guards are back in place and the area is clear.
- Tension is set consistently and documented.
- Blade pathway is confirmed (no rubbing, no misrouting).
- Pemotongan uji coba memenuhi toleransi ketebalan dan ekspektasi remah.
- First-pack verification is completed and signed off.
- What to monitor in week one and when to retension or replaceIn the first week after a change (especially when trialing OEM-alternative blades), monitor:
- thickness drift (trend it by shift)
- crumb load changes vs baseline
- any recurring tear patterns (often alignment or routing)
- changeover time and post-change adjustments
Tentang Penulis
Tommy Tang is a Senior Sales Engineer pada Industri Logam Nanjing, dengan 12 tahun of experience supporting industrial blade selection and OEM-alternative replacement projects. Certifications include CSE, CME, Six Sigma Green Belt, and PMP.

 English
  Spanish
  Italian
  French
  Portuguese
  Russian
  German
  Arabic
  Hindi
Hindi  Vietnamese
  Indonesian
  Japanese
  Korean