

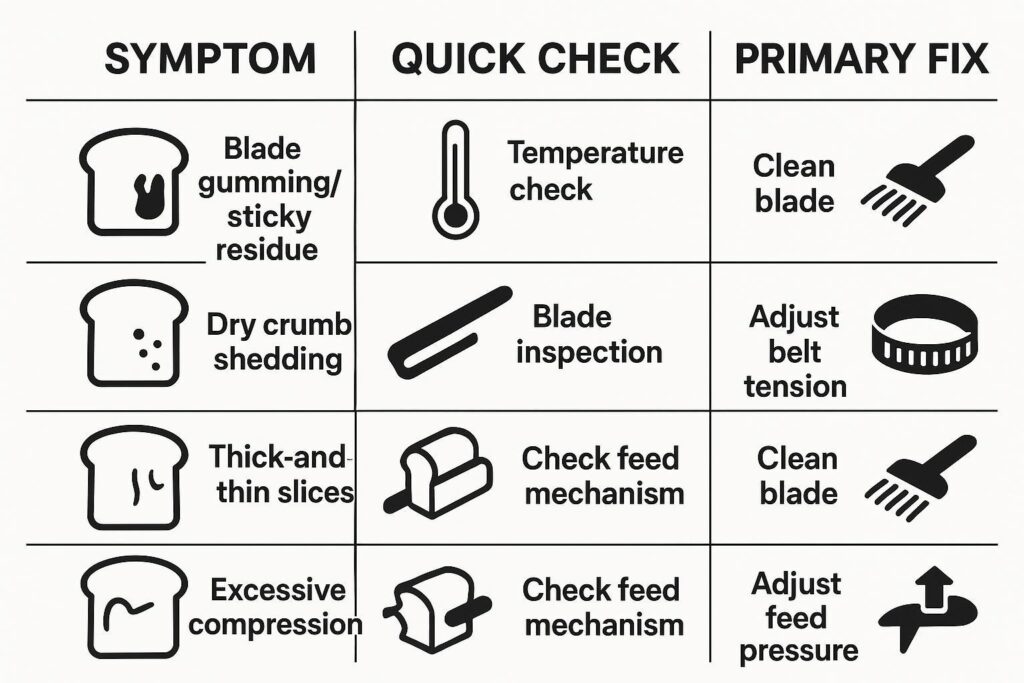
Jika pisau pengiris roti merobek roti hingga meningkatkan limbah secara drastis, panduan ini memberikan perbaikan yang cepat dan dapat diverifikasi.
Anda akan mendapatkan rentang suhu, pemeriksaan mekanis, dan langkah-langkah kontrol lini yang dapat Anda audit hari ini.
Menargetkan lini 600–1200 roti/jam dengan roti loyang, roti berkulit keras (crusty), dan roti bun.
Catatan Keselamatan & SOP: Selalu ikuti manual OEM mesin pengiris Anda dan program keamanan pangan fasilitas Anda. Sebelum memeriksa, membersihkan, atau menyetel pisau, pemandu (guide), sabuk (belt), atau ketegangan (tension), gunakan lockout/tagout dan pastikan semua gerakan telah berhenti. Validasi setiap perubahan proses dengan tim QA Anda, karena kondisi pengirisan dapat memengaruhi pengemasan hilir dan kualitas produk.
Scope note: Titik setel (setpoint) suhu dan mesin di bawah ini adalah referensi awal. Rentang optimal Anda akan bervariasi tergantung pada formula, massa roti, metode pendinginan, kelembapan sekitar, dan kecepatan lini—jadi verifikasi dengan data terukur, bukan dengan perasaan.
Diagnosis dalam 60 detik
Periksa adanya penumpukan lengket (gumming) pada pisau vs. rontokan remah kering; ukur suhu internal sebelum pengirisan.
Catat ketebalan yang tidak rata dalam satu roti (ketegangan/pemandu) vs. robekan masuk dan kemacetan (umpan/tekanan).
Periksa keausan sabuk, sinkronisasi konveyor, dan penumpukan kotoran di antara proses produksi.
Templat log jalankan cepat (salin/tempel)
| Waktu | Produk (tipe/berat) | Gejala (lengket vs kering / robekan masuk / tebal-tipis) | Suhu internal (°F) | Kecepatan lini (roti/jam) | Pengaturan tekanan sabuk atas (top-belt) | Pengaturan ketegangan pisau | Kondisi pemandu (OK/aus/kotor) | Pembersihan dilakukan (Y/T + lokasi) | Perubahan yang dilakukan | Hasil (beban remah / tingkat kemacetan / pergeseran irisan) |
|---|---|---|---|---|---|---|---|---|---|---|
Perbaikan (1–3): Produk dan sistem pemotongan

Rentang suhu dan kelembapan
Ketika masalah pisau pengiris roti merobek roti muncul tiba-tiba di sepanjang giliran kerja (shift), perlakukan kondisi produk sebagai variabel pertama—karena ini adalah variabel yang dapat Anda verifikasi dalam hitungan detik.
- Ukur suhu internal sebelum mesin pengiris. Jangan mengandalkan rasa di permukaan. Gunakan probe yang telah dikalibrasi dan ukur di bagian tengah roti (hindari area kulit roti). Catat nilai dan waktu sejak dikeluarkan dari loyang (depanning)/pendinginan.
- Bekerjalah dalam rentang yang dapat diaudit (referensi awal). Banyak lini melakukan pengirisan terbaik di sekitar 86–104°F suhu internal dan pengemasan di sekitar 95–105°F—lalu sesuaikan berdasarkan formula, ukuran roti, dan metode pendinginan Anda. Sebagai pemeriksaan silang, panduan proses industri tentang pendinginan roti umumnya menargetkan pendinginan produk hingga sekitar 32–43°C (90–110°F) sebelum pengirisan untuk mengurangi robekan dan penumpukan lengket (lihat BAKERpedia, “Pendinginan Roti" "). Untuk pemeriksaan rasionalitas gaya OEM, manual pengoperasian/servis Oliver untuk model mesin pengirisnya menyertakan catatan pemecahan masalah: “Roti mungkin terlalu lunak dan hangat. Pertimbangkan untuk membiarkannya dingin sebelum diiris.” (lihat Manual Pengoperasian dan Servis Oliver Model 908-N/918-N/0938-N).
- Tambahkan toleransi dan pemicu. Sebagai pendekatan kontrol praktis, tetapkan batas tindakan (misalnya, ±3–5°F dari target tervalidasi Anda). Jika rata-rata bergeser ke luar batas selama 3–5 roti berturut-turut (atau satu menit penuh produksi), jeda dan perbaiki pendinginan/penahanan sebelum mengubah perangkat keras.
- Frekuensi pemeriksaan ulang. Ukur ulang saat start-up, setelah waktu henti (downtime) apa pun, setelah penyesuaian sabuk/tekanan, dan setidaknya sekali per shift saat kondisi stabil.
- Seperti apa tampilan “terlalu hangat”: sticky crumbs, smearing on blade sidewalls, compression at entry, and tearing that gets worse as the run continues.
- What “too cool/dry” can look like: fragile crumb shedding, heel cracking, and an increase in loose crumbs that load up guides and belts.
Poin Penting: Always separate “sticky/gummy” tearing from “dry/fragile” tearing before you change hardware. The fixes are different.
Blade condition and type
A blade can be “sharp enough” and still tear bread if the tooth form, sidewall finish, or cleanliness is wrong for the product.
- Confirm the failure mode at the blade. If you see a fine film building on the blade walls, you’re fighting drag and heat—not just edge sharpness. BakingBusiness points out that crumb can deposit as a film on blade walls and that blade-sidewall properties influence how that buildup behaves in production (BakingBusiness, “The three core properties of bread slicing blades” (2019)).
- Match blade type to bread family. Soft pan breads, crusty loaves, and buns won’t behave the same. If tearing is localized to crust transitions, review tooth geometry and set.
- Replace on evidence, not calendar. A quick check is whether tearing correlates with a measurable increase in crumb film, heat, or slice wander at constant tension.
Neutral brand note (materials/coatings and compatibility): If you’re sourcing replacement band blades, it can help to specify base material + heat treatment + any coating requirements and confirm OEM compatibility for your slicer model. Suppliers such as Pisau pemotong roti MAXTOR METAL emphasize OEM/ODM compatibility and material selection; treat that as a documentation and fit check—not as a shortcut around temperature, tension, and sanitation controls.
Tension and guide alignment
If slices go thick-and-thin within the same loaf—or tearing appears on one side more than the other—assume the blade path is wandering.
- Verify blade tension is uniform across the lattice/bands. Uneven tension can create oscillation and deflection that shows up as thickness variation and side tearing.
- Inspect guides for wear and contamination. Worn or debris-loaded guides increase friction and push the blade off its intended line.
- Square up the product path. If the loaf enters skewed, the slicer can “grab” one edge first, starting an entry tear that turns into a jam.
For context, BakingBusiness notes that product temperature, blade tension, and product positioning are all drivers of slicing errors and thickness variation (BakingBusiness, “Slaying bread slicing errors” (2019)).
Perbaikan (4–5): Penanganan dan kontrol lini

Top-belt pressure and belts
Top-belt pressure is a common hidden cause of entry tears—especially when product is warm or when belt condition varies across stations.
- Reduce compression first, then re-test. If you see crushed crowns, dragging, or “pinch” marks, back off pressure and verify you still have stable feed.
- Check belt wear and tracking. A glazed, hardened, or uneven belt face can slip, grab, or micro-jerk the loaf at entry.
- Confirm pressure consistency shift-to-shift. If one crew “tightens until it stops moving,” you’ll get variability no blade change can fix.
Feed, speed, and sanitation
When tearing shows up as entry rips, intermittent jams, or a rising crumb load over time, focus on line control and hygiene.
- Sync conveyors to prevent loaf “bump” at handoff. If the infeed and slicer conveyors aren’t matched, the loaf gets compressed or pulled right as the blades engage.
- Stabilize spacing and guides upstream. Poor lane control creates side contact, which becomes a tear point at the slicer throat.
- Clean between runs with intent. Don’t just blow crumbs deeper into the machine. Remove buildup where it changes friction: blade area, guides, belts, and the infeed throat.

Validasi setelah Anda melakukan perubahan apa pun
After you adjust temperature, tension, belts, guides, or sanitation steps, do a quick verification pass so you don’t “fix” tearing but create a new problem downstream:
- Confirm slice thickness is stable (no visible thick-thin or side drift)
- Check crumb load is not rising over the run (film on blade walls, debris in guides)
- Track jam rate for the next 15–30 minutes (or the next full rack)
- Verify packaging isn’t compromised (compression, poor seal due to excess crumbs)
- Document the final setpoints and have QA/line lead sign off per your SOP
Kesimpulan
If you need replacement band blades, treat sourcing as a documentation and fit exercise: confirm OEM compatibility, provide your drawing/sample, and specify base material, heat treatment, and any coating requirements so performance is repeatable.
About MAXTOR METAL (for traceability): MAXTOR METAL manufactures custom, precision-ground industrial blades with 15+ years of experience and a multi-step quality control process. For procurement teams, it can be helpful to request material certificates and inspection records with each blade batch (learn more: LOGAM MAXTOR).
Recheck slicing temp window (about 86–104°F slicing; 95–105°F packaging), verify zero gumming.
Standardize tension, guides, and belt pressure; sync conveyors; clean between runs.

 English
 Spanish
 Italian
 French
 Portuguese
 Russian
 German
 Arabic
 Hindi
 Vietnamese
 Indonesian
 Japanese
 Korean
satu Respon