Bread crumb waste is easy to dismiss as “just housekeeping.” On an industrial slicing line, it’s a yield leak, an OEE problem, and a food-safety risk all at once.
Nota informativa: MAXTOR METAL supplies industrial cutting blades. The principles in this article are vendor-agnostic and focus on measurable process controls (crumb mass, thickness tolerance, downtime) so you can validate improvements on your own line—regardless of blade brand or slicer make.
The good news is that crumb waste is rarely mysterious. Most of it is created at a few predictable points: the first contact at the crust/crumb boundary, any drag along the blade sidewall, and any instability in guidance or loaf control.
- Why you need to reduce bread crumb waste to protect yield, OEE, and compliance
Every gram of crumbs in the crumb tray is product that can’t be sold. But the bigger cost is usually secondary:
- Yield and giveaway: crumb loss and torn slices often come with thickness drift. That pushes you into rework, repack, or conservative thickness settings that increase giveaway.
- OEE hit: crumb buildup changes friction and feed behavior. It increases jam rates, cleaning stops, and “mystery downtime” that’s hard to code correctly.
- Compliance exposure: crumbs accumulate in corners, under guides, and around guards. They’re a sanitation burden and a verification risk (especially when allergens or multiple SKUs share equipment).
A helpful mental model: crumb waste is a symptom of excess cutting force and uncontrolled friction. Serration geometry, coatings, and setup all change those two things.
- What changes serration geometry, coatings, and setup make on slice quality
Think of slice quality as three outcomes you can actually measure:
- Clean cut rate (visual tearing and “fuzz” at the cut face)
- Thickness stability (within a defined tolerance band)
- Massa di briciole (crumbs collected per unit product)
Serration geometry decides how the blade “bites” into crust and transitions into soft crumb. Coatings and surface finish decide how much the blade sidewall drags, sticks, and carries residue. Setup decides whether the blade can do its job consistently: temperature, tension, guides, alignment, and sanitation discipline.
Bread crumb waste: what to measure before you change blades

If you want improvements that survive shift changes and audits, validate them like a process change—not a one-off trial.
- Crumb loss rate (by weight): collect crumbs from a defined period and weigh them, then divide by sliced product weight.
- Slice thickness tolerance: sample a run (for example, 20–30 consecutive slices) and measure thickness with calipers or your in-line gauge; calculate % within tolerance.
- Downtime and microstops: log stops by reason code (jams, cleaning, blade change, guide adjustment). Tie those minutes back to OEE.
Secondo American Society of Baking guidance on bread slicing (30–36°C / 86–97°F window), product temperature and blade condition strongly influence tearing, gumming, and crumb generation—so record temperature and blade-change timing alongside the metrics above.
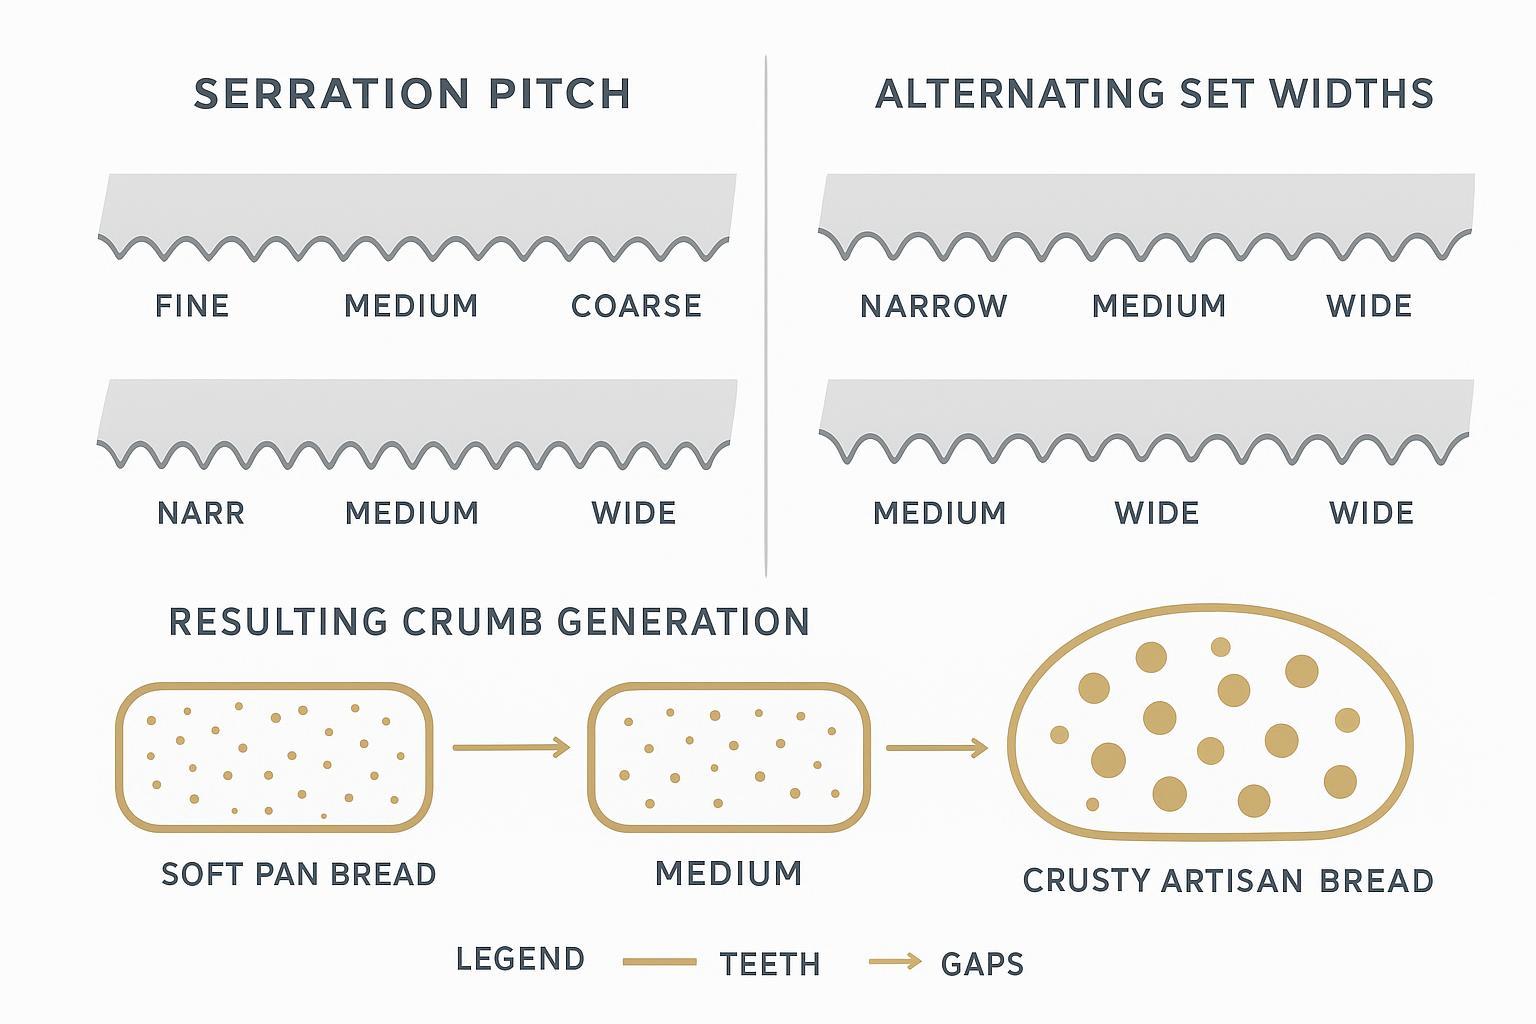
Serration that cuts waste
Serration isn’t just “more aggressive” vs “less aggressive.” It’s geometry that controls where the cutting load goes—into clean shearing or into crushing/tearing.
Geometry and pitch selection
Pitch and tooth form affect two failure modes that create crumbs:
- Crust penetration without crushing the crumb: teeth need enough bite to start the cut cleanly.
- Low-drag travel through the crumb: once the crust is breached, sidewall drag and tooth aggressiveness become the enemy.
Practical selection guidance:
- Soft pan bread / high-speed lines: favor a geometry that minimizes drag and sawing aggression. Too-fine or overly pointed teeth can “grab” and fuzz the cut face.
- Crusty artisan loaves: you typically need more bite to get through the crust cleanly, but that can raise crumb loss if the set is too wide or the edge is unstable.
Your goal is not “the sharpest tooth.” It’s the cleanest transition across the crust-to-crumb boundary with the least sidewall friction.
Alternating set and stability
If the blade path isn’t stable, you’ll see it as thick-thin slices, one-sided tearing, and a surprising amount of loose crumb.
Alternating set patterns can help stability, but they also change the kerf and the way the loaf is supported during the cut. In practice:
- Too much set can increase friction on guides and can throw more crumbs into the machine.
- Too little set can increase sidewall contact and smearing, especially when product is warm.
Treat set changes like a controlled trial: change one variable, measure crumb loss rate, and watch slice-face appearance.
Match to loaf type and throughput
Throughput matters because it changes how sensitive you are to small friction increases:
- At high loaves/hour, a small increase in drag becomes heat, residue buildup, and jams.
- Different SKUs behave differently: enriched sandwich bread, rye, seeded breads, and high-hydration loaves each have different “tear thresholds.”
If you run mixed products on the same slicer, you may need more than one serration geometry (or a changeover standard) instead of chasing a single “universal” tooth.

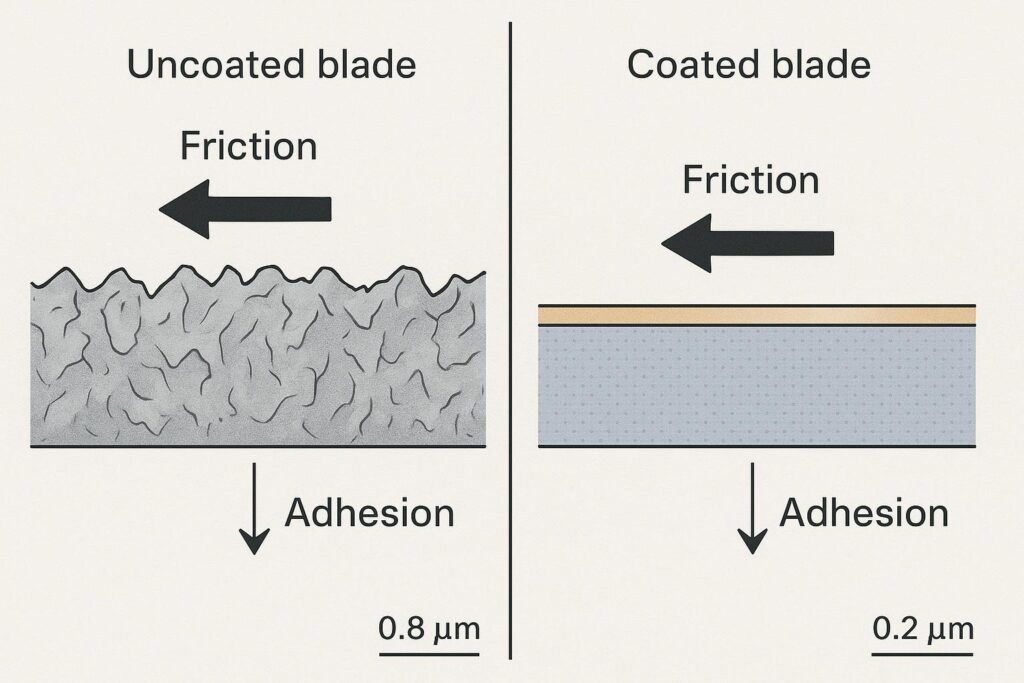
Coatings and surface finish
Serration starts the cut. Surface condition finishes it.
If you see crumb “film” on blade sidewalls, residue on guides, or frequent wipe-downs, you’re not just fighting sharpness—you’re fighting friction and adhesion.
TiN vs DLC for friction and sticking
As a high-level rule: lower friction tends to mean less drag and less sticking, which tends to mean fewer tears and fewer crumbs.
A peer-reviewed tribology study comparing coatings found that DLC coatings showed much lower coefficients of friction (~0.1 or below) than TiN (~0.7 range in their tests), with DLC generally remaining lower and more stable in that experimental setup (peer-reviewed study comparing TiN and DLC friction behavior).
For slicing operations, the practical takeaway isn’t the exact coefficient—it’s what you observe on the line:
- Lower drag often shows up as fewer smears, less buildup, and more consistent slice faces over a run.
- Less sticking can shorten cleaning cycles and reduce the “crumb snowball” effect where residue causes more residue.
Hardness and edge life (HRC)
Edge life is not just “harder is better.” It’s the combination of:
- base steel and heat treat (hardness, toughness)
- tooth geometry (stress concentration)
- how abrasive the product mix is (seeds, inclusions)
- how often the blade is exposed to cleaning chemicals and mechanical scraping
If your crumb waste climbs late in the run, don’t guess—mark blade-hours to failure and correlate it with crumb loss rate and thickness drift. That gives you a defensible replacement interval and makes it easier to compare blade specs without arguments.
Low-Ra finishing and cleanup
Surface roughness (Ra) matters because a rough sidewall gives crumbs and residue something to hang onto.
A smoother surface finish can:
- reduce the “carry” of crumbs along the cut
- reduce sticking and smearing that drives tearing
- shorten cleanup time because residue releases more readily
The point isn’t cosmetic polishing. It’s getting to a finish that supports predictable sanitation.
Operating window and setup
The cleanest geometry and best coating won’t save a line that’s running outside its operating window.
Bread temperature before slicing
Temperature is one of the fastest ways to create (or eliminate) crumb waste.
The American Society of Baking notes a common slicing window of 30–36°C (86–97°F), warning that loaves that are too hot can gum blades and tear, while loaves that are too cool can generate excessive crumbs (ASB bread slicing guidance).
Practical control points:
- Measure center temperature with a calibrated probe (not the crust).
- Set action limits around your validated target and require a recheck after downtime.
Tension, guides, and alignment
When slices wander, you’re usually seeing a mechanical stability problem, not a recipe problem.
Focus your checks on:
- Tension consistency across the blade set (especially on band/lattice systems)
- Guide wear and contamination (crumb packed into guides changes the blade path)
- Infeed alignment and lane control (skewed entry turns into one-sided tearing)
If you need a practical troubleshooting baseline, this bread slicer tearing troubleshooting checklist lays out measurable checks for temperature control, alignment, and cleaning discipline.
Sanitation verification loop
Crumbs aren’t just waste. They’re a hygiene variable.
Build a loop that connects slicing performance to sanitation verification:
- Define “clean” for the slicer: where crumbs must not remain (guides, guards, under belts).
- Verify with a standard method (visual standard + swab/ATP where your program uses it).
- Close the loop: if sanitation fails, treat it like a process signal—review temperature, drag/sticking symptoms, and blade condition.
Where does MAXTOR METAL fit in this discussion? In plants that run Oliver or Berkel lines (or compatible systems), the practical need is often not “a generic replacement blade,” but a blade that matches the machine’s guidance and the product mix. MAXTOR METAL can be used as a source for compatible premium replacement blades and for specifying non-standard serration or coating options when you’re standardizing around measured crumb %, thickness tolerance, and cleanup time—without changing your slicer hardware.
Conclusione
- Key takeaways to reduce bread crumb waste with serration, coatings, and setup
Nota informativa: MAXTOR METAL supplies industrial cutting blades. Recommendations in this article are intended to be vendor-agnostic and should be validated via controlled trials and documented line data.
- Treat bread crumb waste as a measurable KPI tied to yield, OEE, and sanitation—not just cleanup.
- Utilizzo serration geometry to control the crust-to-crumb transition and reduce tearing.
- Utilizzo coatings and low-Ra finishing to reduce sidewall drag and sticking that drives residue buildup and crumb “snowballing.”
- Lock the basics: loaf temperature control, tension/guides/alignment, and a sanitation verification loop.
- Your next steps: run trials, log data, and model TCO/ROI
Run a controlled trial (one variable at a time), and log:
- crumb loss rate (% by weight)
- slice thickness tolerance (% in spec)
- downtime minutes by reason code
Then model the tradeoff in plain terms: blade cost vs. recovered yield, reduced cleaning stops, and fewer rejects. That’s how crumb reduction becomes an improvement you can defend—on the floor, in procurement, and in audits.
Riferimenti
- American Society of Baking (ASB). Bread Slicing. https://asbe.org/article/bread-slicing/ (accessed 2026-05-03).
- Gola, A.; et al. The Effect of TiN and DLC Anti-Wear Coatings on the Tribofilm Formation and Frictional Heating in Dry Sliding Conditions against WC-Co and 100Cr6 Counterparts. Materiali (2021). https://pmc.ncbi.nlm.nih.gov/articles/PMC8235471/ (accessed 2026-05-03).
- ISO. ISO 21920-2:2021 — Geometrical product specifications (GPS) — Surface texture: Profile — Part 2: Terms, definitions and surface texture parameters. https://www.iso.org/standard/76398.html (accessed 2026-05-03).
- ISO. ISO 4287:1997 — Surface texture: Profile method — Terms, definitions and surface texture parameters (withdrawn). https://www.iso.org/standard/10132.html (accessed 2026-05-03).
- ASTM International. ASTM E1655 — Standard Practices for Infrared Multivariate Quantitative Analysis (often used in food & process industries; useful background for validation discipline). https://www.astm.org/e1655-05.html (accessed 2026-05-03).
- PMC (NIH). Implementation of ATP and Microbial Indicator Testing for Hygiene Monitoring in a Food Processing Facility. https://pmc.ncbi.nlm.nih.gov/articles/PMC8090886/ (accessed 2026-05-03).
Jerry Chu è un Technical Support Specialist A Nanjing METAL Industrial, con 10 years of hands-on experience supporting industrial cutting blade selection, troubleshooting, and process stabilization for production lines. He holds PMP E CMRP credentials.
Third-party technical review is available upon request. If you need an independent validation of the measurement plan, sanitation verification loop, or trial design, consider requesting a review from your slicer OEM, your QA/food safety auditor, or an external sanitation/maintenance consultant.
Quality system note
MAXTOR METAL operates under an ISO-aligned quality management system with controls that typically include incoming material inspection, in-process checks, E final inspection/verification. Process documentation and material traceability details can be provided upon request to support supplier qualification and internal audits.