

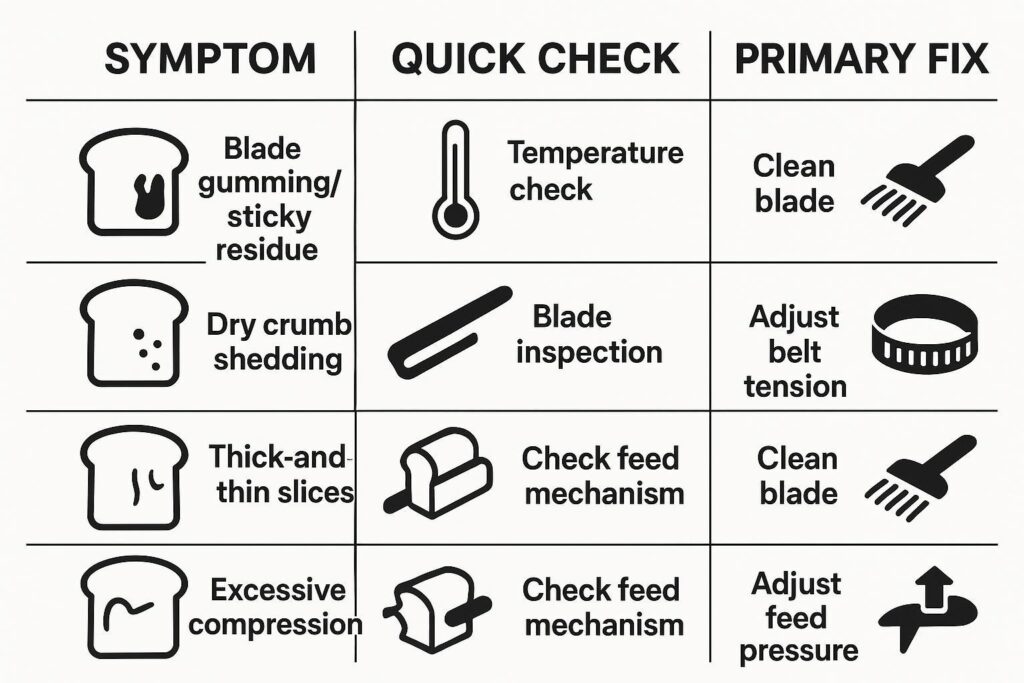
Se l'affettatrice da pane strappa il pane aumentando gli scarti, questa guida fornisce soluzioni rapide e verificabili.
Troverete intervalli di temperatura, controlli meccanici e passaggi di controllo linea da poter verificare oggi stesso.
Destinato a linee da 600–1200 pagnotte/ora con pane in cassetta, pane croccante e panini.
Nota di sicurezza e SOP: Seguire sempre il manuale OEM dell'affettatrice e il programma di sicurezza alimentare dello stabilimento. Prima di ispezionare, pulire o regolare lame, guide, nastri o tensione, utilizzare le procedure di lockout/tagout e verificare che ogni movimento sia arrestato. Convalidare qualsiasi modifica di processo con il team QA, poiché le condizioni di taglio possono influire sul confezionamento a valle e sulla qualità del prodotto.
Scope note: I setpoint di temperatura e macchina riportati di seguito sono riferimenti iniziali. L'intervallo ottimale varierà in base a ricetta, massa della pagnotta, metodo di raffreddamento, umidità ambientale e velocità della linea; pertanto, verificare con dati misurati e non a sensazione.
Diagnosi in 60 secondi
Verificare la presenza di accumuli gommosi sulle lame rispetto alla perdita di mollica secca; misurare la temperatura interna prima del taglio.
Notare fette di spessore irregolare in una singola pagnotta (tensione/guida) rispetto a strappi all'ingresso e inceppamenti (alimentazione/pressione).
Controllare l'usura dei nastri, la sincronizzazione dei trasportatori e l'accumulo di residui tra i cicli di produzione.
Modello rapido di registro di produzione (copia/incolla)
| Ora | Prodotto (tipo/peso) | Sintomo (gommoso vs secco / strappo all'ingresso / spessore irregolare) | Temp. interna (°F) | Velocità linea (pagnotte/ora) | Impostazione pressione nastro superiore | Impostazione tensione lama | Stato della guida (OK/usurata/sporca) | Pulizia eseguita (Sì/No + dove) | Modifica apportata | Risultato (accumulo mollica / tasso di inceppamento / deviazione del taglio) |
|---|---|---|---|---|---|---|---|---|---|---|
Soluzioni (1–3): Prodotto e sistema di taglio

Intervallo di temperatura e umidità
Quando il problema del pane strappato dall'affettatrice si presenta improvvisamente durante un turno, considerare le condizioni del prodotto come prima variabile, poiché è quella verificabile in pochi secondi.
- Misurare la temperatura interna prima dell'affettatrice. Non affidarsi alla sensazione superficiale. Utilizzare una sonda calibrata e misurare al centro della pagnotta (evitando la zona della crosta). Registrare il valore e il tempo trascorso dallo sformatura/raffreddamento.
- Operare all'interno di un intervallo verificabile (riferimento iniziale). Molte linee tagliano al meglio intorno a 86–104°F di temperatura interna e confezionano intorno a 95–105°F— per poi regolare in base a ricetta, dimensioni della pagnotta e metodo di raffreddamento. Come controprova, le linee guida di processo del settore sul raffreddamento del pane mirano comunemente a raffreddare il prodotto fino a circa 32–43°C (90–110°F) prima del taglio per ridurre strappi e accumuli gommosi (vedere BAKERpedia, “Raffreddamento del pane”). Per una verifica di coerenza di tipo OEM, il manuale d'uso e manutenzione di Oliver per i suoi modelli di affettatrici include la seguente nota di risoluzione dei problemi: “Il pane potrebbe essere troppo morbido e caldo. Valutare di lasciarlo raffreddare prima del taglio.” (vedere Manuale d'uso e manutenzione Oliver Models 908-N/918-N/0938-N).
- Aggiungere tolleranze e trigger. Come approccio pratico di controllo, impostare un limite di azione (ad esempio, ±3–5°F rispetto al target convalidato). Se la media si discosta oltre il limite per 3–5 pagnotte consecutive (o per un intero minuto di produzione), interrompere e correggere il raffreddamento/stazionamento prima di modificare i parametri meccanici.
- Frequenza di ricontrollo. Misurare nuovamente all'avvio, dopo ogni fermo macchina, dopo le regolazioni di nastri/pressione e almeno una volta per turno quando le condizioni sono stabili.
- Cosa comporta una temperatura “troppo calda”: sticky crumbs, smearing on blade sidewalls, compression at entry, and tearing that gets worse as the run continues.
- What “too cool/dry” can look like: fragile crumb shedding, heel cracking, and an increase in loose crumbs that load up guides and belts.
Conclusione chiave: Always separate “sticky/gummy” tearing from “dry/fragile” tearing before you change hardware. The fixes are different.
Blade condition and type
A blade can be “sharp enough” and still tear bread if the tooth form, sidewall finish, or cleanliness is wrong for the product.
- Confirm the failure mode at the blade. If you see a fine film building on the blade walls, you’re fighting drag and heat—not just edge sharpness. BakingBusiness points out that crumb can deposit as a film on blade walls and that blade-sidewall properties influence how that buildup behaves in production (BakingBusiness, “The three core properties of bread slicing blades” (2019)).
- Match blade type to bread family. Soft pan breads, crusty loaves, and buns won’t behave the same. If tearing is localized to crust transitions, review tooth geometry and set.
- Replace on evidence, not calendar. A quick check is whether tearing correlates with a measurable increase in crumb film, heat, or slice wander at constant tension.
Neutral brand note (materials/coatings and compatibility): If you’re sourcing replacement band blades, it can help to specify base material + heat treatment + any coating requirements and confirm OEM compatibility for your slicer model. Suppliers such as MAXTOR METAL bread slicer blades emphasize OEM/ODM compatibility and material selection; treat that as a documentation and fit check—not as a shortcut around temperature, tension, and sanitation controls.
Tension and guide alignment
If slices go thick-and-thin within the same loaf—or tearing appears on one side more than the other—assume the blade path is wandering.
- Verify blade tension is uniform across the lattice/bands. Uneven tension can create oscillation and deflection that shows up as thickness variation and side tearing.
- Inspect guides for wear and contamination. Worn or debris-loaded guides increase friction and push the blade off its intended line.
- Square up the product path. If the loaf enters skewed, the slicer can “grab” one edge first, starting an entry tear that turns into a jam.
For context, BakingBusiness notes that product temperature, blade tension, and product positioning are all drivers of slicing errors and thickness variation (BakingBusiness, “Slaying bread slicing errors” (2019)).
Soluzioni (4–5): Movimentazione e controllo linea

Top-belt pressure and belts
Top-belt pressure is a common hidden cause of entry tears—especially when product is warm or when belt condition varies across stations.
- Reduce compression first, then re-test. If you see crushed crowns, dragging, or “pinch” marks, back off pressure and verify you still have stable feed.
- Check belt wear and tracking. A glazed, hardened, or uneven belt face can slip, grab, or micro-jerk the loaf at entry.
- Confirm pressure consistency shift-to-shift. If one crew “tightens until it stops moving,” you’ll get variability no blade change can fix.
Feed, speed, and sanitation
When tearing shows up as entry rips, intermittent jams, or a rising crumb load over time, focus on line control and hygiene.
- Sync conveyors to prevent loaf “bump” at handoff. If the infeed and slicer conveyors aren’t matched, the loaf gets compressed or pulled right as the blades engage.
- Stabilize spacing and guides upstream. Poor lane control creates side contact, which becomes a tear point at the slicer throat.
- Clean between runs with intent. Don’t just blow crumbs deeper into the machine. Remove buildup where it changes friction: blade area, guides, belts, and the infeed throat.

Verificare dopo ogni modifica
After you adjust temperature, tension, belts, guides, or sanitation steps, do a quick verification pass so you don’t “fix” tearing but create a new problem downstream:
- Confirm slice thickness is stable (no visible thick-thin or side drift)
- Check crumb load is not rising over the run (film on blade walls, debris in guides)
- Track jam rate for the next 15–30 minutes (or the next full rack)
- Verify packaging isn’t compromised (compression, poor seal due to excess crumbs)
- Document the final setpoints and have QA/line lead sign off per your SOP
Conclusione
If you need replacement band blades, treat sourcing as a documentation and fit exercise: confirm OEM compatibility, provide your drawing/sample, and specify base material, heat treatment, and any coating requirements so performance is repeatable.
About MAXTOR METAL (for traceability): MAXTOR METAL manufactures custom, precision-ground industrial blades with 15+ years of experience and a multi-step quality control process. For procurement teams, it can be helpful to request material certificates and inspection records with each blade batch (learn more: MAXTOR METAL).
Recheck slicing temp window (about 86–104°F slicing; 95–105°F packaging), verify zero gumming.
Standardize tension, guides, and belt pressure; sync conveyors; clean between runs.

 English
 Spanish
 Italian
 French
 Portuguese
 Russian
 German
 Arabic
 Hindi
 Vietnamese
 Indonesian
 Japanese
 Korean
Una risposta