- What this guide covers: metallurgical window, QA/validation, sanitation, and ROI
- Who should read: technical managers, manufacturing and process engineers
- Outcome: a data-backed path to specify and validate 440C at HRC 56–58
Đầu cắt hạt lựu kiểu Urschel vận hành dưới tải trọng chu kỳ khắt khe: các lưỡi dao vòng tiếp xúc với sản phẩm ở tần suất cao, với mức độ nghiêm trọng của va đập thay đổi đáng kể giữa nông sản tươi mềm và sản phẩm đông lạnh cứng (rau củ đông lạnh IQF và cây lấy củ có thể có độ cứng bề mặt tương đương với gỗ cứng). Khả năng duy trì kích thước cắt và tuổi thọ lưỡi dao liên kết trực tiếp với nhau — một lưỡi dao vòng bị mẻ ngay trong chu kỳ cắt đồ đông lạnh đầu tiên sẽ gây ra sự sai lệch kích thước trong mọi nhát cắt tiếp theo. Đó là lý do tại sao việc đánh giá vật liệu cho ứng dụng này không chỉ là một thông số kỹ thuật về độ cứng: đó là một dải quy trình được xác thực (validated process window) hoạt động ổn định trên toàn bộ danh mục sản phẩm của dây chuyền.
Nếu bạn đang đánh giá các lưỡi dao vòng thay thế cho đầu cắt kiểu Urschel, mác thép 440C thường là lựa chọn theo kiểu "chỉ chạy tốt khi được kiểm soát nghiêm ngặt": đủ cứng để giữ cạnh cắt sắc bén, đủ chống ăn mòn để làm việc trong môi trường ướt, nhưng sẽ không khoan nhượng cho quá trình nhiệt luyện và gia công tinh cẩu thả.
From a quality-system perspective (the way Maxtor Metal documents critical consumables), the fastest path to repeatability is to treat “440C at HRC 56–58” as a validated process window—not just a line item on a purchase order.
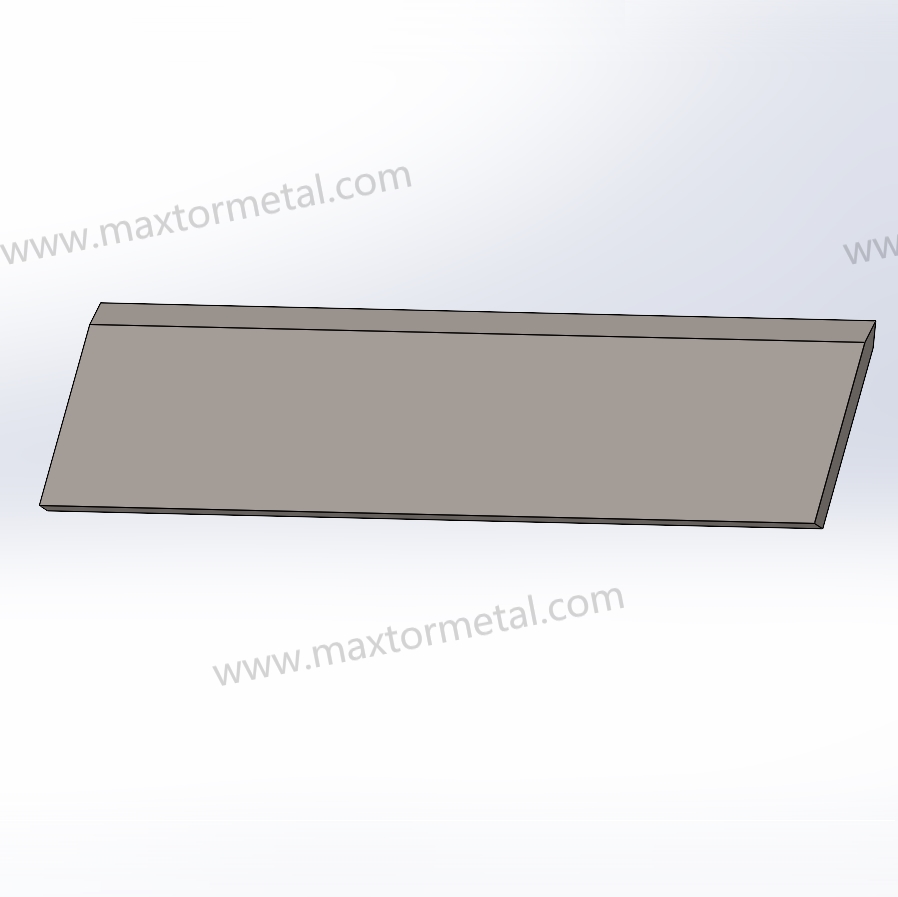
Engineering Note: If your validation plan also covers incoming strip form and ordering language, see Maxtor Metal’s industrial blade strip steel in beveled reels for form-factor specifications — including coil lengths, thickness tolerances, and surface finish grades — aligned with this QA protocol.
Về hướng dẫn này (và lý do nó đáng tin cậy)
This guide is written from the perspective of a blade manufacturer operating under a quality-system mindset: defining a controllable process window, tying requirements to auditable records, and using field data to close the loop.
Cái gì Maxtor Metal can support in a qualification program (examples of documentation we can provide):
- Incoming inspection records for strip/band (dimensions, visual criteria, sampling plan, disposition) — shareable
- Hardness gage control: calibration certificate and calibration interval statement — shareable
- Heat-treatment batch records: time/temperature charts, quench media notes, sub-zero cycle, temper parameters — shareable
- Heat/lot traceability from incoming strip to finished dicer bands
- In-process and final inspection records
- Material test reports (MTR) / chemistry records with heat/lot identifiers — available under customer NDA
- Hardness sampling map + results — available under customer NDA
- Metallography support for qualification lots and failure analysis; metallography photos/reports (location, magnification, acceptance notes) — available under customer NDA
- Grinding / surface integrity screening records (burn screening method + acceptance criteria) — available under customer NDA
- Surface roughness (Ra) test records including cutoff, direction, sampling locations — available under customer NDA
- Retained austenite (RA) by XRD is typically verified via an approved third-party laboratory when RA quantification is required
If you want to align this guide with your plant’s QA system, use it as a template and adjust acceptance bands to your equipment, product mix, and risk profile.
Các nguyên lý cơ bản của thép 440C
Composition and product forms
440C is a high-carbon martensitic stainless steel designed to reach high hardness after hardening and tempering. The key point for dicer bands is that the alloy’s performance comes from a martensitic matrix plus carbides—so chemistry, carbide distribution, and heat treatment all show up as real differences in edge life and chipping behavior.
A practical way to write your incoming material requirement is:
- Specify the grade (440C / UNS S44004 or equivalent)
- Define allowed product forms (strip/band suitable for forming and finishing into dicer bands)
- Bind the grade to documentation: heat/lot traceability + chemical composition record
For a canonical composition reference, ASM International’s Alloy Digest entry for AISI Type 440C is a good starting point.
Properties at HRC 56–58
HRC 56–58 is a common “middle band” for dicer service because it targets a balance:
- High enough hardness for wear resistance and edge retention
- Enough toughness margin to reduce micro-chipping during transient impacts (product inclusions, ice, hard spots, misfeeds)
The catch: the same Rockwell hardness can hide very different microstructures (carbide size/distribution, retained austenite content, temper condition). That’s why hardness is necessary—but not sufficient—as a release criterion.
Điểm chính: Treat HRC 56–58 as an acceptance window that must be paired with microstructure/RA checks and surface integrity checks to be predictive in the field.
Cleanliness options (ESR/VIM)
For Urschel-style dicer bands, conventional air-melt 440C is typically the default from a cost/performance standpoint—provided you control inclusions and variability via incoming QA and process validation.
When would you consider cleaner melting routes?
- ESR (electroslag remelting): when your failure mode is inclusion-driven edge chipping and you need tighter cleanliness.
- VIM and/or VIM+ESR: when you’re chasing the highest consistency and can justify the extra cost (or the application is extremely sensitive to scatter).
A practical approach is to qualify conventional melt first with a strict validation protocol, then “upgrade” only if your field data shows the limiting mechanism is cleanliness rather than heat treat, geometry, or surface damage.
Cách xác định dải (window) nhiệt luyện chuẩn xác cho lưỡi dao vòng máy cắt hạt lựu 440C
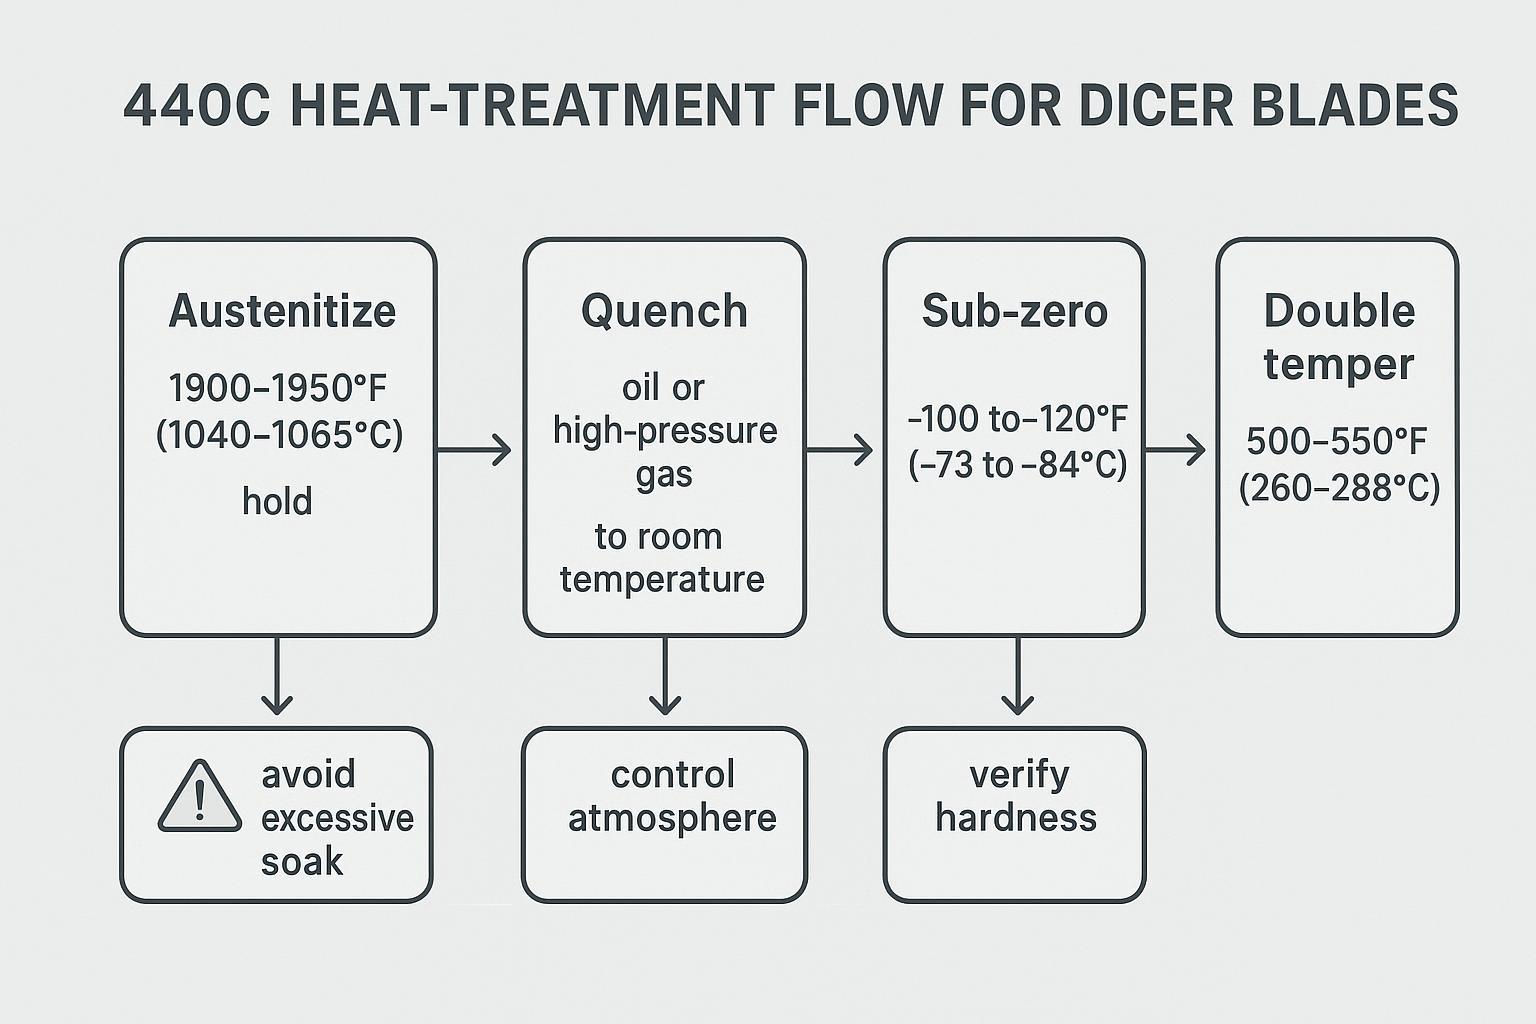
Austenitize and quench ranges
Most processing windows for martensitic stainless place 440C austenitizing roughly in the ~1850–1950°F range (section size and furnace capability matter), followed by a controlled quench. The bounds matter for opposite reasons: austenitizing below the lower end risks incomplete carbide dissolution and patchy hardness; pushing past the upper end dissolves too much carbon into the matrix, which drives retained austenite up and reduces the martensite fraction you’re trying to achieve.
Two rules that prevent most misprocessing:
- Don’t treat austenitize temperature as “higher is safer.” Excessive temperature/soak can shift RA upward and alter carbide condition.
- Don’t treat quench as “anything fast.” Choose a quench that hits your transformation needs without cracking or distortion.
For a baseline reference on stainless heat treatment ranges and considerations, ASM’s Heat Treatment of Stainless Steels is a useful canonical source.
Sub-zero and tempering for toughness
The common reason dicer bands meet hardness but still chip is microstructure mismatch—often too much RA, poorly stabilized martensite, or high residual stress.
A practical, shop-floor-friendly sequence used by many processors is:
- Austenitize (within your validated band)
- Quench
- Sub-zero (cold treatment) to reduce RA and stabilize
- Double temper to relieve stress and tune hardness/toughness
A defensible way to specify this is not “use this exact recipe,” but:
- Require documented furnace controls and batch records
- Require the supplier to declare their validated ranges for each step
- Verify outcomes with hardness + RA + microstructure + field trial KPIs
Microstructure targets and pitfalls
For dicer bands, the microstructure targets are functional:
- Tempered martensite matrix with appropriate carbide distribution
- RA controlled to a band that matches your chipping-risk tolerance
- No evidence of surface thermal damage from grinding (burn) that creates brittle layers
Common pitfalls that show up as premature chipping or erratic life:
- High retained austenite: may pass hardness but reduces stability and can transform under load.
- Over-austenitizing: can drive RA up and change carbide condition.
- Under-tempering or inadequate temper cycles: leaves high residual stress.
- Grinding burn / rehardening: creates a brittle skin and microcracks at the edge.
Tại sao HRC 56–58 là cần thiết nhưng chưa đủ: Quy trình QA và xác thực
Hardness and impact methods (ASTM E18/E23)
Hardness is the fastest screening metric, but only if the method is controlled.
- Use a standards-based Rockwell method such as Tiêu chuẩn ASTM E18 and define:
- scale (typically HRC for hardened martensitic stainless)
- number of indents per part/lot
- location plan (avoid edges, avoid thin unsupported zones)
- gage R&R expectations
If chipping resistance is critical, add a toughness proxy with a consistent method such as ASTM E23 (Charpy). For thin band/blade geometries, you may need a subsize specimen plan, but the core benefit is comparing lot-to-lot Và process-to-process rather than chasing an absolute number.
Microstructure and RA checks (third-party XRD + metallography)
Two checks close the “hardness gap”:
- Retained austenite (RA) by XRD: set a release band appropriate to your risk profile and application. If you don’t have in-house XRD, define an approved third-party lab and lock the method so results are comparable lot-to-lot.
- Metallography: verify carbide distribution, martensite condition, and any abnormal structures; correlate with failure analysis.
Practical RA acceptance guidance (how to set a band)
Because Rockwell hardness can be similar across very different microstructures, RA should be treated as a predictive release metric—especially when the dominant failure mode is edge chipping.
For wet-service dicer band applications such as Urschel-style heads, Maxtor Metal’s engineering practice is to use ≤5% RA as a starting control target during qualification, then tighten or relax the band based on field chipping data. This is not a universal number—geometry, product hardness, and sanitation chemistry all shift the optimum—but it gives procurement documents a defensible, auditable starting point rather than an open-ended instruction.
A defensible way to specify RA in procurement documents is:
- Qualification stage: define an RA target based on failure mode and stabilize it with field results.
- If your dominant risk is micro-chipping/brittle edge failures, start with a lower RA target(≤5% is a common field starting point for dicer band service).
- If your dominant risk is distortion/cracking risk in heat treat, avoid overly aggressive RA reduction and use trials to confirm.
- Production surveillance stage: once the process is proven, keep RA as a periodic audit metric to control drift.
Note: the “right” RA number depends on geometry, processing route, and service conditions. If you already have baseline RA data from a known-good band, use that baseline to set your acceptance band rather than adopting a generic number.
What to document (so the data stays auditable)
- specimen prep method and location
- etchant and imaging magnification (metallography)
- RA measurement method parameters (XRD setup) and reporting format
- measurement uncertainty / repeatability statement from the lab (so you can set a realistic acceptance band)
- the acceptance band and the corrective action when out of band
Out-of-band actions (examples)
- RA higher than your band while hardness is in spec → review austenitize/soak control, quench severity, sub-zero step effectiveness, and temper stabilization; re-check for grind burn before release
- RA lower than expected with increased cracking/distortion risk → review quench and cold treatment severity; confirm geometry stability and residual stress condition
A simple way to set acceptance bands (no guesswork)
If you don’t want to debate “generic” RA numbers, set your acceptance bands from a known-good baseline lot, then tighten them as field data accumulates.
| Hệ mét | What to collect in the baseline lot | A practical acceptance-band rule | Why it works |
|---|---|---|---|
| Độ cứng (HRC) | n measurements per lot using a fixed location plan | Use your spec window (e.g., 56–58) and add a drift check (e.g., median stays inside the window across lots) | Prevents “meets spec but drifting” situations |
| RA by XRD | n measurements, same specimen location, same lab/method | Start with a percentile band (e.g., keep future lots within the baseline 10–90% range), then tighten if chipping risk is high | Robust when you don’t trust normality assumptions |
| Edge life | n trials per lot (hours or tons) under the same product mix | Track the median and 10–90% range per lot; require non-regression vs baseline before approving changes | Separates true improvement from outliers |
| Chipping rate | chips per inspection interval with the same inspection method | Use a simple rule: if the median worsens vs baseline for two consecutive lots, trigger a root-cause review | Creates an early-warning system |
Tip: when using third-party XRD, require the lab to report repeatability/uncertainty so you don’t set a band tighter than the method can reliably resolve.
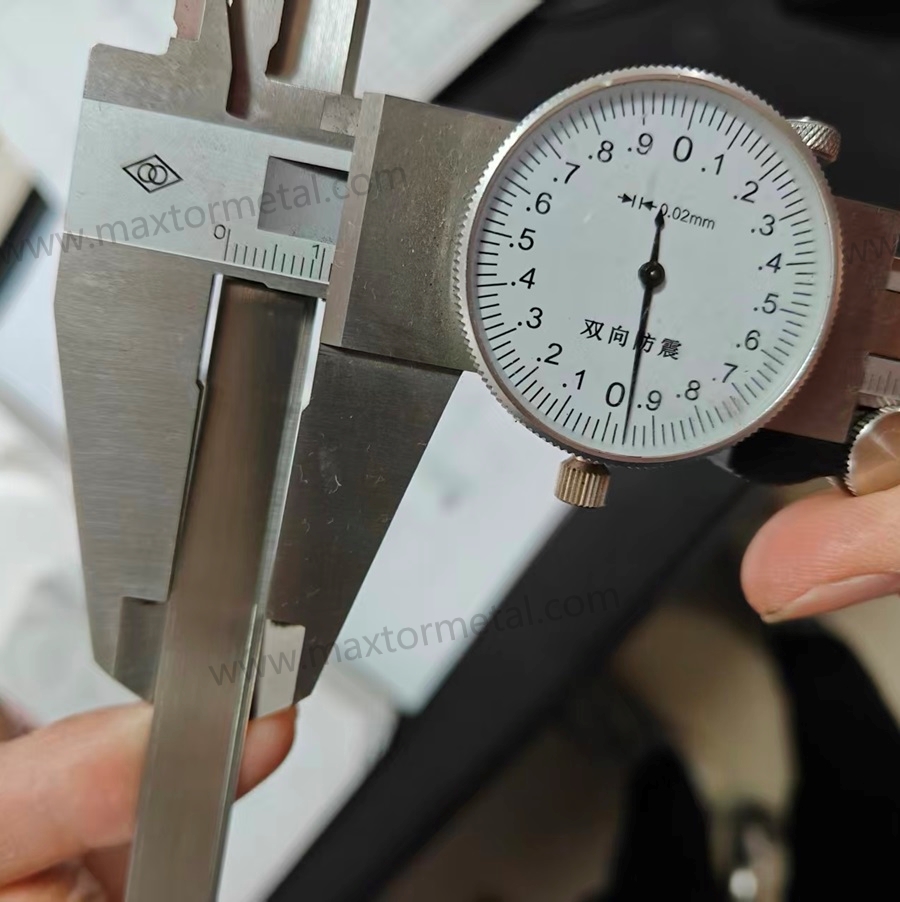
Geometry, burn, and surface finish (Ra ≤ 32 µin)
For replacement dicer bands, geometry and surface integrity often dominate “mysterious” field failures. Include explicit checks for:
- flatness / straightness (fit-up stability)
- edge geometry (bevel angle, land, edge radius if specified)
- burr control
- grinding burn and microcracking (nital etch, Barkhausen where appropriate, or microscopy)
For product-contact surfaces, a common hygienic baseline is Ra ≤ 0.8 µm (32 µin). 3-A sanitary design guidance frequently references this threshold; see the 3-A SSI deck Basics of Sanitary Design. EHEDG design guidelines consistently specify product-contact surfaces smoother than Ra = 0.8 µm; see EHEDG Guideline Document 8 for the relevant hygienic equipment design criteria.
Make Ra requirements comparable by specifying measurement details (otherwise different suppliers may report different numbers for the same surface):
- measurement direction (parallel/perpendicular to grind lines)
- evaluation length and cutoff / filter setting used by the profilometer
- number of traces per part and the sampling locations
A practical acceptance package ties finish to function:
- Ra (specify the measurement cutoff and direction)
- visual finish criteria (no pits, laps, embedded debris)
- passivation status (see next section)
Maxtor Metal quality controls and traceability records (technical integration): A QC-oriented supplier should be able to provide a traceable record set for each lot, such as:
- heat/lot number linkage from strip to finished band
- material test report (chemistry) and incoming verification
- heat-treat batch record (time/temperature charts, quench media, sub-zero cycle, temper cycles)
- hardness sampling map and results
- microstructure photo set and RA report (XRD) for qualification lots (and periodic surveillance thereafter)
- surface finish (Ra) records and burn screening criteria
- nonconformance disposition and corrective-action link when a lot is out of band
This isn’t marketing fluff—it’s what lets a plant engineer correlate a chipping spike to a specific heat treat batch, grind wheel condition, or strip heat.
Vệ sinh và tuân thủ định mức
Cleaning and passivation (ASTM A380/A967)
In wet food-processing service, “stainless” isn’t a binary state. Surface condition (free iron, embedded grit, smeared metal from machining) can change corrosion behavior and cleanability.
Two widely cited references to anchor your cleaning/passivation language are:
- ASTM A380 for cleaning/descaling/passivation practices
- ASTM A967 for passivation treatment options and related requirements
Write your spec so sanitation steps are verifiable:
- define the cleaning/passivation method class to be used
- require documentation of the process and any verification tests you rely on
Chemical compatibility in washdowns
Dicer environments often see aggressive washdowns, temperature swings, and chloride exposure. Even with 440C, corrosion risk increases when:
- chloride concentration is high
- there are crevices or rough surfaces
- passivation is inconsistent
- residues remain trapped under bands or hardware
This is where surface finish, passivation discipline, and assembly hygiene matter as much as the alloy selection.
Documentation and traceability for audits
If you’re in a regulated or audit-heavy environment, treat blades/bands as controlled components:
- link each lot to a traceability packet
- store heat-treat records and inspection data by lot
- define retention time and retrieval process
The payoff is simple: when a plant sees a sanitation deviation or foreign material risk, you can isolate by lot and respond with evidence.
Thử nghiệm thực tế và ROI (Tỷ suất hoàn vốn)
Why ROI framing matters for blade qualification
For procurement and production managers, the question behind any blade qualification is simple: does the cost and effort of running a validated program pay off? The answer is almost always yes—but only if you measure the right things.
A practical way to frame the ROI case before a trial:
| Cost driver | Typical measurement unit | Where validated 440C at HRC 56–58 reduces cost |
|---|---|---|
| Blade changeover downtime | Minutes/week × labor + line rate | Longer, more consistent edge life reduces unplanned stops |
| Blade consumption rate | Bands per ton processed | Reduced chipping scatter extends usable life per set |
| Cut-size rework/waste | % yield loss on critical cut dimension | Tighter Cpk on HRC and RA → more consistent cut geometry |
| Supplier qualification overhead | Engineer-hours per lot | Standardized documentation package reduces re-qualification burden |
Example framing (hypothetical): A mid-size frozen vegetable processor running two Urschel lines might see blade changeover account for 20–40 minutes of downtime per week per line under an unvalidated supply program. If a validated process window improves edge-life consistency, it can be reasonable to expect a meaningful reduction in that downtime—but the exact number depends on product mix, sanitation cycle frequency, and baseline blade life. That’s why predefining trial KPIs (see below) is the only reliable way to measure your specific ROI.
Key Takeaway: Blade validation is not a cost—it is the mechanism by which you convert a commodity purchase into a controlled consumable with predictable cost-per-ton.
Mẫu xác thực tối giản (sao chép/dán vào kế hoạch QA của bạn)
Use this as a “minimum viable” qualification pack for replacement dicer bands. It is designed so a plant can audit the lot, reproduce the processing window, and run CAPA when results drift.
Stage 1 — Qualification lots (prove the process window)
Use this stage when you are onboarding a supplier, changing strip source, changing heat-treatment routing, or adjusting finishing.
A) Incoming material (strip/band)
- Supplier, PO, part number / drawing revision
- Grade designation (440C / UNS S44004 or equivalent)
- Heat/lot number and traceability linkage
- MTR / chemistry record (under customer NDA if required)
- Incoming inspection record: dimensions, visual criteria, sampling plan, disposition
B) Process records (heat treat + finishing)
- Heat-treat batch ID + time/temperature chart
- Quench media notes + control checks
- Sub-zero step (temperature, time, sequence)
- Temper cycles (count, temperature range, time)
- Grinding / finishing record (wheel spec, dressing interval, coolant condition, operator/shift)
Maxtor Metal maintains batch-level records for each of these steps as standard practice; qualification customers can request the full documentation package under a mutual NDA.
C) Release tests (qualification lot)
- Hardness (ASTM E18): sampling map, number of indents, results, gage status
- Surface integrity: burn screening method + acceptance criteria
- Surface finish (Ra): instrument settings (cutoff), direction, sampling locations, results
- Metallography: photo set ID, location, magnification, acceptance notes (under customer NDA if required)
- RA by XRD (third-party, if required): lab, method reference, location, result, uncertainty/repeatability statement
D) Field trial log (qualification lots)
- Installation: date/time, line, product type, sanitation cycle notes
- KPI log: edge life, chipping rate, downtime, cut-size Cpk
- Removal reason: planned vs failure, with photo evidence when possible
Stage 2 — Production lots (control drift)
After the process window is proven, keep a lean release plan on every lot and move deeper tests to periodic surveillance.
A) Lot release (every lot)
- Traceability linkage (heat/lot → finished band)
- Hardness check with the same location plan
- Surface integrity screening (burn) and Ra verification per your agreed sampling plan
- Confirm heat-treatment batch record is complete and within declared ranges
B) Periodic surveillance (e.g., on a scheduled cadence or when drift is suspected)
- Metallography photo set review
- RA by third-party XRD (when RA is a controlling risk)
- Expanded dimensional/geometry audits
Out-of-spec & CAPA triggers (simple, audit-friendly rules)
- Any release metric out of band → quarantine the lot and run a documented disposition (use-as-is / rework / scrap)
- If a KPI regresses vs baseline for consecutive lots or shows a consistent drift trend → trigger a root-cause review
- Prioritize checks in this order when failures are ambiguous: burn/surface integrity → RA/microstructure → heat-treat records → strip heat/MTR
Trial design and KPIs in frozen and root crops
A good trial doesn’t just ask “did it last longer?” It asks whether the new bands improve repeatable output without raising risk.
Trial design principles:
- Compare against a baseline band under the same product mix and sanitation cycle.
- Control one variable at a time (material/HT/finish), or you won’t know what caused the outcome.
- Predefine the run duration or throughput target.
KPIs that travel well across frozen and root crops:
- edge life (hours or tons processed)
- downtime (minutes/week attributable to band changeover or rework)
- chipping rate (chips per inspection interval, or % bands failing before target)
- cut-size capability (Cpk on the critical cut-size dimension)
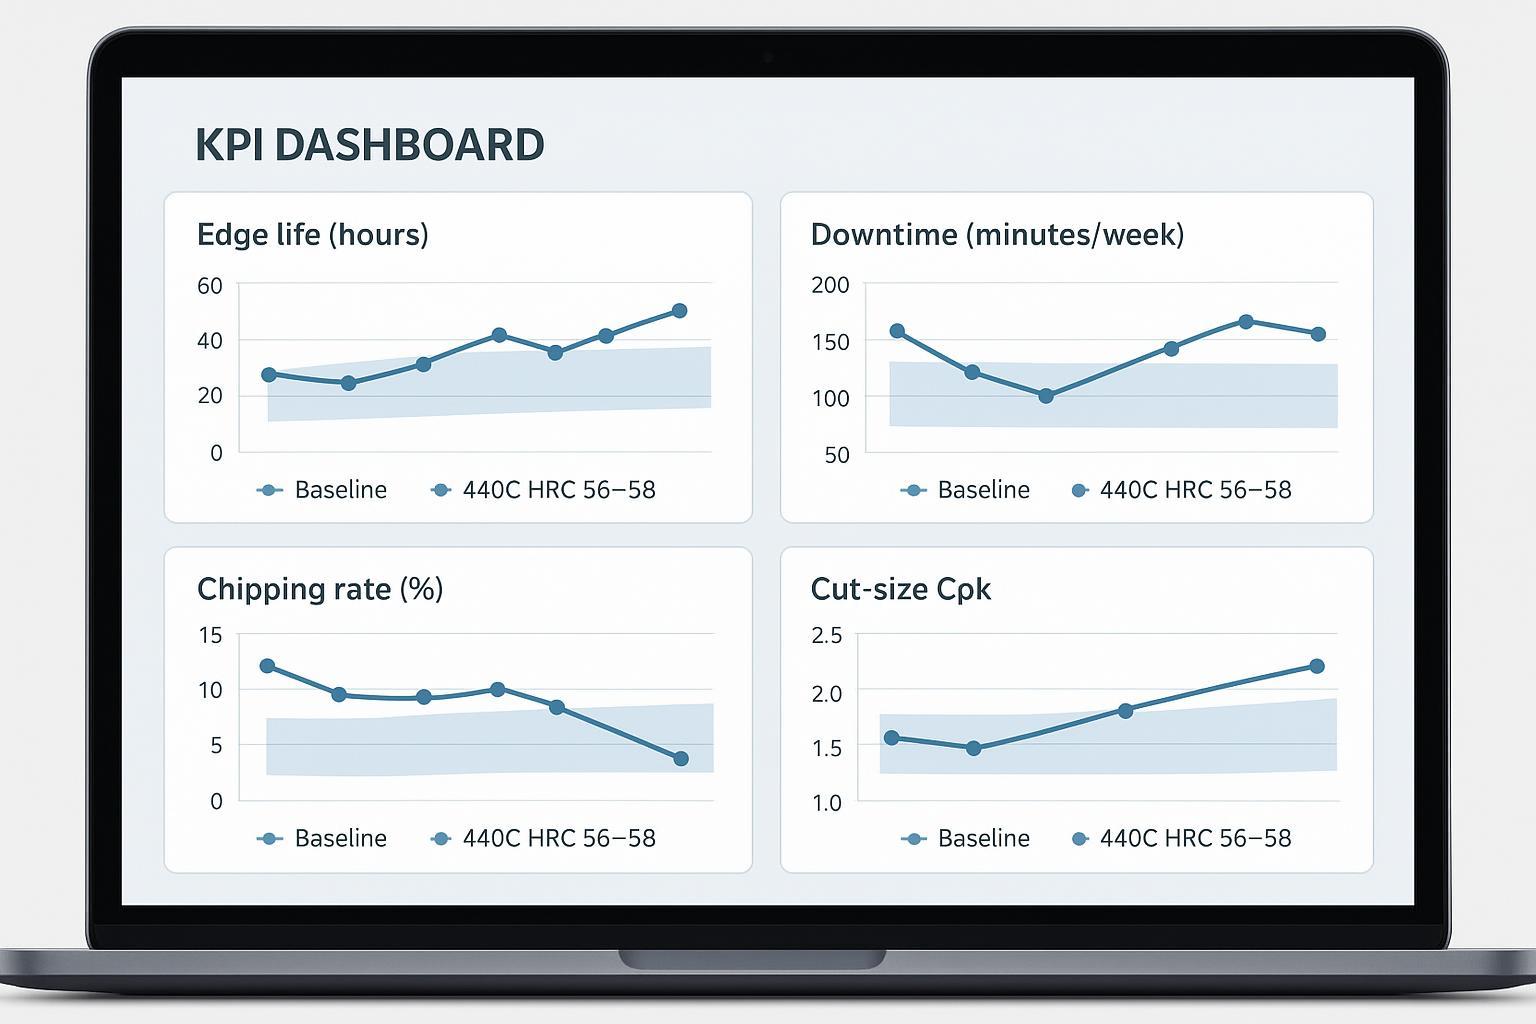
How to present trial results (so decisions are data-backed)
To reduce debate and make trials comparable across lots, define a simple statistical view upfront:
- Lot-to-lot scatter: use box plots for edge life (hours/tons) and chipping counts per inspection interval
- Stability over time: use a basic control chart for chipping rate or downtime minutes/week
- Khả năng: report cut-size Cpk on the critical dimension with the same sampling method each run
If you only do one thing: report sample size (n), cái medianvà 10–90% range for edge life per lot. That usually reveals whether you have a true process-window improvement or just a “best-case” outlier.
Make the trial “audit-ready” by defining acceptance bands upfront:
- HRC 56–58 is the hardness band—define the sampling plan.
- Define a chipping threshold (what counts as a fail).
- Define Cpk targets (or the minimum improvement delta) for cut-size.
- Define sanitation outcomes (no abnormal corrosion/pitting after a defined washdown cycle count).
A practical logging checklist:
- lot ID + heat-treat batch ID
- installation date/time, line, product type
- sanitation cycles and chemistry notes
- inspection intervals and findings (chips, burn, corrosion marks)
- reason for removal (planned vs failure)
Root-cause feedback to process window
When a trial misses targets, force a closed-loop diagnosis rather than “try a different supplier” guessing:
- If hardness is in band but chipping is high → prioritize RA/microstructure check + grind burn screening.
- If edge life is low with clean edges → revisit carbide condition (austenitize/temper window) and surface finish.
- If corrosion appears early → revisit passivation and surface finish, then confirm washdown compatibility.
Done well, your field trial becomes a control loop: it tightens the heat-treatment and finishing window until the outcome is predictable.
Các giải pháp thay thế và lựa chọn
420 vs 440C trade-offs
420-class martensitic stainless generally offers:
- better toughness margin at a given corrosion resistance level
- lower achievable wear resistance than 440C at comparable processing
If your dominant failure mode is brittle chipping (and not wear), 420 variants can be worth evaluating—but you’ll usually pay for it in edge life unless geometry and process changes compensate.
D2/M2 risks in wet service
High-wear tool steels like D2 and high-speed steels like M2 can deliver excellent wear resistance, but wet service introduces risks:
- corrosion and staining
- sanitation chemical sensitivity
- crevice corrosion at interfaces
If you go this route, you’re often forced into coatings, tighter cleaning constraints, or more aggressive surface protection—each with its own validation burden.
PM stainless options and when to upgrade
Powder-metallurgy (PM) stainless options can improve cleanliness and consistency, and may reduce inclusion-driven chipping scatter. Upgrade triggers typically look like:
- you’ve validated geometry, finishing, and conventional 440C heat treat
- failure analysis still points to cleanliness/inclusion sensitivity
- ROI still works after the material premium
Phạm vi và giới hạn
This guide is intended for qualification and supplier validation of 440C dicer replacement bands operating in wet, sanitation-driven environments.
- Use it when your goal is repeatability: stable hardness, controlled microstructure/RA (when required), and verified surface integrity.
- Treat all numeric targets as site-specific: geometry, product mix, sanitation chemistry, and equipment condition can shift the “best” window.
- For unusually severe impact loading, highly abrasive inclusions, or extreme corrosion exposure, treat this guide as a baseline and add additional validation (materials upgrade, coating trials, or application-specific testing).
Final acceptance should be based on documented lot records and your plant trial results (and third-party verification where required).
Kết luận
- 440C remains a cost-effective choice when validated to spec
- Use the defined QA and trial protocol to ensure repeatability
The one-sentence version: For Urschel-style dicer band applications in wet food-processing environments, 440C validated to HRC 56–58 with controlled RA (≤5% starting target), documented heat-treat batch records, and surface integrity screening is the most cost-effective path to repeatable edge life—provided the validation protocol treats hardness as a necessary but not sufficient release criterion.
If you want a spec that holds up across suppliers, the key is to bind “440C at HRC 56–58” to documented process controls: heat/lot traceability, heat-treat batch records, hardness + RA verification, and surface integrity checks. That’s the same discipline Maxtor Metal applies internally to keep performance repeatable across lots. Maxtor Metal qualification packages—including MTRs, heat-treat batch records, hardness sampling maps, and third-party XRD reports—are available to customers running formal supplier validation programs.
For reference language around strip supply forms and how to describe them in procurement documents, you can note earlier—then keep your acceptance criteria in the validation protocol above.
Câu hỏi thường gặp:
Độ cứng của lưỡi dao thay thế máy cắt hạt lựu 440C nên là bao nhiêu?
HRC 56–58 là dải chấp nhận phổ biến vì nó cân bằng giữa khả năng giữ cạnh cắt và một biên độ dẻo dai nhất định. Đừng xuất xưởng chỉ dựa trên độ cứng — hãy kết hợp nó với kiểm tra tổ chức vi cấu trúc/austenite dư và kiểm tra tính toàn vẹn bề mặt (vết cháy).
Quy trình nhiệt luyện 440C được khuyến nghị để đạt HRC 56–58 là gì?
Một chu trình kiểm soát điển hình là austenit hóa trong khoảng 1850–1950 °F (1010–1065 °C), tôi (quench), áp dụng bước xử lý âm sâu (sub-zero) để giảm lượng austenite dư, sau đó ram hai lần (double temper). Hãy sử dụng hệ thống kiểm soát lò nung có ghi chép dữ liệu và xác thực kết quả bằng dữ liệu độ cứng và lượng austenite dư (RA) thay vì chỉ dựa vào một công thức định danh (nominal recipe).
Làm thế nào để kiểm tra độ cứng chính xác trên lưỡi dao 440C đã tôi cứng?
Hãy sử dụng phương pháp Rockwell dựa trên tiêu chuẩn như ASTM E18, xác định sơ đồ vị trí đo và thiết lập tần suất lấy mẫu cho mỗi lô hàng. Đảm bảo cấu hình đo lường của bạn phù hợp với các phần có tiết diện mỏng để tránh kết quả sai lệch.
Làm thế nào để đo lượng austenite dư trong mác thép 440C?
Nhiễu xạ tia X (XRD) là một phương pháp định lượng phổ biến; hãy kết hợp nó con đường phân tích kim tương (metallography) để xác nhận tình trạng tổ chức vi cấu trúc. Phần quan trọng là thiết lập một dải chấp nhận và ghi lại các tham số phương pháp để kết quả có thể so sánh giữa các lô hàng với nhau. Đối với ứng dụng lưỡi dao vòng kiểu Urschel, mục tiêu kiểm soát ban đầu là ≤5% RA là một điểm tham chiếu phổ biến trong ngành.
Độ bóng bề mặt nào là chấp nhận được đối với lưỡi dao bằng thép không gỉ tiếp xúc với thực phẩm?
Tiêu chuẩn vệ sinh cơ bản thường được trích dẫn là Ra ≤ 0,8 µm (32 µin) đối với các bề mặt tiếp xúc với sản phẩm, được tham chiếu trong hướng dẫn thiết kế vệ sinh 3-A và được lặp lại trong tài liệu của EHEDG. Hãy xác định rõ phương pháp và hướng đo lường của bạn để các nhà cung cấp báo cáo theo cùng một cách.
स्टेनलेस डाइसर बैंड के लिए किस पैसिवेशन (passivation) मानक का संदर्भ दिया जाना चाहिए?
Hãy sử dụng tiêu chuẩn ASTM A380 cho các quy trình làm sạch/thụ động hóa và ASTM A967 cho các yêu cầu và lựa chọn xử lý thụ động hóa hóa học. Sau đó, hãy chỉ rõ các yêu cầu về tài liệu và xác thực dữ liệu.
Tại sao lưỡi dao máy cắt hạt lựu 440C vẫn bị mẻ ngay cả khi độ cứng đạt chuẩn?
Bởi vì độ cứng không thể hiện được lượng austenite dư, tình trạng carbide, ứng suất dư hoặc vết cháy do mài. Hiện tượng sứt mẻ (chipping) thường do lượng RA quá cao, quá trình ổn định ram chưa đủ hoặc tổn thương nhiệt trên bề mặt.
Quy trình thử nghiệm tại nhà máy nên được thiết kế như thế nào để đánh giá chất lượng lưỡi dao vòng cắt hạt lựu thay thế?
Hãy sử dụng phương pháp so sánh đối chứng với dữ liệu nền, định nghĩa trước các chỉ số KPI (tuổi thọ lưỡi dao, thời gian dừng máy, tỷ lệ sứt mẻ, chỉ số Cpk của kích thước cắt) và thiết lập dải chấp nhận trước khi bắt đầu. Ghi lại mã định danh lô hàng (Lot ID), chu kỳ vệ sinh sát khuẩn và kết quả kiểm tra để có thể truy xuất lỗi về các nguyên nhân trong khoảng giới hạn quy trình. Maxtor Metal có thể cung cấp mẫu tài liệu thử nghiệm và hồ sơ truy xuất nguồn gốc theo từng lô để hỗ trợ quy trình này.
Tác giả
Jesse Xu — Senior Quality Engineer, QA (Quality Assurance), Maxtor Metal
- Kinh nghiệm: 15 years in quality engineering, with hands-on phân tích lỗi experience to distinguish whether edge chipping or rapid wear is driven by heat-treatment process variation versus material segregation.
- Chứng nhận: ASQ–CQE, ISO 9001 Lead Auditor, ASNT Level II