

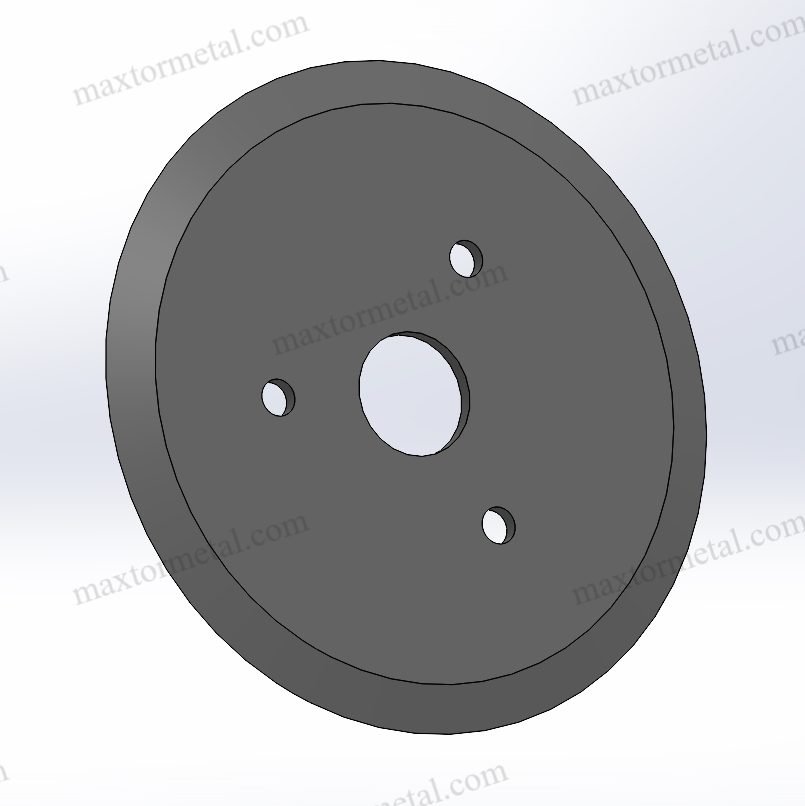
تظهر زوائد الشق الطولي (الرايش) على شكل حافة مرتفعة، أو حافة غير منتظمة (وبرية)، أو غبار ناتج عن القطع، أو خيوط “ممضوغة” على طول الشق—وغالباً ما تكون أسوأ على أحد جانبي الشريط. وهي لا تسيء للمظهر فحسب، بل تتسبب في زيادة الهدر (قصاصات الحواف، المرفوضات)، وحالات انحشار الخامات في المراحل اللاحقة، والتوقفات غير المخطط لها عندما يضطر المشغلون إلى تعديل الإعدادات أثناء التشغيل.
الخبر السار: العديد من حالات زيادة الرايش المفاجئة تنتج عن انحراف الإعدادات الذي يمكنك تصحيحه مباشرة على خط الإنتاج في غضون 15–30 دقيقة—دون الحاجة إلى تفكيك كامل للآلة. وعادةً ما تتحقق أسرع النتائج من خلال إعادة التداخل (overlap) والخلوص (clearance) إلى النطاق الصحيح، واستعادة حالة حافة القطع، وتثبيت ميكانيكا حركة الشريط (الشد والسرعة).
لا تحتاج إلى أدوات خاصة للبدء. تمتلك معظم المصانع بالفعل ما يلزم: مقاييس التحسس (feeler gauges)، ومؤشر القياس القرصي (dial indicator)، وفيلم قياس الضغط، ومقياس حرارة بالأشعة تحت الحمراء (IR).
ملاحظة تتعلق بالسلامة: هذا الدليل مخصص لاستكشاف أخطاء التشغيل وإصلاحها فقط. احرص دائماً على اتباع إجراءات الإغلاق وتثبيت اللافتات التحذيرية (lockout/tagout)، ووسائل الحماية، وإجراءات الشركة المصنعة للمعدات الأصلية (OEM) الخاصة بموقعك قبل فحص أو ضبط أي محطة شق طولي.
قم بإجراء الفحوصات أدناه وستلاحظ حوافاً أكثر نظافة، وكفاءة إجمالية للمعدات (OEE) أكثر استقراراً، وتكلفة إجمالية أقل للملكية اليوم—لأنك ستقلل من الهدر والوقت المستغرق في “الضبط بالاعتماد على الإحساس”.”
مثال عام (الأفلام/التعبئة والتغليف): أشارت دراسة حالة من Maxcess حول عملية معالجة شريط بوليمر رقيق إلى القضاء على التجاعيد و مضاعفة إنتاجية اللفات بعد تركيب حل لفرد الشريط، مما ساعد على استقرار العمليات اللاحقة بما في ذلك الشق الطولي واللف. انظر دراسة حالة Maxcess: شركة Plitek تقضي على التجاعيد وتضاعف إنتاجية اللفات (مرجع عام؛ تعتمد النتائج على تصميم الخط ونوع المادة).
حلول فورية الآن (رايش الشق الطولي)
ضبط التداخل والخلوص
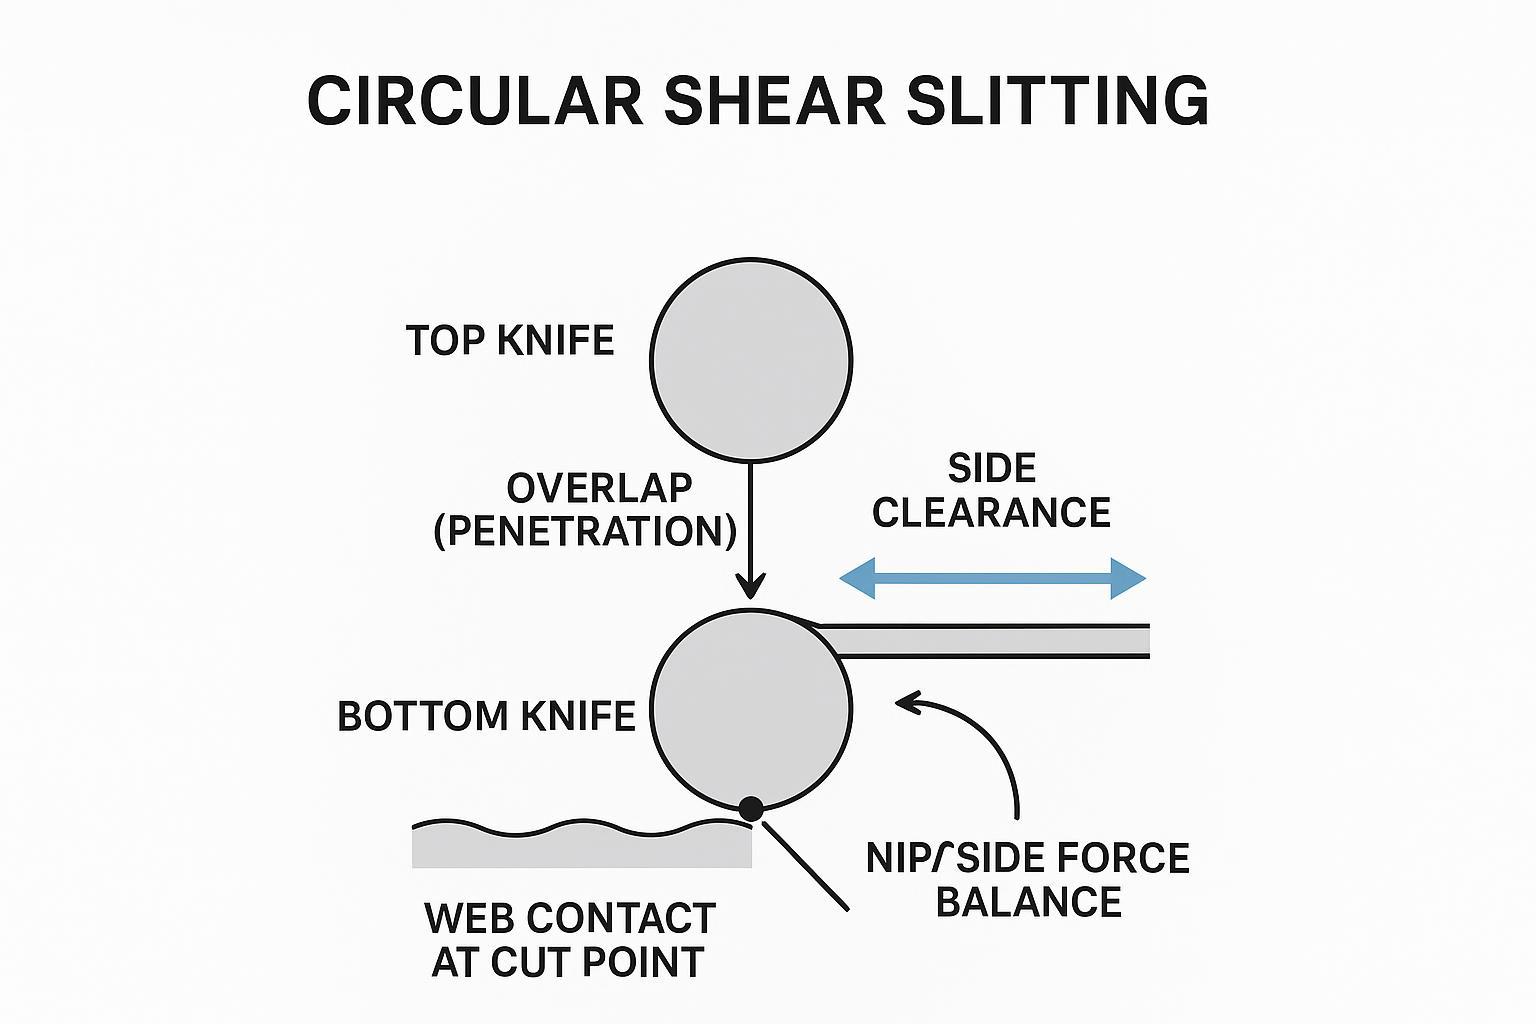
إذا زاد الرايش فجأة بعد عملية تغيير الإعدادات، فاعتبر التداخل والخلوص الجانبي هما المتهم الأول #1. هذا هو أسرع مكان للبدء في استكشاف أخطاء الشق الدائري بالقص وإصلاحها لأنه يحدد مباشرة ما إذا كنت تقوم بالقص الفعلي أو بالاحتكاك.
ماذا يعني “التداخل” و“الخلوص” (في جملة واحدة): التداخل هو مدى تغلغل السكاكين بعد نقطة التماس النظرية؛ أما الخلوص فهو الفجوة الجانبية المحكومة التي تسمح للسكاكين بالقص بدلاً من الاحتكاك.
ابدأ بتوقف قصير وأجرِ فحوصات تداخل وخلوص سكاكين الشق الطولي التالية:
- تأكد من الخلوص الجانبي عند نقطة القطع (باستخدام مقياس التحسس feeler gauge). افحص كلاً من جانب المشغل وجانب التشغيل. فالخلوص الواسع جداً قد يؤدي إلى تشوه الشريط بدلاً من قصه؛ بينما يؤدي الخلوص الضيق جداً إلى زيادة الاحتكاك ويمكن أن يتسبب في تلف الحواف الناتج عن الحرارة.
- أعد ضبط التداخل بخطوات صغيرة. إذا رأيت حافة وبرية وغباراً، فقلل التداخل قليلاً. وإذا بدا الشق ممزقاً أو غير مقطوع بشكل متقطع، فزد التداخل قليلاً. قم بتغيير متغير واحد في كل مرة.
- تحقق من التوازي على طول العرض. إذا كان أحد المسارات نظيفاً والآخر يحتوي على رايش، فقد يكون الإعداد متعامداً بشكل عام ولكنه غير متناسق عبر عمود الدوران (arbor stack).
أهم النقاط الرئيسية: يشير رايش الشق بالقص المنتظم عبر جميع المسارات عادةً إلى مشكلة في التداخل/الخلوص أو حالة السكين؛ بينما يشير الرايش الذي يظهر ويختفي بنمط متكرر غالباً إلى انحراف الدوران (runout) أو استقرار الشد.
للحصول على مرجع أعمق حول منطق الخلوص والأخطاء الشائعة، راجع دليل MAXTOR METAL: الدليل الشامل لضبط خلوص شفرات القص.
إذا كنت تقوم بضبط التداخل/الخلوص بعد تغيير الإعدادات—أو كنت تقوم بمطابقة السكاكين لتقليل الرايش والحرارة—فراجع منتجات MAXTOR METAL من سكاكين وشفرات الشق الطولي الدائرية لمعرفة التكوينات النموذجية وخيارات التخصيص.
استعادة حدة الحواف وإزالة الرايش
السكين “الجديد” ليس بالضرورة سكيناً حاداً عند حافة القطع—خاصة إذا تم التعامل معه بشكل خاطئ، أو تعرض للاصطدام، أو تم تجميعه باستخدام فواصل ملوثة.
الإجراءات السريعة على خط الإنتاج التي تحقق نتائج فعالة:
- افحص بحثاً عن الشروخ الدقيقة (micro-chips) وحلقات التدحرج. استخدم عدسة مكبرة إن وجدت؛ حيث يمكن أن يتسبب التلف الطفيف في الحافة في تكوين رايش كبير بشكل غير متناسب على الأفلام والمنسوجات غير المغزولة.
- نظف أسطح التلامس والفواصل. وجود رايش واحد على الفاصل أو شوائب عالقة يمكن أن يؤدي إلى إمالة مجموعة السكاكين وتغيير الخلوص الفعلي عند نقطة القطع.
- إذا لم تتمكن من الشحذ على الفور، فقم بتقليل الحمل. قم بخفض السرعة و/أو الشد قليلاً لوقف التمزق أثناء جدولة عملية إعادة الشحذ.
راقب درجة الحرارة كمؤشر على الاحتكاك. إذا أظهر مقياس الحرارة بالأشعة تحت الحمراء (IR) ارتفاعاً في درجة الحرارة حول السكاكين، فقد يكون هناك احتكاك (ضيق شديد، قوة جانبية مفرطة) أو قطع بحافة ثلمة.
ورقة مرجعية سريعة لأعراض الحواف (فحص بصري سريع):
- قص نظيف: حافة حادة، غبار قطع في حده الأدنى، مظهر متناسق من مسار لآخر.
- الاحتكاك/قوة جانبية مفرطة الضيق: حافة لامعة أو ملطخة، ارتفاع درجة حرارة السكين، وأحياناً مظهر “مصقول”.
- التمزق (عدم كفاية عملية القص): ragged edge, intermittent uncut fibers/strands, burr that worsens when tension fluctuates.
- Micro-chips/rolled edge: localized burr that “prints” repeatedly, often paired with a periodic defect pattern and audible tick/chatter.
Align entry, stabilize tension and speed
Once overlap/clearance and edge condition are reasonable, burrs that persist are often web-mechanics problems.
- Square the web into the station. A skewed entry angle can bias side force and make one edge consistently worse.
- Stabilize tension before you touch knife settings again. A tension change can “fake” a clearance issue by changing how the web sits at the cut point.
- Reduce speed briefly to isolate cause. If burrs drop quickly with a 10–20% speed reduction, you’re likely dealing with a stability issue (flutter, tension loop response, or heat buildup).
- Check overspeed assumptions if your system uses it. Industry guidance commonly references a small bottom-knife overspeed to maintain scissor action; see the principles described in the Carolina Knife “Principles of Shear Splitting” PDF.
مجموعة التشخيص السريع
جدول إجراءات التشغيل القياسية (SOP) السريع: العَرَض ← السبب ← الفحص ← الحل السريع ← التحقق
| What you see | السبب المحتمل | ما يجب فحصه | Quick fix | Verify it worked |
|---|---|---|---|---|
| Uniform burr across lanes | Overlap/clearance out of range; dull edge | Feeler gauge at cut point; knife edge under magnification; spacer cleanliness | Reset overlap/clearance in small steps; clean spacers; reduce load (speed/tension) if needed | Edge looks crisp; dusting drops; knife temp trend stabilizes |
| Burr mostly on one side | Skewed entry; side load imbalance; stack not parallel | Web entry squareness; pressure film pattern; lane-to-lane clearance | Square web; balance nip/side load; re-check parallelism | Left/right edge match improves |
| Burr repeats periodically down-web | Runout/TIR; stack error; mounting face contamination | Dial indicator TIR at knife OD; check mounting faces | Clean faces; re-stack; replace damaged spacers; verify alignment | Pattern disappears; TIR reduced |
| Fuzzy edge / fiber pull-out | Tearing from low shear action; dull edge; unstable tension | Overlap/clearance; tension stability; edge condition | Increase overlap slightly; stabilize tension; sharpen/replace if chipped | Less fuzz; steadier slit edge |
| Shiny/smeared edge on film | Rubbing/heat; too tight clearance; debris | IR temp trend; clearance; spacer burrs | Open clearance slightly; clean stack; reduce side force | Temp rise slows; smear disappears |
(Always follow your OEM manual, safety procedures, and holder design limits before making adjustments.)
Runout and axis alignment
If burr quality cycles “good/bad/good/bad” at a regular interval down-web, suspect runout.
Do a quick runout check with a dial indicator:
- Measure TIR on the knife OD while rotating slowly. If runout is high, the effective overlap and clearance change once per revolution.
- Check bearing/shaft condition and mounting faces. A clean knife on a dirty or damaged mounting surface will still run out.
- Confirm axis alignment between upper and lower arbors. Misalignment forces the cut point to wander, which shows up as lane-to-lane inconsistency.
This pattern-based diagnosis matches what many shear slitting OEMs describe: burr that appears periodically is usually not “material randomness,” but geometry repeatability (runout, stack error, alignment).
Pressure mapping and nip balance
Uneven side load or nip force can turn a good knife setup into a rubbing setup.
Use pressure film to map contact:
- Place film at the nip/holder contact zone per your line’s safe procedure.
- Run at low speed briefly and compare the print density across the width.
- Correct obvious left/right imbalance first, then re-check edge quality.
For a quick reminder of common shear slitting failure modes tied to overlap and setup forces, DIENES USA’s list of issues is a useful reference: "6 of the most common problems found in shear slitting".
If you’re deciding between shear and crush slitting for a film job, DIENES USA also notes that shear slitting is preferred when a very clean and uniform cutting edge is required, while crush cutting is easier but tends to produce rougher edges and higher dust. See "Shear vs. Crush: When to use Which One?".
Preventive checks and logging
Lock in your gains by making the setup repeatable across shifts.
A simple way to make troubleshooting faster (and more objective) is to log three “signals” every time burr spikes: runout (TIR), knife-area temperature rise, and tension stability. Use the conservative guidance below as starting reference points and always defer to your OEM manual, holder design, and web/material limits:
- Runout (TIR) quick-check: If you measure more than about 0.001–0.002 in (0.025–0.05 mm) TIR at the knife OD during a slow rotation, treat it as a likely contributor to periodic burr (effective overlap/clearance changes once per revolution). If you’re above this range, clean mounting faces, re-stack, and re-check before changing geometry. (Reference guidance compiled from knife/slitting suppliers; for example, DIENES USA’s shear cutting resources discuss how geometry repeatability impacts slit quality and dust generation: “The 2 Types of Shear Cutting and the 4 Relations that Impact Quality”.)
- Temperature trend: Log the knife-area temperature at startup and again after 5–10 minutes. A fast upward trend (even if the absolute number varies by plant) often indicates rubbing from tight clearance, debris in the stack, or dull edges.
- Tension stability: Record setpoint and the observed swing (or dancer position variation). If burr correlates with larger swings after speed changes, stabilize tension control before re-tuning overlap/clearance.
Log template (copy/paste):
- Minimum fields: material, thickness, speed, tension setpoint, overlap, clearance, symptom (burr/fuzz/dusting), corrective action, result.
- Optional (recommended): measured TIR, knife temp (start/10 min), lane #, photos under magnification, date/shift/operator.
Keeping the “minimum fields” consistent is what makes trend reviews and repeatability possible across shifts.
- Record the last “good” overlap/clearance, tension, and speed for each material and thickness.
- Log knife life by hours or meters slit, not by calendar time.
- Add a two-minute verification step: feeler gauge check + quick IR temperature scan after startup.
MAXTOR METAL supports matched blade pairing, QC traceability, and one‑stop import to help plants keep knife geometry and documentation consistent from order to install.
الضبط المخصص حسب نوع المادة
Films (PET/OPP/PE)
Films punish heat and rubbing.
A practical rule: when a film edge defect changes quickly with speed or tension, suspect stability/heat first (flutter, side force, rubbing). When it prints in a repeatable pattern, suspect geometry repeatability (runout/stack). Use the IR thermometer and a quick TIR check to decide which path to follow before you touch overlap/clearance again.
- ابدأ بـ lower overlap و أ tighter, controlled clearance than you’d use for fibrous webs.
- If you see edge melt or a glossy “smeared” lip, reduce overlap and confirm you’re not over-loading the side force.
- Verify results with magnification: the goal is a clean edge with minimal dusting and no stretched “whiskers.”
الأقمشة غير المنسوجة والمنسوجات
Nonwovens often show burr as fiber pull-out or fuzz.
- إعطاء الأولوية edge sharpness و stable web support at the cut point.
- Increase overlap modestly if you see incomplete shear, but back off if fuzz increases (that’s often rubbing or excessive compression).
- If the web is stretchy, tune tension for stability first—otherwise you’ll chase overlap all shift.
الورق والرقائق
Paper and laminates are sensitive to dusting, delamination, and edge cracking.
- Keep overlap in a moderate range and avoid excessive compression.
- Watch for dust bursts that correlate with temperature rise; that often indicates friction or dullness rather than “bad paper.”
- When burr increases after a speed change, re-check tension response and web entry alignment before you touch knife geometry.
نتائج من الميدان (مثال)
In one film/packaging slitting improvement project, a standardized setup-and-verification routine (geometry checks, spacer hygiene, and quick logging) delivered measurable gains:
- Scrap down 45%
- Burr-related stops down 65.94%
- Changeover time down 46.8%
- Knife life increased by 4.3×
(Results vary by material, line condition, operator practices, and holder design. Use these numbers as a reference for what’s achievable when the process becomes repeatable.)
الخاتمة
Fast wins come from three things: correct overlap/clearance, sharp edges, and balanced pressure at the cut point.
To keep burrs from returning, verify runout, tension stability, and anvil/holder condition—and document the last-known-good settings so you can repeat them on the next changeover.
Track a few KPIs and review them weekly: burr-related complaints, scrap rate, changeover time, and uptime. If those numbers improve, your “fix” is real—not just a short-term adjustment that hides the problem.
If you want a second set of eyes on knife pairing and inspection documentation for your material set, you can contact ماكستور ميتال with your knife drawings/specs and current defect photos.
FAQ
1) What causes slitting burrs in shear slitting?
Slitting burrs most often come from dull knives, incorrect overlap/clearance, runout, or unstable web mechanics (tension and speed). Uniform burr points to setup and edge condition; periodic burr often points to runout or stability problems.
2) How do I reduce slitting burrs in 15 minutes without changing knives?
Reset overlap and side clearance in small steps, clean spacer/contact faces, stabilize tension, and reduce speed briefly to isolate the cause. Use an IR thermometer to catch friction/heat that indicates rubbing.
3) What’s the difference between overlap and clearance on slitter knives?
Overlap is how far the knives penetrate past the tangent line to create scissor action; clearance is the controlled side gap that prevents rubbing while still allowing shear. Wrong overlap or clearance can turn shear cutting into tearing or friction.
4) Why do slitting burrs come and go in a repeating pattern?
A repeating burr pattern down the web is a classic runout symptom: once per revolution the effective overlap and clearance change. Confirm with a dial indicator runout check on the knife OD and mounting surfaces.
5) What tools should a line-side slitting burr troubleshooting kit include?
At minimum: feeler gauges (clearance checks), dial indicator (runout/TIR), pressure film (nip/side load balance), and an IR thermometer (heat/friction). These four tools cover most burr spikes quickly.
6) Why do we get a fuzzy slit edge on film and nonwovens?
Fuzzy edges typically indicate tearing or fiber pull-out rather than clean shear. Check sharpness first, then verify overlap/clearance, tension stability, and whether side load is causing rubbing and heat.
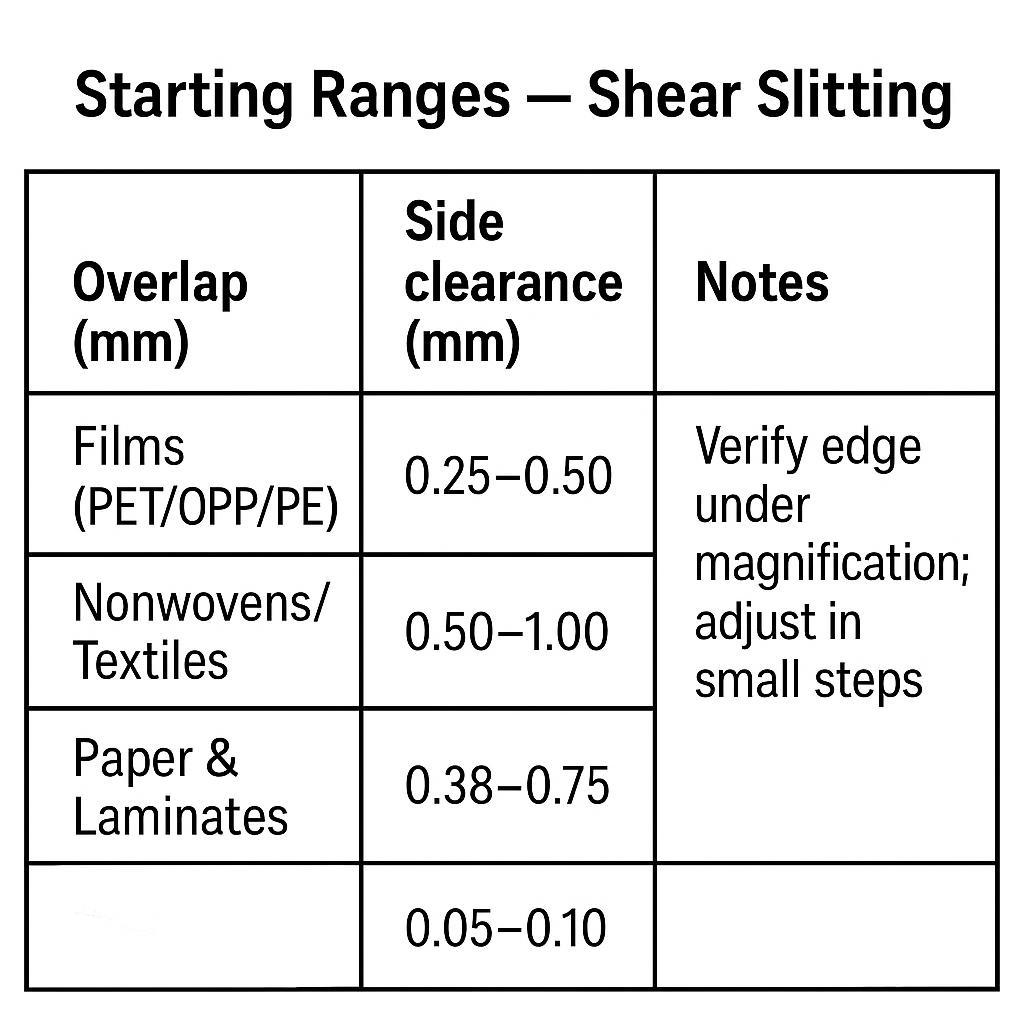
7) What are safe starting settings for overlap and clearance by material?
Use conservative starting ranges, then verify edge quality under magnification and adjust in small steps. As a baseline, films often need lower overlap and tighter control to avoid heat; nonwovens often need sharpness and stability more than force.
8) How do I stop burr problems from coming back after the next changeover?
Document the last-known-good settings (overlap/clearance, tension, speed), add a short startup verification (feeler gauge + IR scan), and log knife life by hours or meters. Repeatability is what protects OEE across shifts.
جيري تشو is a Technical Support Specialist in MAXTOR METAL’s After-sales Service team with عشر سنوات of cross-industry field experience (paper, plastic recycling/shredding, metal slitting, and wood processing). He supports customers in troubleshooting real-world converting and slitting issues such as edge burrs and excessive dust. Certifications: مدير مشاريع معتمد (PMP) و CMRP.

 English
  Spanish
  Italian
  French
  Portuguese
  Russian
  German
  Arabic
  Hindi
Hindi  Vietnamese
  Indonesian
  Japanese
  Korean