Come utilizzare questa guida (ambito e presupposti): Gli intervalli e le procedure di risoluzione dei problemi riportati di seguito sono punti di partenza pratici per coltelli circolari da taglio nelle tipiche linee di trasformazione. Le impostazioni ottimali effettive dipendono dalla progettazione della macchina (rigidità del portautensili, eccentricità, spessore degli spessori), dal supporto del nastro e dalla variabilità del substrato: convalidare sempre con una prova controllata e modificare una sola variabile alla volta.
Nota tecnica: Per le specifiche a livello di lama, inclusi gli standard di eccentricità assiale e i gradi del materiale, vedere Lame di precisione circolari da taglio di Maxtor Metal.
Se stai cercando di ottenere bordi più netti con meno cambi di formato, la soluzione più rapida di solito non è una nuova macchina, ma adattare la geometria del bordo al comportamento del materiale sotto tensione. Maxtor Metal Si osserva lo stesso schema in tutte le linee di pellicole, tessuti non tessuti, tessili e laminati: una smussatura che funziona perfettamente su un supporto morbido può scheggiarsi, sfregare o far emergere bave nel momento in cui la rigidità aumenta.
- Perché la geometria del bordo è importante per i tempi di attività, il controllo delle bave e il costo totale di proprietà (TCO).
La geometria del bordo determina come la lama entra nel nastro, come si distribuiscono le forze e se il taglio rimane stabile con l'usura del bordo. Controlla anche i costi dei difetti più comuni: questo è il cuore di geometria della lama di controllo della bava di taglioUna discrepanza si manifesta con sprechi ripetuti: cambi di lama non pianificati, variazioni di larghezza, peluria/polvere sui bordi, inceppamenti a valle e scarti.
- Come la rigidità del materiale e la configurazione influenzano le scelte tra smusso singolo, doppio o composto.
La rigidità modifica il "supporto" di cui il bordo ha bisogno. Le anime morbide beneficiano di una bassa forza d'ingresso e di un buon supporto contro le vibrazioni. Le anime rigide penalizzano i bordi fragili e amplificano la spinta laterale, l'eccentricità e la sovrapposizione eccessivamente aggressiva.
- Cosa offre questa guida: un quadro di selezione con parametri di partenza
Otterrai un modo di scegliere guidato dalla rigidità smusso singolo, doppio smusso, O composto/micro-smusso geometria, più finestre di impostazione e controlli che mantengono stabile la qualità del taglio al variare delle condizioni. In tutto, trattalo come un lama per taglierina a smusso singolo, a doppio smusso o a smusso composto Problema di selezione: non esiste un angolo di rettifica universale.
Meccanica del tagliente (geometria dello smusso per lame circolari da taglio)
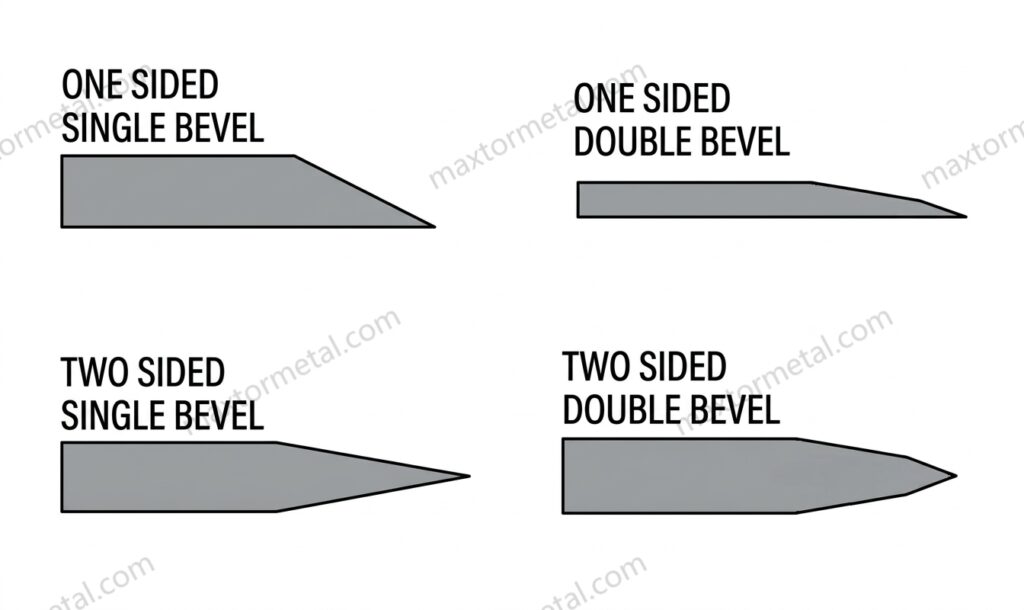
Meccanica a smusso singolo
Una singola smussatura è direzionale per sua natura. Un lato del bordo svolge la maggior parte del "lavoro", il che può rendere l'ingresso iniziale netto ed efficiente, soprattutto su nastri più morbidi.
Il compromesso è la forza laterale. I biselli singoli possono "guidare" il taglio se la guida del nastro, l'allineamento del coltello o il carico laterale non sono controllati. Ecco perché i biselli singoli sono spesso descritti come consegnato: l'orientamento del supporto è importante e invertire la direzione può alterare la qualità del bordo.
I bordi asimmetrici possono comportarsi in modo direzionale: un angolo del cuneo non uniforme modifica il modo in cui le forze di taglio si distribuiscono sul nastro, il che può influenzare il tracciamento se l'allineamento e il carico laterale non sono controllati.
Bilancia a doppio smusso
Una doppia smussatura divide il cuneo in modo più uniforme. In pratica, questo spesso significa:
- Traiettoria più neutra (minore tendenza a spingere da un lato)
- Maggiore tolleranza ai piccoli errori di allineamento.
- Qualità dei bordi più uniforme nei cambi di direzione
La doppia smussatura è solitamente la scelta "di base" più sicura quando è necessaria una qualità stabile su diversi materiali, larghezze o variazioni di impostazione da un turno all'altro.
Supporto composto/micro-smussato
I bordi composti (spesso una smussatura primaria più una piccola smussatura secondaria in punta) sono un modo per mantenere un ingresso affilato fornendo al contempo maggiore supporto al filo.
Pensatela come "affilata dove serve, rinforzata dove si rompe". Quando la rigidità o l'abrasività sono elevate, una micro-smussatura può ridurre le scheggiature e l'arrotondamento prematuro senza trasformare il coltello in un cuneo smussato.
Selezione guidata dalla rigidità
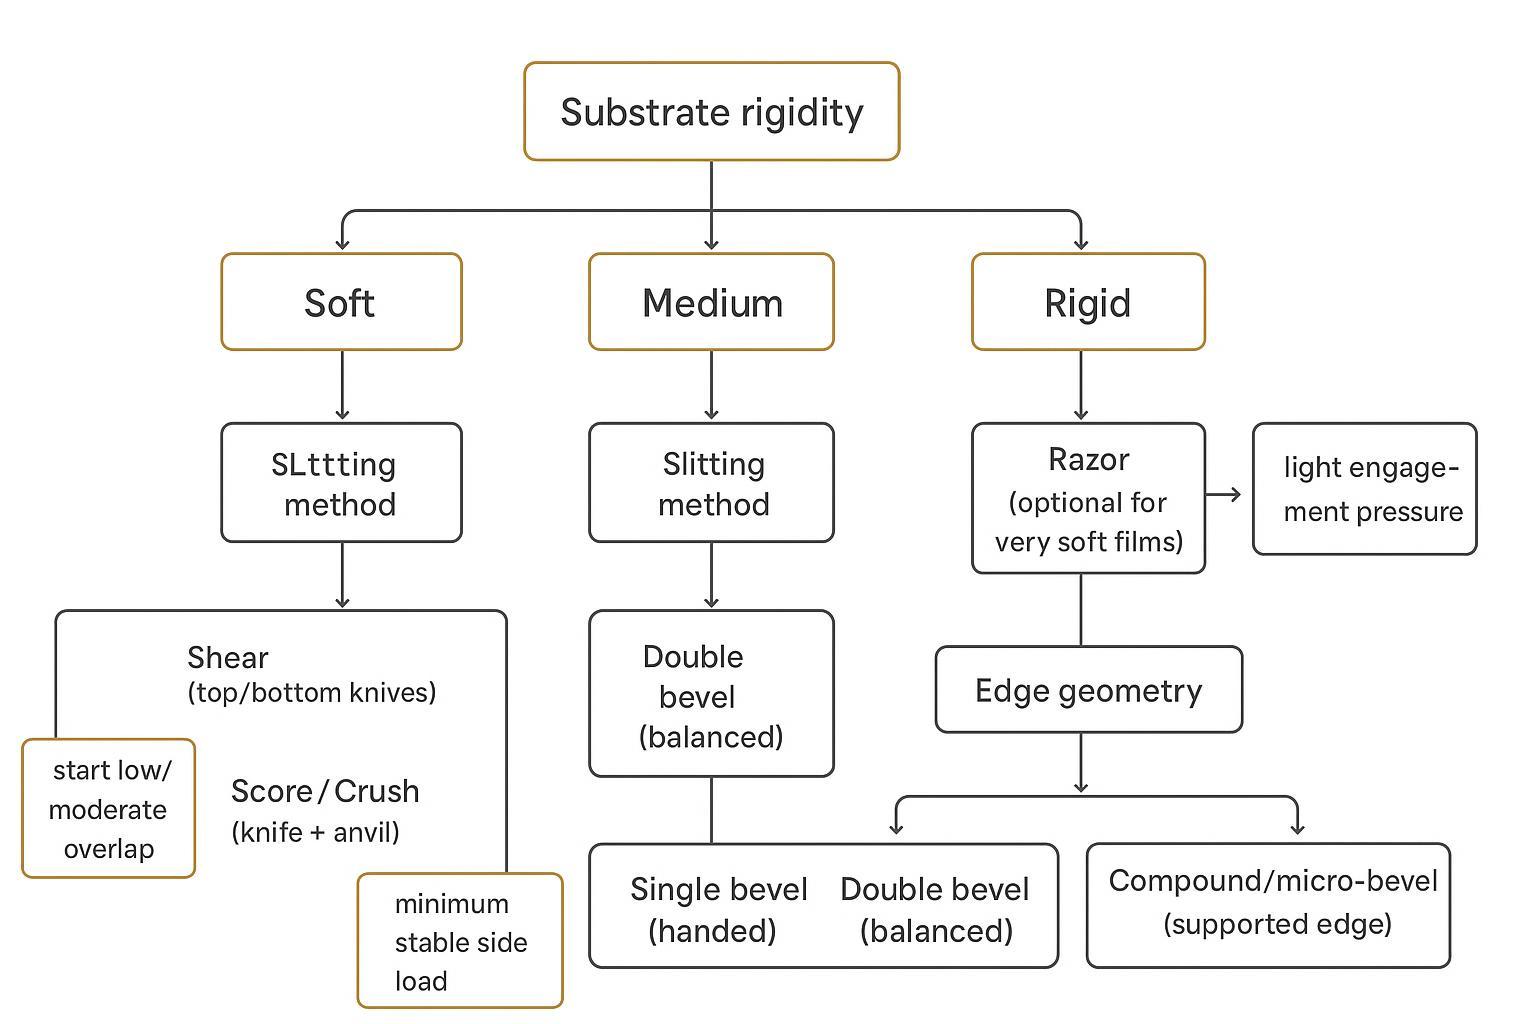
Mappatura della rigidità alla geometria (scegli la smussatura in base alla rigidità del materiale)
Non serve un laboratorio per classificare la rigidità. Per la maggior parte delle linee di conversione, una classificazione pratica utilizza:
- Calibro / spessore (schermata rapida)
- Gestione del comportamento (sensazione di flessione/a sbalzo)
- Comportamento della macchina (flutter, sensazione di instabilità, sensibilità alla tensione)
Per la carta e il cartone, la rigidità viene spesso specificata utilizzando metodi standardizzati di resistenza alla flessione (ad esempio, gli standard ISO di rigidità della carta/cartone come ISO 2493-2:2020 (Tester di tipo Taber) e i principi più ampi in ISO 5628:2019), il che è utile quando è necessario confrontare i voti in modo obiettivo.
Una mappatura utile dell'area di produzione si presenta così:
- Morbido: pellicole/fogli sottili, tessuti non tessuti a bassa grammatura, tessuti elastici (soggetti a svolazzi)
- Medio: la maggior parte delle pellicole per imballaggio, carte patinate, tessuti non tessuti di media densità
- Rigido: pannelli, laminati rigidi, compositi di grosso spessore (il danno ai bordi/la polvere diventano predominanti)
Quando preferire la smussatura singola
La lama a smusso singolo è più efficace quando è necessario un ingresso pulito e con poca forza e si può controllare la direzione e il supporto.
Preferire la smussatura singola quando:
- Il web è morbido e sensibile a schiacciamento o deformazione dei bordi
- Si desidera una forte "presa" iniziale con un carico di taglio inferiore
- La linea corre in una direzione dominante e puoi mantenere costante l'orientamento del coltello
Segnali di allarme per smusso singolo:
- La qualità del bordo cambia quando si inverte la direzione
- Stai compensando con un carico laterale maggiore o una sovrapposizione maggiore
- Si nota un aumento della bava/peluria man mano che il bordo si usura (punta fragile o orientamento errato).
Uso bidirezionale vs. uso manuale
Se il processo inverte la direzione (o se si scambia frequentemente l'orientamento della lama superiore/inferiore), è qui che la smussatura singola spesso crea confusione.
- Smusso singolo: trattare come consegnatoAnnotare l'orientamento della lama nel registro degli utensili e sulla mappa dell'albero/distanziatore.
- Doppio smusso: tipicamente più bidirezionale e capace di perdonare.
- Composto: dipende se la base è singola o doppia; una smussatura singola composta si comporta comunque come una smussatura manuale.
Suggerimento professionaleSe gli operatori non riescono a mantenere un orientamento della smussatura costante e affidabile durante i cambi di produzione, una doppia smussatura o una smussatura composta-doppia smussatura spesso riducono i "difetti misteriosi" più di qualsiasi microregolazione.
Impostazione dei parametri
Finestre a fessura
Per una guida più approfondita sulla configurazione delle variabili di coinvolgimento, vedere ottimizzazione della profondità di sovrapposizione e dello spazio laterale.
Finestre di avvio pratiche (sovrapposizione e carico laterale)
Usa questi gamme di base come prima passata, poi perfezionare in base alla qualità del bordo e ai segni di calore/attrito:
- Materiali flessibili (ad esempio, film in PE): sovrapposizione 0,30–0,50 mm; leggero side load. On soft or compliant webs where maintaining zero-clearance contact under tension variation is a challenge, a spring-loaded holder system can stabilize the cut point; see Sistema a molla per taglio a cesoia a gioco zero.
- Anime a rigidità media (ad es. BOPP/CPP): sovrapposizione 0,45–0,70 mm; medio carico laterale
- Nastri rigidi/laminati (ad es. PET/laminati): sovrapposizione 0,60–0,90 mm; medio-alto carico laterale
Ordine di regolazione (per ridurre al minimo l'usura superflua):
- Riduci la sovrapposizione se vedi polvere/particelle fini, segni di calore o accumuli di materiale fuso.
- Verificare l'allineamento/l'eccentricità e la pulizia del distanziale.
- Aumentare la sovrapposizione o il carico laterale solo fino al minimo necessario a stabilizzare il taglio.
Nota: il termine "carico laterale" è qui espresso intenzionalmente come livelli relativi, poiché diversi detentori utilizzano scale e unità di misura differenti.
Il taglio a cesoia ha successo quando si ottiene una vera azione a forbice: allineamento, sovrapposizione/penetrazione controllata, carico laterale stabile minimo e pila di distanziatori uniforme.
Iniziate con quest'ordine (modificate una variabile alla volta):
- Verificare le condizioni del coltello (filo, intaccature) e esaurire
- Per la selezione dell'accoppiamento del foro (H7/h6 vs H7/g6) e la procedura di assemblaggio che mantiene la ripetibilità del TIR durante i cambi, vedere Tolleranza e concentricità del foro centrale: ISO 286 per lame da taglio.
- Verificare che i supporti/distanziatori siano puliti e paralleli (vedere tolleranza di spessore cumulativo per pile di lame multiple)
- Impostare la sovrapposizione/penetrazione in modo conservativo
- Aggiungere solo il carico laterale necessario per garantire la stabilità.
- Relazione tra tensione e velocità dell'accordatura
Per una logica di configurazione più approfondita e per la risoluzione dei problemi, assicurati che le tue note di configurazione siano allineate alle pratiche di misurazione standardizzate per le proprietà del nastro e la geometria della macchina (ad esempio, standard di prova di rigidità e spessore e routine di eccentricità/ispezione coerenti).
Sintomi → probabili primi aggiustamenti:
- Bava o ruvidità del bordo: ridurre prima la sovrapposizione eccessiva; poi verificare lo spazio libero/l'allineamento e l'acutezza dei bordi.
- Polveri/particelle fini: la sovrapposizione o il carico laterale sono spesso eccessivi rispetto alla rigidità del nastro; verificare che le lame non sfreghino.
- Taglio incompleto / etichetta intermittenteSovrapposizione troppo bassa, carico laterale troppo basso o lame smussate.
Se desideri una sequenza passo passo basata su verifiche pratiche, Maxtor Metal Guida alla configurazione del taglio a cesoia è un buon testo di riferimento complementare.
Dettagli di schiacciamento/punteggio
Il taglio a frantumazione/incisione è un processo basato sulla pressione: un coltello entra in contatto con un'incudine e separa il materiale mediante una deformazione controllata. È meccanicamente più semplice, ma non perdona gli errori quando la pressione viene usata al posto dell'affilatura.
Punti di partenza validi in molti contesti:
- Tieni il coltello nitido quanto consentito dal processoNon "forzare" un bordo smussato esercitando pressione.
- Utilizzo pressione/penetrazione minima che produce un taglio stabile.
- Se aumentando la pressione si solleva della polvere, di solito si è superato il punto ottimale.
Nella frantumazione/incisione, mantenere la selezione dell'angolo e le impostazioni di pressione legate al comportamento di deformazione del substrato e allo spessore misurato. Per la misurazione dello spessore, utilizzare uno standard appropriato per la famiglia di materiali (ad esempio, ISO 4593 per lo spessore della pellicola/foglio di plastica mediante scansione meccanica, oppure ISO 5084 per spessori tessili e non tessuti sotto pressione specificata).
Finitura dei bordi e rivestimenti
La finitura dei bordi è importante perché influisce sull'attrito e sulla velocità con cui il nastro si riscalda o si trascina nel punto di taglio.
Adotta un approccio di selezione semplice:
- Se vedi bordo di fusione o segni di calore sulle pellicole, prima di modificare la geometria, esaminare le fonti di attrito (pressione, sovrapposizione, condizioni dei bordi, pulizia).
- Se vedi usura abrasiva (arrotondamento dei bordi, crescita della banda lucida) sui materiali riempiti, un bordo supportato (smusso composto/micro-smussatura) spesso mantiene la qualità più a lungo.
Se stai specificando nuovi strumenti, assicurati che la richiesta sia misurabile:
- Geometria degli spigoli (singolo/doppio/composto)
- Applicazione di destinazione e famiglia di substrati
- Parametri di qualità che ti interessano (bava, peluria, polvere, tolleranza di larghezza)
- Surface coatings (DLC or PTFE) add another layer to this selection: a coating that works on one substrate type can degrade quickly on another depending on whether your line is wear-limited or transfer-limited. For a selection framework with field case data, see DLC vs PTFE Coatings for Slitting Blades: Engineer’s Guide.
Per i lettori che valutano le opzioni di approvvigionamento e specifica, Maxtor Metal coltelli e lame circolari Questa pagina rappresenta il punto di partenza ideale per scoprire i formati dei coltelli circolari e le possibilità di personalizzazione.
Manuali di istruzioni sui materiali
Pellicole e fogli
Ciò che generalmente conta di più è il controllo delle vibrazioni, un ingresso netto e la prevenzione del surriscaldamento e dell'attrito.
Guida introduttiva:
- pellicole morbide e sottili: smusso singolo o composto con ingresso affilato; mantenere l'impegno leggero e il supporto della lama stabile.
- Fogli o laminati di fogli: il supporto del bordo diventa più importante; la doppia smussatura o la smussatura composta spesso riducono la formazione di bave nel tempo.
Difetti comuni in base al livello di rigidità (cosa controllare per prima cosa):
- reti morbide: stiramento dei bordi; accumulo di polvere fusa (spesso dovuto a eccessiva sovrapposizione/pressione o attrito/sfregamento)
- Anime a rigidità media: bava; polvere
- Reti rigide: bava; taglio incompleto / screpolature del bordo
Controlli che prevengono studi clinici inutili:
- Prima di attribuire la colpa al coltello, verificate la stabilità della tensione.
- Monitorare le condizioni dei bordi nel tempo e in base alla lunghezza; i nastri flessibili possono mascherare l'usura fino a quando i difetti non aumentano improvvisamente.
Carta/cartone e laminati
Carta e cartone spesso premiano un'azione di taglio stabile e uno spazio di sicurezza costante. I laminati possono essere "rigidi nel complesso", ma presentano comunque strati fragili che possono scheggiare i bordi o generare polvere.
Guida introduttiva:
- Carta di medio spessore / carta patinata: la doppia smussatura è una base stabile comune.
- Laminati rigidi / strutture a pannelli: doppio smusso composto o robusto; ridurre la sovrapposizione eccessiva per controllare la polvere.
Principali controlli di qualità:
- Polvere sui bordi vs. bava: la presenza di polvere spesso indica impostazioni troppo aggressive, non solo la geometria dei bordi.
- Se i bordi della fessura si sfrangiano, verificare l'affilatura del bordo e l'allineamento del supporto prima di aumentare la pressione.
Tessuti/non tessuti ed elastomeri
Mini caso di studio: tessuto non tessuto spunbond in PP per uso igienico (25 g/m²) a 380–520 m/min
Nota sui dati: Le cifre riportate di seguito provengono dal progetto di supporto fornito da Maxtor Metal a un produttore di tessuti non tessuti per l'igiene; il nome del cliente è stato reso anonimo.
Un convertitore di tessuto non tessuto igienico in funzione Tessuto non tessuto in PP, circa 25 g/m² (Di 0,18–0,22 mm(senza riempitivo) ha utilizzato il nastro tagliato in un processo di laminazione del backsheet in cui la pulizia dei bordi ha influenzato la stabilità del riavvolgimento e la successiva saldatura a ultrasuoni.
Nozioni di base sulla linea (configurazione di taglio/avvolgimento): Larghezza del nastro di 3.200 mm, circa 20 corsie (larghezza delle corsie 90-160 mm), portacoltelli superiori a carico pneumatico. La linea **funzionava a 380-520 m/min**; il team ha anche utilizzato **~3-4% di sovravelocità del coltello inferiore** per stabilizzare il punto di taglio.
Nota del settore: un principio comunemente citato nel taglio a cesoia è che un piccolo velocità eccessiva del coltello inferiore (3–5%) stabilizza il punto di taglio e previene l'instabilità della tela nel punto di taglio.
Istantanea prima/dopo (metriche chiave):
| Metrico | Prima | Dopo |
|---|---|---|
| difetti primari | Pelucchi / filamenti di fibre / strappi ai bordi / accumulo di lanugine | Riduzione di pelucchi e filamenti; minore tendenza a tirare i bordi; minore accumulo di lanugine |
| Gravità (punteggio interno) | Fuzz 8/10, corde 6/10 | Fuzz 4/10, corde occasionali |
| Intervento dell'operatore | Pulizia ogni 2-3 rotoli di pannolini usati; 6-8 interventi/turno; lanugine visibile dopo circa 90 minuti | 1-2 interventi/turno; tempi di inattività per la pulizia ridotti di circa un ciclo di manutenzione per turno |
| Vita da coltello | Circa 35-42 ore; il deterioramento dei bordi è visibile dopo circa 2 turni. | ~55–68 ore (circa +45–60%) |
| Scarti/rilavorazioni | Linea di base | Scarti di rifilatura dei bordi ridotti di circa 18-25%; reclami per scarti di riavvolgimento notevolmente ridotti |
Cosa è cambiato (le azioni che hanno fatto la differenza):
- Geometria: standard doppio smusso → smusso composto lama superiore (principale ~45° con un piccolo smusso/micro-smusso di ~15°)
- Sovrapposizione: spostato in una finestra stabile di 0,35–0,50 mm (regola: non aumentare prima la sovrapposizione quando compare la peluria, verifica prima la deriva della tensione e l'accumulo di lanugine)
- Carico laterale: medio-alto → leggero-medio, puntando alla pressione minima necessaria per mantenere un morso chiuso
- Controlli di processo: variazione della tensione di svolgimento mantenuta a ±5%, rampa di accelerazione più lenta, allineamento migliorato tra rulli di distribuzione e profilo di riavvolgimento conico ottimizzato
- Regole dell'operatore: pulizia della lanugine della zona di taglio ogni 4 ore, ispezione del coltello ad ogni cambio turno e nessuna produzione continua dopo il primo microchip visibile
Due comuni “soluzioni rapide” hanno peggiorato la situazione:
- L'aumento del carico laterale ha ridotto temporaneamente la formazione di filamenti, ma ha comportato un aumento del riscaldamento, della lanugine e dell'usura.
- L'aumento della sovrapposizione da ~0,45 mm a ~0,90 mm ha eliminato i tag intermittenti ma ha iniziato a cilindro e perlina il bordo e l'usura accelerata.
Punto chiave: La geometria a smusso composto ha ampliato la finestra operativa stabile, ma non è stata in grado di compensare la tensione instabile (ad esempio, deriva >±7%) o il cattivo allineamento del portautensili al di sopra di ~520 m/min.
Questi materiali spesso si deteriorano a causa di sfilacciamenti, filamenti e strappi del filo, sintomi che possono far apparire il filo della lama smussato anche quando il coltello è affilato.
Guida introduttiva:
- Tessuti non tessuti (morbidi): un ingresso netto è utile; una smussatura singola può funzionare bene se la direzione è controllata.
- Tessuti (resistenti, fibrosi): la doppia smussatura o la smussatura composta spesso mantengono la qualità del filo più a lungo.
- Elastomeri: concentrarsi sulla minimizzazione della resistenza e sul controllo della tensione; un bordo supportato riduce l'effetto "presa".
⚠️ AttenzioneQuando si cerca di eliminare la peluria/filamenti, è bene evitare di aumentare continuamente il carico laterale o la pressione. Questo può nascondere la causa principale (supporto del nastro, allineamento, geometria del bordo) e al contempo accelerare l'usura.
Decisione e TCO
Albero decisionale passo passo
Utilizzate questo elenco come lista di controllo ripetibile per le riunioni di cambio turno:
- Classificazione della rigidità: morbida / media / rigida (in base a calibro + maneggevolezza + comportamento della macchina)
- Confermare il metodo di taglio: cesoia o incisione/schiacciamento
- Scegli la geometria:
- Morbida + stabilità direzionale disponibile → smusso singolo (o composto per una maggiore durata)
- Materiali misti / frequenti inversioni → doppio smusso
- Rischio di scheggiatura dei bordi dovuto a superfici rigide/abrasive → supporto con smusso composito/micro-smussatura
- Impostare prima un approccio conservativo; aumentare la sovrapposizione/pressione solo se necessario.
- Bloccare una procedura di verifica (sotto)
Metriche e controlli di qualità
Definisci "buono" in termini misurabili prima di sperimentare modifiche geometriche:
- Qualità del bordo: altezza della bava, lunghezza della peluria, livello di polvere (foto standard visiva)
- Stabilità della larghezza: tolleranza della larghezza della fessura e deriva durante una corsa
- Segnali di calore/attrito: bordo fuso, bande di lucidatura, accumulo di detriti
- Metriche di uptime: tempo di cambio formato, tasso di rilavorazione/scarto, durata della lama in metri/tempo
Una semplice sequenza di verifica:
- Consulta il primo articolo: dopo 5-10 minuti di corsa
- Controllo a metà corsa: dopo la stabilizzazione
- Verifica a fine ciclo: conferma l'andamento dell'usura
Manutenzione e riaffilatura
La geometria del filo e la manutenzione sono strettamente collegate. Se si riaffila, è necessaria la ripetibilità.
Controlli che proteggono il TCO:
- Registra il tipo di smusso, l'orientamento (se singolo) e gli ultimi parametri di affilatura
- Verificare la presenza di eccentricità e ammaccature prima di reinstallarlo.
- Non compensare i bordi smussati con la pressione; ciò aumenta i costi dei difetti più rapidamente di quanto faccia risparmiare tempo.
Conclusione
- Punti chiave: abbinare rigidità, geometria e configurazione per una qualità stabile
Le travi rigide penalizzano i bordi fragili e amplificano gli errori di impostazione; le travi morbide penalizzano il supporto inadeguato e il controllo della tensione. Il percorso più affidabile è trattare Selezione e impostazione della smussatura in un unico sistema: scegli il bordo che meglio si adatta alla rigidità, quindi regola la sovrapposizione/pressione e il carico laterale al minimo necessario per ottenere una fessura stabile.
In pratica, questo è anche il modo migliore per ridurre il TCO: meno cambi di produzione non pianificati, meno scarti e meno tempo speso a inseguire i difetti. Se si standardizzano queste scelte su tutte le linee, Maxtor Metal può aiutarti a tradurre la composizione del substrato e il profilo dei difetti in un punto di partenza coerente per la smussatura e la configurazione.
- Prossimi passi: convalidare con prove, documentare le impostazioni, monitorare i difetti
Eseguire una prova controllata per ogni famiglia di materiali, documentare la geometria e la finestra di configurazione che funzionano e mantenere uno standard fotografico dei difetti in modo che gli operatori possano reagire sempre allo stesso modo.
Se desideri un consiglio per iniziare rapidamente, condividi: tipo di substrato + calibro, metodo di taglio, velocità della linea e 2-3 foto del difetto attuale. Lo mapperemo in un intervallo di rigidità e ti proporremo una smussatura di base e una finestra di impostazione.
FAQ
Domanda: Qual è la differenza tra una lama slitter a bisello singolo e una a bisello doppio?
Risposta: Una lama a bisello singolo presenta un filo asimmetrico che tende a tagliare in una direzione preferenziale, mentre quella a bisello doppio è simmetrica e più neutrale. Il bisello singolo può offrire un'imboccatura netta su nastri morbidi, ma il bisello doppio è solitamente più tollerante quando le configurazioni variano o la direzione viene invertita.
Domanda: Quando dovrei utilizzare un filo composto (micro-bisello) sulle lame circolari da slitter?
Risposta: Utilizzate un filo composto/micro-bisello quando il tagliente necessita di maggiore supporto, tipicamente con materiali ad elevata rigidità, cariche abrasive, o quando i biselli singoli affilati si scheggiano o perdono il filo troppo rapidamente. È un compromesso pratico tra affilatura e durata.
Domanda: Perché il cambio della geometria del bisello ha peggiorato le bave?
Risposta: Le bave solitamente aumentano quando l'impostazione diventa troppo aggressiva per la nuova geometria; le cause comuni sono sovrapposizione/pressione eccessiva, carico laterale troppo elevato o disallineamento/eccentricità (runout). Considerate la geometria e l'impostazione come un unico pacchetto: cambiate la geometria, quindi regolate nuovamente al ribasso la sovrapposizione/pressione e aumentate solo se necessario.
Domanda: Le lame a bisello singolo sono direzionali per il taglio?
Risposta: Sì. Le lame a bisello singolo sono solitamente "destre o sinistre" (handed), il che significa che l'orientamento influisce sulla qualità del tagliente e sul tracciamento. Se il vostro processo inverte la direzione o gli operatori invertono frequentemente il montaggio, il bisello doppio (o doppio composto) riduce il rischio.
Domanda: Come scelgo la geometria della lama slitter per film morbidi rispetto ai laminati rigidi?
Risposta: I film morbidi solitamente rispondono meglio a un'imboccatura netta con un contatto leggero (bisello singolo o composto con imboccatura netta), mentre i laminati rigidi spesso necessitano di un maggiore supporto del filo (bisello doppio o composto/micro-bisello). In entrambi i casi, una sovrapposizione/pressione conservativa e una tensione stabile sono ciò che mantiene i difetti sotto controllo.
Domanda: Quali sono le regolazioni più rapide per ridurre polvere e sfridi fini durante il taglio?
Risposta: Iniziate riducendo la sovrapposizione/pressione aggressiva e diminuendo il carico laterale al valore minimo stabile, quindi verificate l'allineamento/eccentricità (runout) e la pulizia dei distanziali. La polvere indica spesso che si è superato il punto ottimale e che si sta strofinando o deformando eccessivamente il nastro (web).
Domanda: Come posso capire se il mio problema è la geometria della lama o l'impostazione della macchina?
Risposta: Se i difetti cambiano drasticamente con piccole regolazioni di sovrapposizione/pressione, solitamente si tratta dell'impostazione. Se i difetti rimangono anche dopo aver verificato l'allineamento e un contatto conservativo — e se il tagliente si usura rapidamente o si scheggia — la geometria (e il livello di supporto del filo) è spesso la leva giusta su cui agire.
Domanda: Con quale frequenza devono essere riaffilate le lame circolari slitter?
Risposta: Eseguire la riaffilatura in base agli indicatori della qualità di taglio, non secondo un calendario fisso: l'aumento di bave/pelucchi/polvere, la necessità di una pressione maggiore per mantenere il taglio o la deriva della stabilità della larghezza sono indicatori tipici. Monitorare la durata della lama in base al metraggio/tempo e mantenere costanti i parametri di affilatura affinché i risultati siano ripetibili.
Maxtor Metal produce lame circolari per slitter e utensili correlati per i trasformatori che necessitano di una qualità costante del filo e una ripetibilità documentata, specialmente quando il mix di substrati spazia dai film morbidi ai laminati rigidi.
Jesse Xu — Ingegnere senior della qualità (QA), Maxtor Metal15 anni di esperienza nel controllo qualità e nell'analisi dei guasti delle lame industriali (ad esempio, distinguere se la scheggiatura o l'usura rapida sono causate dal trattamento termico o dalla segregazione del materiale). Certificazioni: ASQ-CQE, Auditor capo ISO 9001, ANT Livello II.