

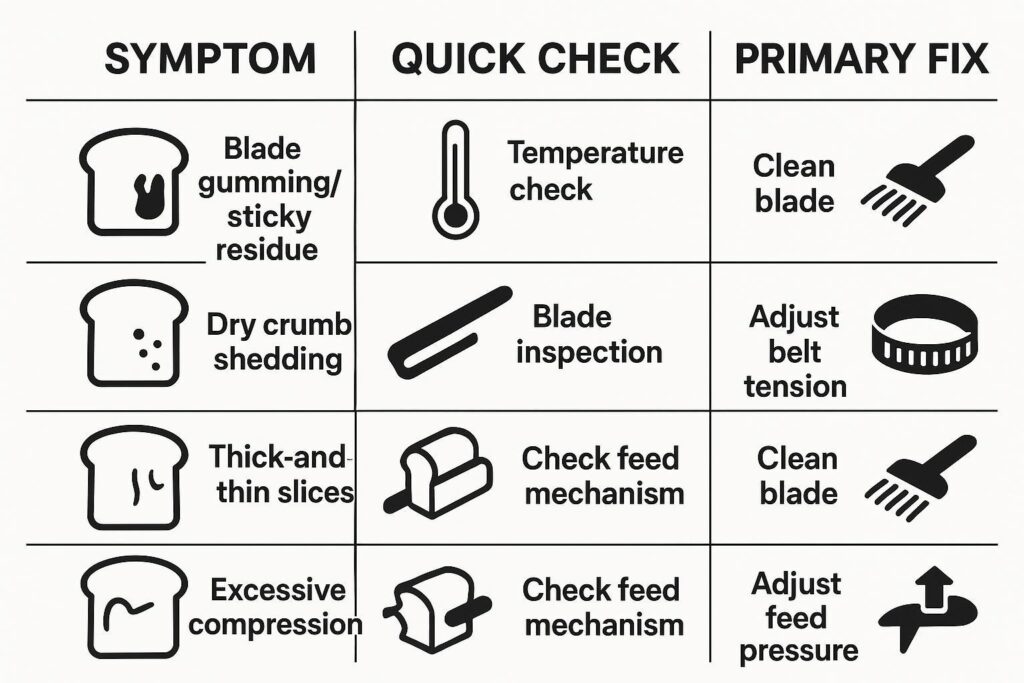
Wenn das Reißen des Brotes an der Brotschneidemaschine zu erhöhtem Ausschuss führt, bietet dieser Leitfaden schnelle, überprüfbare Lösungen.
Sie erhalten Temperaturfenster, mechanische Prüfungen und Schritte zur Liniensteuerung, die Sie noch heute auditieren können.
Ausgelegt auf Linien mit 600–1200 Laiben/Stunde für Kastenbrot, Krustenbrot und Brötchen.
Sicherheits- und SOP-Hinweis: Befolgen Sie stets das OEM-Handbuch Ihrer Schneidemaschine und das Lebensmittelsicherheitsprogramm Ihres Betriebs. Verwenden Sie vor dem Inspizieren, Reinigen oder Einstellen von Messern, Führungen, Riemen oder der Spannung Lockout/Tagout (LOTO) und stellen Sie sicher, dass alle Bewegungen gestoppt sind. Validieren Sie alle Prozessänderungen mit Ihrem QS-Team, da die Schneidbedingungen die nachgelagerte Verpackung und Produktqualität beeinflussen können.
Anwendungsbereichshinweis: Die unten angegebenen Temperatur- und Maschineneinstellwerte sind Ausgangsreferenzen. Ihr optimales Fenster variiert je nach Rezeptur, Laibmasse, Kühlmethode, Umgebungsluftfeuchtigkeit und Liniengeschwindigkeit – verifizieren Sie dies daher anhand von Messdaten, nicht nach Gefühl.
Diagnose in 60 Sekunden
Achten Sie auf Verklebungen an den Messern im Vergleich zu trockenem Krümelabwurf; messen Sie die Kerntemperatur vor dem Schneiden.
Achten Sie auf ungleichmäßige Scheibenstärken in einem Laib (Spannung/Führung) im Vergleich zu Einreißungen am Einlauf und Staus (Zufuhr/Druck).
Überprüfen Sie Riemenverschleiß, Fördersynchronisation und Schmutzansammlungen zwischen den Durchläufen.
Vorlage für ein schnelles Betriebsprotokoll (Kopieren/Einfügen)
| Uhrzeit | Produkt (Typ/Gewicht) | Symptom (klebrig vs. trocken / Einlauf-Riss / ungleichmäßige Scheiben) | Kerntemperatur (°F) | Liniengeschwindigkeit (Laibe/Std.) | Druckeinstellung des oberen Riemens | Messerspannungseinstellung | Zustand der Führung (OK/verschlissen/schmutzig) | Reinigung durchgeführt (J/N + wo) | Durchgeführte Änderung | Ergebnis (Krümelbildung / Staurate / Verlaufen des Schnitts) |
|---|---|---|---|---|---|---|---|---|---|---|
Behebungen (1–3): Produkt und Schneidsystem

Temperatur- und Feuchtigkeitsfenster
Wenn das Reißen des Brotes an der Brotschneidemaschine plötzlich während einer Schicht auftritt, betrachten Sie den Produktzustand als erste Variable – denn diesen können Sie in Sekundenschnelle überprüfen.
- Messen Sie die Kerntemperatur vor der Schneidemaschine. Verlassen Sie sich nicht auf das Gefühl an der Oberfläche. Verwenden Sie ein kalibriertes Einstechthermometer und messen Sie in der Mitte des Laibs (vermeiden Sie die Krustenzone). Notieren Sie den Wert und die Zeit seit dem Entformen/Kühlen.
- Arbeiten Sie innerhalb eines prüfbaren Fensters (Ausgangsreferenz). Viele Linien schneiden am besten bei etwa 86–104°F Kerntemperatur und verpacken bei etwa 95–105°F– passen Sie dies dann basierend auf Ihrer Rezeptur, Laibgröße und Kühlmethode an. Als Gegenprobe zielen Branchenrichtlinien zur Brotkühlung üblicherweise darauf ab, das Produkt auf etwa 32–43°C (90–110°F) abzukühlen, bevor es geschnitten wird, um Reißen und Verkleben zu reduzieren (siehe BAKERpedia, “Bread Cooling“„). Für eine Plausibilitätsprüfung nach OEM-Standard enthält das Betriebs- und Wartungshandbuch von Oliver für seine Schneidemaschinenmodelle folgenden Fehlerbehebungshinweis: “Das Brot ist möglicherweise zu weich und warm. Lassen Sie es vor dem Schneiden abkühlen.” (siehe Bedienungs- und Wartungsanleitung für Oliver-Modelle 908-N/918-N/0938-N).
- Toleranzen und Auslöser hinzufügen. Legen Sie als praktischen Steuerungsansatz eine Eingriffsgrenze fest (zum Beispiel, ±3–5°F von Ihrem validierten Zielwert). Wenn der Durchschnitt bei 3–5 aufeinanderfolgenden Laiben (oder einer vollen Produktionsminute) außerhalb des Grenzwerts liegt, halten Sie inne und korrigieren Sie die Kühlung/Lagerung, bevor Sie Hardware-Änderungen vornehmen.
- Häufigkeit der Nachprüfung. Messen Sie beim Anfahren, nach jeder Stillstandszeit, nach Riemen-/Druckanpassungen und mindestens einmal pro Schicht bei stabilen Bedingungen erneut nach.
- Wie “zu warm” aussieht: sticky crumbs, smearing on blade sidewalls, compression at entry, and tearing that gets worse as the run continues.
- What “too cool/dry” can look like: fragile crumb shedding, heel cracking, and an increase in loose crumbs that load up guides and belts.
Wichtigste Erkenntnis: Always separate “sticky/gummy” tearing from “dry/fragile” tearing before you change hardware. The fixes are different.
Blade condition and type
A blade can be “sharp enough” and still tear bread if the tooth form, sidewall finish, or cleanliness is wrong for the product.
- Confirm the failure mode at the blade. If you see a fine film building on the blade walls, you’re fighting drag and heat—not just edge sharpness. BakingBusiness points out that crumb can deposit as a film on blade walls and that blade-sidewall properties influence how that buildup behaves in production (BakingBusiness, “The three core properties of bread slicing blades” (2019)).
- Match blade type to bread family. Soft pan breads, crusty loaves, and buns won’t behave the same. If tearing is localized to crust transitions, review tooth geometry and set.
- Replace on evidence, not calendar. A quick check is whether tearing correlates with a measurable increase in crumb film, heat, or slice wander at constant tension.
Neutral brand note (materials/coatings and compatibility): If you’re sourcing replacement band blades, it can help to specify base material + heat treatment + any coating requirements and confirm OEM compatibility for your slicer model. Suppliers such as MAXTOR METAL bread slicer blades emphasize OEM/ODM compatibility and material selection; treat that as a documentation and fit check—not as a shortcut around temperature, tension, and sanitation controls.
Tension and guide alignment
If slices go thick-and-thin within the same loaf—or tearing appears on one side more than the other—assume the blade path is wandering.
- Verify blade tension is uniform across the lattice/bands. Uneven tension can create oscillation and deflection that shows up as thickness variation and side tearing.
- Inspect guides for wear and contamination. Worn or debris-loaded guides increase friction and push the blade off its intended line.
- Square up the product path. If the loaf enters skewed, the slicer can “grab” one edge first, starting an entry tear that turns into a jam.
For context, BakingBusiness notes that product temperature, blade tension, and product positioning are all drivers of slicing errors and thickness variation (BakingBusiness, “Slaying bread slicing errors” (2019)).
Behebungen (4–5): Handhabung und Liniensteuerung

Top-belt pressure and belts
Top-belt pressure is a common hidden cause of entry tears—especially when product is warm or when belt condition varies across stations.
- Reduce compression first, then re-test. If you see crushed crowns, dragging, or “pinch” marks, back off pressure and verify you still have stable feed.
- Check belt wear and tracking. A glazed, hardened, or uneven belt face can slip, grab, or micro-jerk the loaf at entry.
- Confirm pressure consistency shift-to-shift. If one crew “tightens until it stops moving,” you’ll get variability no blade change can fix.
Feed, speed, and sanitation
When tearing shows up as entry rips, intermittent jams, or a rising crumb load over time, focus on line control and hygiene.
- Sync conveyors to prevent loaf “bump” at handoff. If the infeed and slicer conveyors aren’t matched, the loaf gets compressed or pulled right as the blades engage.
- Stabilize spacing and guides upstream. Poor lane control creates side contact, which becomes a tear point at the slicer throat.
- Clean between runs with intent. Don’t just blow crumbs deeper into the machine. Remove buildup where it changes friction: blade area, guides, belts, and the infeed throat.

Nach jeder Änderung validieren
After you adjust temperature, tension, belts, guides, or sanitation steps, do a quick verification pass so you don’t “fix” tearing but create a new problem downstream:
- Confirm slice thickness is stable (no visible thick-thin or side drift)
- Check crumb load is not rising over the run (film on blade walls, debris in guides)
- Track jam rate for the next 15–30 minutes (or the next full rack)
- Verify packaging isn’t compromised (compression, poor seal due to excess crumbs)
- Document the final setpoints and have QA/line lead sign off per your SOP
Fazit
If you need replacement band blades, treat sourcing as a documentation and fit exercise: confirm OEM compatibility, provide your drawing/sample, and specify base material, heat treatment, and any coating requirements so performance is repeatable.
About MAXTOR METAL (for traceability): MAXTOR METAL manufactures custom, precision-ground industrial blades with 15+ years of experience and a multi-step quality control process. For procurement teams, it can be helpful to request material certificates and inspection records with each blade batch (learn more: MAXTOR METAL).
Recheck slicing temp window (about 86–104°F slicing; 95–105°F packaging), verify zero gumming.
Standardize tension, guides, and belt pressure; sync conveyors; clean between runs.

 English
 Spanish
 Italian
 French
 Portuguese
 Russian
 German
 Arabic
 Hindi
 Vietnamese
 Indonesian
 Japanese
 Korean
Eine Antwort